Categories
Body

nsxb20062a.pdf

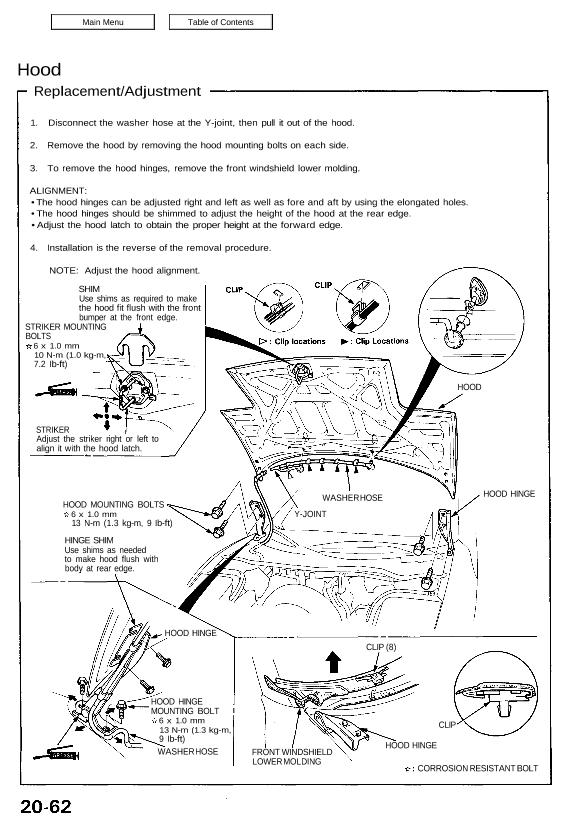
Hood Replacement/Adjustment 1. Disconnect the washer hose at the Y-joint, then pull it out of the hood. 2. Remove the hood by removing the hood mounting bolts on each side. 3. To remove the hood hinges, remove the front windshield lower molding. ALIGNMENT: • The hood hinges can be adjusted right and left as well […]

Categories
Brakes & ABS

nsxb19044a.pdf

Troubleshooting Anti-lock Brake System (ABS) Indicator Light Temporary Driving Conditions: 1. The ABS indicator light will come on and the ABS control unit memorizes the diagnostic trouble code (DTC) under certain conditions. NOTE: The DTC explained on pages 19-46. • The tire(s) adhesion is lost due to excessive cor- nering speed. DTC: 5, 5-4, 5-8. […]

Categories
Manual Transmission

nsxe13048a.pdf

Transmission Assembly Installation NOTE: Check that the two dowel pins are installed in the clutch housing. 1. Place the transmission on the transmission jack, and raise it to the engine level. 2. Set the release fork to the clutch housing, (see page, 13-9) 3. Install the 2 transmission housing mounting bolts and engine stiffener. 4. […]

Categories
Specifications

nsxa03006a.pdf

” Clutch end plate diameter: 1st: 116 mm (4.57 in) 1st-hold, 2nd, 3rd and 4th: 120 mm (4.72 in) Standards and Service Limits Automatic Transmission — Section 14 Automatic Transmission — Section 14 Main Menu Table of Contents −∼ Automatic 2nd accamula» ↽∣⋮∟⊾−∘−⊏⊴⊻≓↼↗−− Shifting device and parking brake control Servo body Transmission Transmission — Section […]

Categories
Brakes & ABS

nsxb19062a.pdf

Hydraulic System Relieving Accumulator/Line Pressure 1. Drain the brake fluid from the master cylinder and modulator reservoir thoroughly. 2. Remove the red cap from the bleeder on the top of the power unit. 3. Install the special tool on the bleeder screw, and turn it out slowly 90° to collect high-pressure fluid into reservoir. Turn […]

Categories
Automatic Transmission

nsxd14129a.pdf

THRUST NEEDLE BEARING SEALING RINGS 35 mm 3RD GEAR NEEDLE BEARING 37 x 43 x 22 mm 2ND GEAR THRUST NEEDLE BEARING THRUST WASHER O-RINGS Replace. 2ND CLUTCH ASSEMBLY SPACER 31 mm LOCKNUT Replace. 140 N.m (14.0 kg-m. 101 Ib-ft) CONICAL SPRING WASHER Replace. SECONDARY SHAFT Check splines for excessive wear or damage. Check bearing […]

Categories
Engine Block

nsxb07016a.pdf

Piston Rings Ring-to-Groove Clearances After installing a new set of rings, measure ring-to-groove clearances: Top and Second Ring Clearance Standard (New): 0.030-0.055 mm (0.001 – 0.002 in) Service Limit: 0.13 mm (0.005 in) FEELER GAUGE Alignment 1. Install the rings as shown on page 7-15. Identify top and second rings by the chamfer on the […]

Categories
Manual Transmission

nsxb13022a.pdf

Shift Fork Assembly Disassembly/Reassembly NOTE: • Be careful not to lose the 5th shift fork steel ball. • Install the spring pins so their grooves are 180° apart. Prior to reassembling, clean all the parts in solvent, dry them, and apply lubricant to any contact surfaces. Disassembly: Remove the 3 mm spring pin and 5 […]

Categories
Electrical

nsxb23242b.pdf

Stereo Sound System Antenna Mast Replacement Removal: NOTE: The antenna mast alone can be replaced without removing the power antenna motor. 1. Remove the antenna nut, O-ring, spacer, and bush- ing. 2. Carefully withdraw the antenna mast while extend- ing it by turning the radio switch ON. ANTENNA NUT O-RING Replace. SPACER BUSHING ANTENNA MAST […]

Categories
Manual Transmission

nsxb13024a.pdf

Mainshaft Assembly Clearance Inspection 1. Measure the clearance between 2nd and 3rd gears. Standard: 0.06 — 0.21 mm (0.002-0.008 in) Service Limit: 0.3 mm (0.012 in) 2ND GEAR 3RD GEAR 2. If the clearance exceeds the service limit, measure the thickness of 3rd gear. Standard: 35.92 — 35.97 mm (1.414-1.416 in) Service Limit: 35.80 mm […]