Category: Body
nsxb20039a.pdf
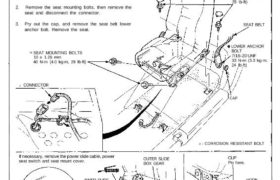
Seats Replacement NOTE: • Before removing the seat, move the seat until you can see its mounting bolts and seat mount cover caps. • Take care not to scratch the seat cover, interior trim, dashboard and center armrest. • On reassembly, replace the lower anchor bolt ( * ) and use liquid thread lock. 1. […]
nsxb20049a.pdf
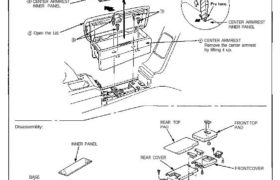
Center Armrest Replacement CAUTION: When removing the center armrest inner panel, wrap the flat tip screwdriver with protective tape or a shop towel to prevent damage. NOTE: Take care not to scratch the center armrest, dashboard and rear center trim panel. Disassemble in numbered sequence. CENTER ARMREST INNER PANEL Open the Lid. INNER BOX Installation […]
nsxb20012a.pdf
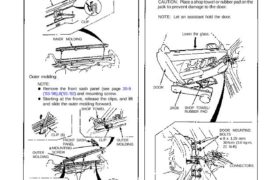
Doors Moldings Removal NOTE: Lower the glass fully. Remove: (see pages 20-7(’93-’96),6(’91-’92), 8(’93-’96),7(’91-’92) Trim plate Sash covers Inside door handle Door panel Inner molding: NOTE: Pry the clips out using a flat tip screwdriver, then pull up the inner molding. INNER MOLDING CLIP INNER MOLDING Outer molding: NOTE: Remove the front sash panel (see page […]
nsxb20024a.pdf
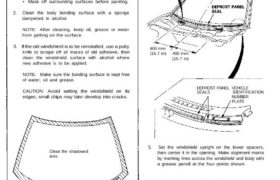
Windshield Installation 1. Scrape the old adhesive smooth with a knife to a thickness of about 2 mm (0.08 in) on the bonding surface around the entire windshield flange. NOTE: • Do not scrape down to the painted surface of the body; damaged paint will interfere with pro- per bonding. • Remove all traces of […]
nsxb20082a.pdf
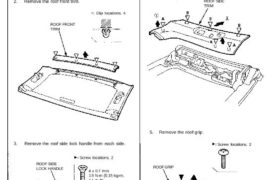
Roof Roof Trim/Panel Replacement CAUTION: • To prevent damage, place the roof on an appropriate pad. • When prying with a flat tip screwdriver, wrap it with protective tape to prevent damage. NOTE: Take care not to scratch the trim, panel and roof. 1. Remove the roof. 2. Remove the roof front trim. >: Clip […]
nsxb20043a.pdf
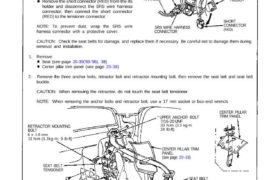
Seat Belts Replacement SRS wire harnesses are routed near the retractor. All SRS wire harnesses and connec- tors are colored yellow. Do not use electrical test equipment on these circuits. CAUTION: Be careful) not to damage the SRS wire harnesses when servicing the retractor. Remove the short connector (RED) from the its holder and disconnect […]
nsxb20068a.pdf
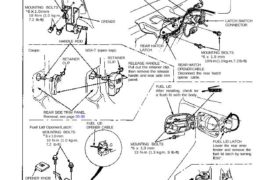
Opener/Latch Replacement NOTE: Take care not to bend the cables. Rear Hatch Opener/Latch: REAR HATCH OPENER CABLE Disconnect the rear hatch opener cable. Replacement, see page 20-67 MOUNTING BOLTS * 6 x 1.0 mm 10 N·m (1.0 kg-m, 7.2 Ib-ft) OPENER HANDLE ROD Coupe: RETAINER CLIP NSX-T (open top): RETAINER CLIP REAR HATCH LATCH LATCH […]
nsxb20081a.pdf
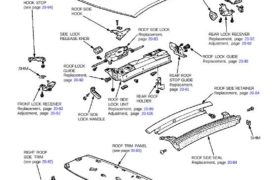
Roof Index ROOF HOOK STOP (see page 20-94) SHIM REAR RECEIVER DAMPER SHIM REAR RECEIVER SWITCH SIDE LOCK RELEASE KNOB ROOF SIDE LOCK Replacement, page 20-83 ROOF LOCK GUIDE Replacement, page 20-90 FRONT LOCK RECEIVER Replacement, page 20-92 Adjustment, page 20-92 ROOF SIDE LOCK HANDLE REAR ROOF STOP GUIDE Replacement, page 20-91 REAR LOCK RECEIVER […]
nsxb20110a.pdf
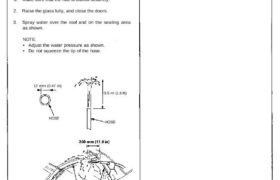
Water Leak Test NOTE: When the following parts have been replaced or removed, and or the roof side lock unit, door glass and door have been adjusted, this water leak test should be done. • Roof side seals • Roof side lock units • Front and rear pillar seals • Door and door glass 1. […]
nsxb20014a.pdf
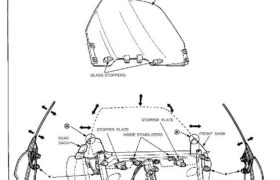
Doors Glass Adjustment Adjusting bolt locations. NOTE: Take care not to damage location on the front and rear sashes. GLASS GLASS STOPPERS REGULATOR ASSEMBLY REAR GLASS GUIDE REAR SASH STOPPER PLATE INSIDE STABILIZERS STOPPER PLATE FRONT SASH FRONT GLASS GUIDE NOTE: Place the vehicle on a firm, level surface when ad- justing the glass. Make […]