Category: Body
Categories
nsxb20036a.pdf
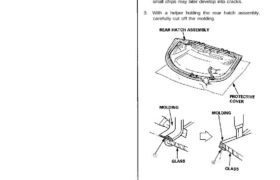
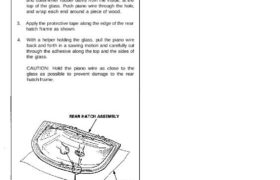
Rear Hatch Glass Molding Replacement CAUTION: • Wear gloves to replace the molding. • Do not damage the glass and defroster grid lines. 2. Place the rear hatch assembly on its surface as shown. CAUTION: Avoid setting the glass on its edges; small chips may later develop into cracks. 3. With a helper holding the […]
Categories
nsxb20020a.pdf
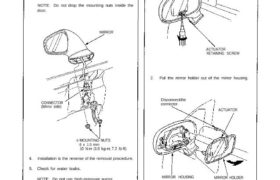
Mirror Removal Mirror Holder Replacement 1. Insert a Phillips screwdriver in the door mirror through the service hole, then loosen the actuator retaining screw. MIRROR ACTUATOR RETAINING SCREW 2. Pull the mirror holder out of the mirror housing. Disconnect the connector. ACTUATOR MIRROR HOLDERMIRROR HOUSING 3. Remove the actuator (see section 23). 4. Installation is […]
Categories
nsxb20019a.pdf
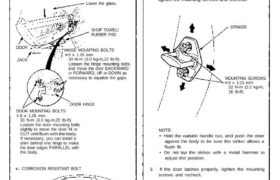
Position Adjustment After installing the door, check for a flush fit with the body, then check for equal gap between the front, rear, and bottom door edges and the body. The door and body edges should also be parallel. Adjust at the door hinges as shown. CAUTION: Place a shop towel or rubber pad on […]
Categories
nsxe20040a.pdf
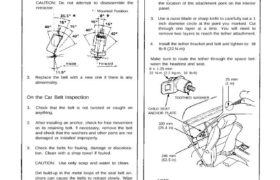
Seat Belts Inspection Retractor Inspection 1. With the retractor installed, check that the belt can be pulled out freely. 2. Make sure that the belt does not lock when the retractor is tilted over slowly to 15° from the mounted position. The belt should lock when the retractor is tilted over 40° CAUTION: Do not […]
Categories
nsxe20045a.pdf
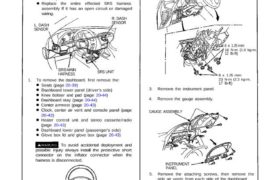
Replacement SRS wire harnesses are routed near the dashboard and steering column, CAUTION: AH SRS electrical wiring harnesses are covered with yellow outer insulation. Before disconnecting the SRS wire harness, in- stall the short connector on the airbag (see page 23-232). Replace the entire effected SRS harness assembly If it has an open circuit or […]
Categories
nsxb20058a.pdf
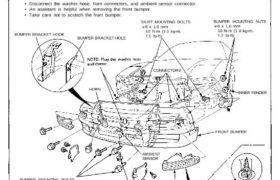
Front Bumper Replacement 1. Loosen the mounting screw, then pull the right and left front turn signal lights out and disconnect the connectors. 2. Remove the skirt covers, then remove the bumper mounting bolts on each side, and lower skirt mounting bolt. 3. Lower the inner fender, then remove the bumper mounting nuts and the […]
Categories
nsxb20033a.pdf
Rear Hatch Glass Removal CAUTION: • Use covers to avoid damaging the body. • Wear gloves to remove and install the glass. • Do not damage the defroster grid lines. • Take care not scratch or score the molding. 1. Remove the rear hatch assembly from the body (see page 20-64). 2. Using an awl, […]
Categories
nsxb20074a.pdf
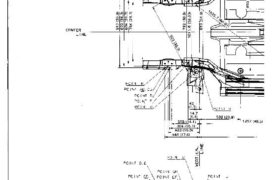
Frame Repair Chart Unit: mm (in) Mam Menu Table of Contents Frame Repair Chart Unit: mm (in) POINT EF PDINT GH i POINT ⊟⊇↲↽∼⊺ E шт ——7 E’ng ∁ ∖ ≸⊃⊇⊓∖⊔ A I mis:. а: зава a N O Q Ч N’ v- ” C) ¡n w CENTER °’ “’ °° ↾∖ ” LINE › […]
Categories
nsxb20073a.pdf
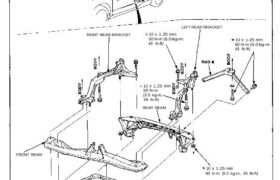
Rear Sub-frame Sub-frame torque value specifications: LEFT REAR BRACKET RIGHT REAR BRACKET 10 x 1.25 mm 60 N-m (6.0 kg-m. 43 Ib-ft) 10 x 1.25 mm 60 N-m (6.0 kg-m. 43 Ib-ft) FRONT BEAM 10 x 1.25 mm 60 N-m (6.0 kg-m, 43 Ib-ft) 10 x 1.25 mm 60 N-m (6.0 kg-m, 43 Ib-ft) CENTER […]
Categories
nsxb20003a.pdf
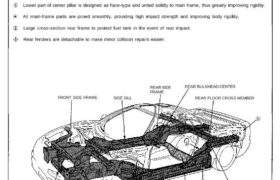
Construction Features • Mid-engine car with ground-hugging, full-forward canopy design. • The lower body is AH-PO for greater resistance to corrosion and collision damage. • Outer panels, (except the roof) are constructed of individual panels to allow more convenient and economical repairs. • In considerations of rigidity, surface smoothness and simultaneous body painting, the trunk […]