Category: Body
Categories
nsxb20100a.pdf
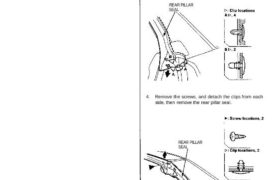
Rear Pillar Seal/Retainer Replacement NOTE: • When the rear pillar seal has been removed, and/or it is damaged, replace it with new one. • Have an assistant help replace the rear pillar seal. 1. Remove the roof. 2. Remove the rear roof rail trim (see page 20-80). 3. Detach the clips from the bottom of […]
Categories
nsxb20092b.pdf
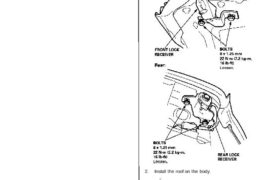
Roof Lock Receivers Adjustment NOTE: This adjustment should be done in the following order after removing or replacing the lock receiver. 1. Loosen the lock receiver mounting bolts at each of the four corners, then tighten them lightly. 2. Install the roof on the body. CAUTION: When installing the roof, make sure both roof side […]
Categories
nsxb20089a.pdf
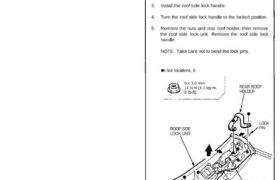
Roof Side Lock Unit Replacement CAUTION: To prevent damage, place the roof on an appropriate pad. 1. Remove the roof. 2. Remove: • Roof front trim (see page 20-82) • Roof side trim (see page 20-82) • Roof side seal (see page 20-84) • Roof side retainer (see page 20-84) 3. Install the roof side […]
Categories
nsxb20006a.pdf
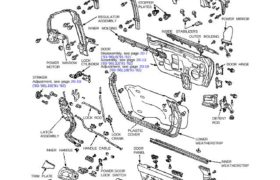
Doors REAR SASH Adjustment, see page 20-17(’93-’96),16(’91-’92) REAR GLASS GUIDE Index FRONT GLASS GUIDE REGULATOR ASSEMBLY INNER MOLDING STOPPER PLATES GLASS Adjustment, see page 20-14(’93-’96), 13(’91-’92) FRONT SASH Adjustment, see page 20-17(’93-’96), 16(’91-’92) POWER MIRROR INSIDE STABILIZERS OUTER MOLDING DOOR HINGEPOWER WINDOW MOTOR LOCK CYLINDER DOOR Disassembly, see page 20-7 (’93-’96),6(’91-’92) Assembly, see page 20-13 […]
Categories
nsxd20050a.pdf
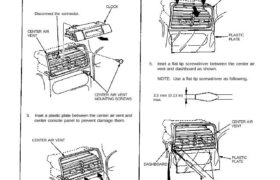
Dashboard Component Removal/Installation Clock and center air vent removal: NOTE: Take care not to scratch the dashboard and related parts. 1. Remove the clock by pulling it backward from the center air vent, then disconnect the connector. 2. Remove the center air vent mounting screws. Disconnect the connector. CLOCK CENTER AIR VENT CENTER AIR VENT […]
Categories
nsxb20002a.pdf
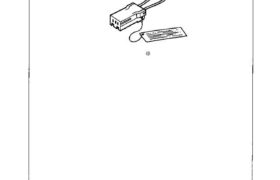
Special Tools Ref. No. Tool Number 07MAZ-SP00200 Description SRS Service Connector Qty 2 Page Reference 20-55(’91-’93)(’94-’96), 56(’91-’93)(’94-’96), Main Menu Table of Contents I’O‘Olls Sperren Ref. N0. I Tool Number Description ∣ Qty l Page Reference a) ÿ 07MAZ—SP00200 20-2 SRS Service Connector 2 I 20-55(’91—’93)(‘94—’96)‚ ì 56(‘91-‘93)(’94-’96) J Attachments nsxb20002a (26 kB)
Categories
nsxd20049a.pdf
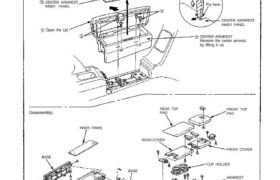
Center Armrest Replacement CAUTION: When removing the center armrest inner panel, wrap the flat tip screwdriver with protective tape or a shop towel to prevent damage. NOTE: Take care not to scratch the center armrest, dashboard and rear center trim panel. Disassemble in numbered sequence. CENTER ARMREST INNER PANEL Open the Lid. CENTER ARMREST INNER […]
Categories
nsxb20090a.pdf
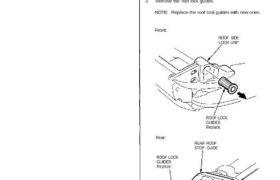
Roof Lock Guides Replacement CAUTION: To prevent damage, place the roof on an appropriate pad. 1. Remove the roof. 2. Remove: • Roof front trim (see page 20-82) • Roof side trim (see page 20-82) • Roof side lock (see page 20-83) 3. Remove the roof lock guides. NOTE: Replace the roof lock guides with […]
Categories
nsxb20094a.pdf
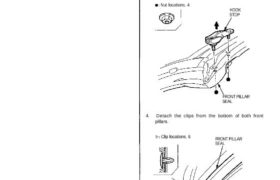
Front Pillar Seal/Retainer Replacement NOTE: • When the front pillar seal has been removed, and or it is damaged, replace it with new one. • Have an assistant help replace the front pillar seal. 1. Remove the roof. 2. Remove the front roof rail trim (see page 20-79). 3. Remove the hook stop from each […]
Categories
nsxb20111a.pdf
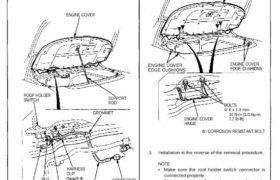
Engine Cover/Roof Cover Removal NOTE: • Take care not to scratch the body. • Open the rear hatch. 1. Open the engine cover, and support it with the sup- port rod. Disconnect the roof holder switch connec- tor, remove the nut, then remove the ground wire. NOTE: If necessary, remove the roof switch sub- harness. […]