Component Removal/Installation
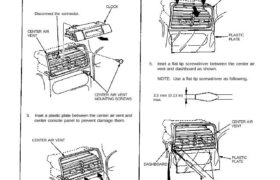
Clock and center air vent removal:
NOTE: Take care not to scratch the dashboard and
related parts.
1. Remove the clock by pulling it backward from the
center air vent, then disconnect the connector.
2. Remove the center air vent mounting screws.
Disconnect the connector.
CLOCK
CENTER AIR
VENT
CENTER AIR VENT
MOUNTING SCREWS
3. Inset a plastic plate between the center air vent and
center console panel to prevent damage them.
CENTER AIR VENT
CENTER CONSOLE
PANEL PLASTIC PLATE
(Thin plate)
4. To make a gap between the center air vent and
dashboard, pull the top of the center air vent while
lowering it as shown.
NOTE: Make a gap thoroughly.
DASHBOARD
CENTER AIR
VENT
PLASTIC
PLATE
5. Inset a flat tip screwdriver between the center air
vent and dashboard as shown.
NOTE: Use a flat tip screwdriver as following.
3.3 mm (0.13 in)
max.
CENTER AIR
VENT
DASHBOARD
PLASTIC
PLATE
HOOKS
FLAT TIP
SCREWDRIVER
6. After insetting a flat tip screwdriver, turn it 90°.
HOOK
CENTER AIR
VENT
30 mm
(1.2 in)
FLAT TIP
SCREWDRIVER
7. Inset the tip of a flat tip screwdriver in under the
hook by turning a flat tip screwdriver. Detach the
hook by prying it.
HOOK
CENTER AIR
VENT
FLAT TIP
SCREWDRIVER
8. Pull the center air vent backward while prying the
hook.
CAUTION: Use a shop towel on the dashboard to
prevent damage.
DASHBOARD
HOOK
CENTER AIR
VENT
SHOP TOWEL
FLAT TIP SCREWDRIVER
9. Detach the another hook as the same work, then
remove the center air vent.
CENTER AIR
VENT
HOOKS
10. Install the center air vent and clock.
NOTE:
DASHBOARD
Make sure the connector of the clock is con-
nected properly.
(cont’d)
If there is a minor dent on the dashboard, repair
it by hand as shown.
Dashboard
Component Removal/Installation (cont’d)
SRS wire harnesses are routed near the dashboard.
CAUTION:
LEFT DASH
SENSOR
PASSENGER’S
AIRBAG
RIGHT DASH
SENSOR
SRS MAIN
HARNESS SRS UNIT
Center console panel removal:
NOTE:
Disassemble in numbered sequence.
ASHTRAY
CENTER CONSOLE
PANEL
Disconnect the
connectors.
SRS UNIT
Lift up the parking
brake lever.
Installation is the reverse of the removal procedure.
NOTE: Make sure the connectors are connected properly.
All SRS wiring harnesses are covered with
yellow outer insulation.
Before disconnecting any part of the SRS wire
harness, install the short connectors (see page
23-328).
Replace the entire affected SRS harness assem-
bly if it has an open circuit or damaged wiring.
Take care not to scratch the dashboard, center console panel and related parts.
Do not drop the screws inside the dashboard.
Remove the center armrest (see page 20-49), clock and center air vent (see page 20-50).
Climate control unit, stereo cassete/radio and glove box removal:
Disassemble in numbered sequence.
NOTE: Remove the center console panel.
CLIMATE CONTROL
UNIT
Disconnect the connectors.
SRS UNIT
STEREO
CASSETE RADIO
Disconnect the connectors.
GROUND CABLE
Passenger’s:
GLOVE BOX
Disconnect the connectors.
PASSENGER’S
AIRBAG
DASHBOARD LOWER
COVER (Passenger’s)
TRUNK LID OPENER
MAIN SWITCH
GLOVE BOX
LID
Installation is the reverse of the removal procedure.
NOTE: Make sure the connectors are connected properly.
(cont’d)
Dashboard
Component Removal/Installation (cont’d)
SRS wire harnesses are routed near the steering
column.
CAUTION:
All SRS wiring harnesses are covered with
yellow outer insulation.
Before disconnecting any part of the SRS wire
harness, install the short connectors (see page
23-328).
Replace the entire affected SRS harness assem-
bly if it has an open circuit or damaged wiring.
NOTE: Take care not to scratch the dashboard,
steering column and related parts.
CAUTION: When prying with a flat tip screw-
driver, wrap it with protective tape or a shop towel
to prevent damage.
LEFT DASH
SENSOIR
PASSENGER’S AIRBAG RIGHT DASH
SENSOR
SRS MAIN HARNESS SRS UNIT
Drivers:
RETRACTOR SWITCH/DASH
BRIGHTNESS CONTROLLER
INSTRUMENT
PANEL
TCS SWITCH
Disconnect the connectors.
DASHBOARD
BRACE
KNEE
BOLSTER
KNEE BOLSTER
PAD
INSTRUMENT
PANEL
CLIP
KNEE BOLSTER
PAD
Disconnect the
connectors.
DASHBOARD LOWER
COVER (Driver’s)
Installation is the reverse of the removal procedure.
NOTE: Make sure the connectors are connected properly.