CAUTION: To prevent damage, place the roof on an
appropriate pad.
1. Remove the roof.
2. Remove:
• Roof front trim (see page 20-82)
• Roof side trim (see page 20-82)
• Roof side seal (see page 20-84)
• Roof side retainer (see page 20-84)
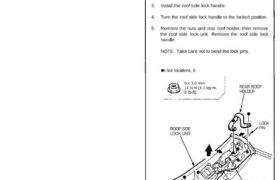
3. Install the roof side lock handle.
4. Turn the roof side lock handle to the locked position.
5. Remove the nuts and rear roof holder, then remove
the roof side lock unit. Remove the roof side lock
handle.
NOTE: Take care not to bend the lock pins.
Nut locations, 6
6 x 1.0 mm
11 N-m (1.1 kg-m,
8 Ib-ft)
REAR ROOF
HOLDER
ROOF SIDE
LOCK UNIT
LOCK
PIN
LOCK PIN ROOF SIDE
LOCK
ROOF SIDE
LOCK HANDLE
Roof
Roof
Roof Side Lock Unit Replacement
(cont’d)
6. If necessary, remove the roof side hook.
ROOF SIDE
LOCK UNIT
ROOF SIDE
HOOK
SCREW
5 x 0.8 mm
5 N-m (0.5 kg-m, 3.6 Ib-ft)
Apply liquid thread lock.
7. Installation is the reverse of the removal procedure.
NOTE:
• Grease the location indicated by the arrow and
the lock pins.
• Make sure the roof side lock works smoothly.
• Install the roof side retainer and roof side seal
properly as described on page 20-85.
• Before installing the roof trim, install the roof on
the body, then check that the seals fit flush (see
page 20-107).
If necessary, align the roof side seals by adjust-
ing the roof side lock unit (see page 20-106).
• Check that the door glass contacts the seals
evenly (see page 20-109).
• Check for water leaks (see page 20-110).