Replacement
NOTE:
• When the front pillar seal has been removed, and or
it is damaged, replace it with new one.
• Have an assistant help replace the front pillar seal.
1. Remove the roof.
2. Remove the front roof rail trim (see page 20-79).
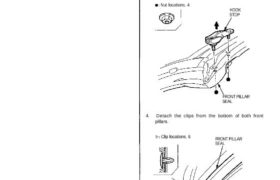
3. Remove the hook stop from each side.
Nut locations, 4
HOOK
STOP
FRONT PILLAR
SEAL
4. Detach the clips from the bottom of both front
pillars.
Clip locations, 6 FRONT PILLAR
SEAL
5. Remove the front pillar seal.
FRONT PILLAR
SEAL
6. Remove the screws, then remove the front pillar
retainer.
NOTE: If necessary, remove the glass guide clip
from the front pillar retainer.
Screw locations, 7
GLASS GUIDE
CLIP
7. Scrape the old sealant from the body bonding sur-
face with a putty knife.
NOTE: Do not scrape down to the painted surfaces
of the body.
8. Clean the body bonding surface with a sponge
dampened in alcohol.
NOTE: After cleaning, keep oil, grease and water
from getting on the surface.
9. If the old front pillar retainer is to be reinstalled, use
a putty knife to scrape off all of the old sealant and
the EPT sealer as shown, then clean the front pillar
retainer surface with alcohol where new sealant and
EPT sealer are to be applied.
Scrape off.
FRONT PILLAR
RETAINER
10. Glue the new EPT sealer to top edge of the front pil-
lar retainer as shown.
EPT sealer thickness: 5 mm (0.2 in)
10 mm (0.39 in)
EPT SEALER
FRONT PILLAR
RETAINER
FRONT PILLAR
RETAINER
FRONT PILLAR
RETAINER
NEW
EPT
SEALER
NEW
EPT
SEALER
Front Pillar Seal/Retainer
Replacement
11. Install the front pillar retainer.
NOTE:
• Be careful not to touch the front pillar retainer
where sealant will be applied.
• First tighten the screw at top of the front pillar
retainer.
First tighten.
FRONT PILLAR
RETAINER
12. Apply new sealant to the body and retainers on
each side as shown.
:Sealant locations
(Cemedine P/N 08712 – 0004, or equivalent)
RETAINER
15 mm
(0.59 in)
min.
SEALANT
FRONT PILLAR
RETAINER
13. Peel the separator off from the butyl tapes on the
new front pillar seal.
NOTE: Fold the separator of the butyl tape at the
roof portion of the front pillar seal.
SEPARATOR
Fold it.
BUTYL
TAPES
BUTYL
TAPES
SEPARATOR
Peel off.
FRONT PILLAR
SEAL
SEPARATORS
Peel off.
EPT
SEALER
14. Align the holes on the front pillar seal with the
holes on the body, and engage the lips of the front
pillar seal with the groove of the retainers, then
gently set each corner of the front pillar seal down
on the sealant as shown.
NOTE: Do not press on the seal yet to make the adhe-
sive stick.
RETAINER
FRONT PILLAR
SEAL
FRONT PILLAR
RETAINER
FRONT PILLAR
SEAL
About 70°
SEALANT
NOTE: Install the pillar and roof portions of the front
pillar seal into the retainers about 50 mm (2 in).
FRONT PILLAR
SEAL
FRONT PILLAR
SEAL
RETAINER
LIPS
FRONT PILLAR
RETAINER WINDSHIELD
Front Pillar Seal/Retainer
Replacement
15. Install the hook stop on each side.
NOTE: Do not press on the seal yet to make the adhe-
sive stick.
Nut locations, 4
6 x 1.0 mm
11 N-m (1.1 kg-m,
8 Ib-ft)
HOOK STOP
16. Install each pillar portion of the front pillar seal into
the front pillar retainer as shown, then attach the clips.
NOTE:
• Do not press on the seal yet to make the adhe-
sive stick.
• After setting the lip at location install the front
pillar seal while pushing the lip in the front pillar
retainer with a rounded plastic spatula at location
FRONT PILLAR
RETAINER
FRONT PILLAR
SEAL
(Pillar portion) LIP
Clip locations, 6
FRONT PILLAR
RETAINER
PLASTIC
SPATULA
17. Install the roof portion of the front pillar seal into the
retainer on the roof rail.
NOTE:
• Do not press on the seal yet to make the adhe-
sive stick.
• Install the roof portion in the same way as the pil-
lar portion.
• Before installing the roof portion of the front pil-
lar seal, lubricate the lips with soapy water.
FRONT PILLAR
SEAL
(Roof portion)
BUTYL
TAPE
RETAINER LIPS
Apply soapy
water.
LIP
FRONT PILLAR
SEAL
FRONT PILLAR
SEAL
BUTYL TAPE
SEPARATOR
BUTYL TAPE
SEPARATOR
RETAINER
18. Carefully pull the separator away from the butyl
tape at the roof portion of the front pillar seal.
SEPARATOR
FRONT PILLAR
SEAL
19. Press on the roof portion of the butyl tape to make
the adhesive stick.
NOTE: Do not press on the front pillar seal portion
of the seal yet.
BUTYL TAPE
FRONT PILLAR
SEAL
20. Scrap or wipe the excess sealant off with a putty
knife or towel.
NOTE: To remove sealant from a painted surface or
the front pillar seal, wipe with a soft shop towel damp-
ened with alcohol.
21. Close the doors, then check that there is about 20 mm
(0.79 in) between the top edge of the front sash and
the seam on the front pillar seal on each side.
Adjust the seal as needed, then press on the front
pillar portion of the butyl tape to make the adhesive
stick.
NOTE: Do not raise the door glass.
SEAM
20 mm
(0.79 in)
FRONT SASH
FRONT PILLAR
SEAL
PLASTIC
SPATULA
LIP
BUTYL TAPE
Front Pillar Seal/Retainer
Replacement
22. Let the sealant dry for at least three hours after
installing the front pillar seal.
23. Install the roof on the body, then check that the
seals fit flush (see page 20-107).
NOTE: If necessary, align the roof side seal by
adjusting the roof side lock unit (see page 20-106).
24. Check that each door glass contact the seals evenly
(see page 20-109).
25. Check for water leaks (see page 20-110).
26. Remove the roof, then reinstall all remaining removed
parts.