Category: Body
Categories
nsxb20066a.pdf
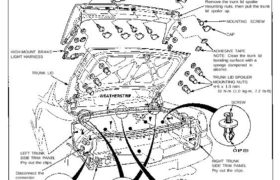
Trunk Lid Spoiler/Trunk Trim Panel Replacement NOTE: • Take care not to scratch the trunk lid. • Take care not to bend or scratch the trim panels. CAUTION: When prying with a flat tip screwdriver, wrap it with protective tape or a shop towel to prevent damage. Disconnect the connector. HIGH-MOUNT BRAKE LIGHT Carefully pry […]
Categories
nsxb20112a.pdf
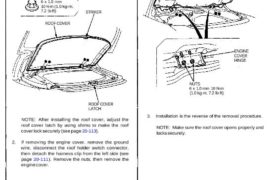
Engine Cover/Roof Cover Replacement NOTE: • Take care not to scratch the body. • Open the rear hatch. Roof cover (Engine cover) removal: 1. Open the roof cover, remove the nuts, then remove the roof cover. Nut locations, 4 6 x 1.0 mm 10 N-m (1.0 kg-m, 7.2 Ib-ft) STRIKER ROOF COVER LATCH NOTE: After […]
Categories
nsxb20083a.pdf
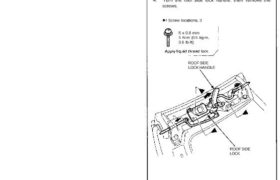
Roof Side Lock Replacement CAUTION: To prevent damage, place the roof on an appropriate pad. 1. Remove the roof. 2. Remove the roof front trim and roof side trim (see page 20-82). 3. Install the roof side lock handle. 4. Turn the roof side lock handle, then remove the screws. Screw locations, 3 5 x […]
Categories
nsxb20079a.pdf

Roof Rail Trim, Front and Rear Replacement CAUTION: • Wear gloves to remove and install the trim. • When prying with a flat tip screwdriver, wrap it with protective tape to prevent damage. NOTE: • Take care not to scratch the trim. • Remove the roof. Front roof rail trim: 1. Remove the sunvisor from […]
Categories
nsxb20065a.pdf
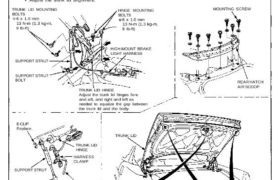
Trunk Lid Replacement/Adjustment 1. Remove the mounting screws, then remove the rear hatch air scoop. 2. Disconnect the high-mount brake light harness connector, and remove the harness clamp from the support strut. 3. Remove the trunk lid by removing the trunk lid mounting bolts. 4. Installation is the reverse of the removal procedure. NOTE: • […]
Categories
nsxb20022a.pdf
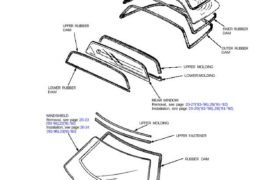
Windshield, Rear Window, Rear Hatch Glass Index ( ): Quantity of parts used. REAR HATCH GLASS Removal. see page 20-33 (’93-’96),32(’91-’92) Installation, see page 20-33 (’93-’96),32(’91-’92) UPPER RUBBER DAM MOLDING Replacement, see page 20-36(’93-’96), 35(’91-’92) INNER RUBBER DAM OUTER RUBBER DAM UPPER MOLDING LOWER MOLDING LOWER RUBBER DAM WINDSHIELD Removal, see page 20-23 (’93-’96),22(’91-’92) Installation, […]
Categories
nsxb20005a.pdf
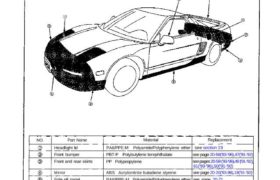
Types and Materials of Exterior Resin Parts NOTE: A standard symbol is stamped on the underside of each resin part to show the type of material used. Example: HONDA >PP< NO. Part Name Headlight lid Front bumper Front and rear skirts Mirror Side sill panel Trunk ltd spoiler Rear bumper Fuel filler lid Washer Tank […]
Categories
nsxb20070a.pdf
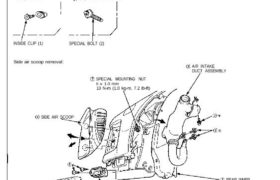
Side Air Scoop/Side Sill Panel/Side Step Panel Replacement CAUTION: When prying with a flat tip screwdriver, wrap it with protective tape or a shop towel to prevent damage. NOTE: • Take care not to scratch the body and related parts. • Do not drop the special mounting nuts inside the body. Disassemble in numbered sequence. […]
Categories
nsxe20042a.pdf
SRS wire harnesses are routed near the carpet. CAUTION: All SRS electrical wiring harnesses are covered with yellow outer insulation. Before disconnecting the SRS wire harness, install the short connector on the airbag (see page 23-323). Replace the entire effected SRS harness assembly if it has an open circuit or damaged wiring. 1. To remove […]
Categories
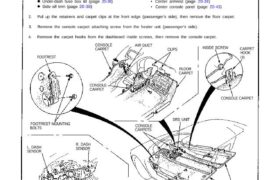
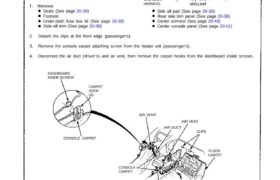
nsxd20047a.pdf
Carpet Replacement SRS wire harnesses are routed near the carpet. CAUTION: Remove: 2. Detach the clips at the front edge (passenger’s). 3, Remove the console carpet attaching screw from the heater unit (passenger’s). 4. Disconnect the air duct (driver’s) and air vent, then remove the carpet hooks from the dashboard inside screws. DASHBOARD INSIDE SCREW […]