Side Air Scoop/Side Sill Panel/Side Step Panel
Replacement
CAUTION: When prying with a flat tip screwdriver, wrap it with protective tape or a shop towel to prevent damage.
NOTE:
• Take care not to scratch the body and related parts.
• Do not drop the special mounting nuts inside the body.
Disassemble in numbered sequence.
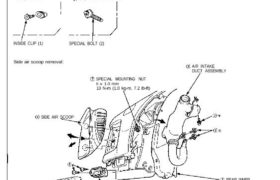
Clip location Special bolt locations
INSIDE CLIP (1) SPECIAL BOLT (2)
Side air scoop removal:
SPECIAL MOUNTING NUT
6 x 1.0 mm
10 N-m (1.0 kg-m, 7.2 Ib-ft)
AIR INTAKE
DUCT ASSEMBLY
SIDE SILL PANEL
REAR INNER
FENDER
SPECIAL MOUNTING NUT
6 x 1.0 mm
10 N-m (1.0 kg-m, 7.2 Ib-ft)
CORROSION RESISTANT BOLT
SIDE AIR
OUTLET
SIDE AIR SCOOP
Replacement
CAUTION: When prying with a flat tip screwdriver, wrap it with protective tape or a shop towel to prevent damage.
NOTE:
• Take care not to scratch the body and related parts.
• Do not drop the special mounting nuts inside the body.
Disassemble in numbered sequence.
Clip location Special bolt locations
INSIDE CLIP (1) SPECIAL BOLT (2)
Side air scoop removal:
SPECIAL MOUNTING NUT
6 x 1.0 mm
10 N-m (1.0 kg-m, 7.2 Ib-ft)
AIR INTAKE
DUCT ASSEMBLY
SIDE SILL PANEL
REAR INNER
FENDER
SPECIAL MOUNTING NUT
6 x 1.0 mm
10 N-m (1.0 kg-m, 7.2 Ib-ft)
CORROSION RESISTANT BOLT
SIDE AIR
OUTLET
SIDE AIR SCOOP
NOTE:
• Take care not to twist the side sill panel.
• Take care not to scratch the body and related parts.
Disassemble in numbered sequence.
Clip locations
NOTE: Loosen the screw,
then remove the clip using
a clip remover.
Clip locations
SIDE CLIP (9)
Remove the clips by turning
them 45°.
SIDE SILL
PANEL
SIDE CLIP
I NOTE: When removing the side sill
panel, the clips will stay in the body.
Side sill panel and side step panel removal:
SIDE STEP PANEL
FRONT INNER
FENDER
REAR INNER FENDER
SIDE SILL PANEL
Remove the side sill panel by
sliding it forward.
To install the side sill panel, remove the clips from the
body, install them on the panel, then install the panel on
the car.
NOTE: If necessary, replace any damaged clips.