Carpet
Replacement
SRS wire harnesses are routed near the carpet.
CAUTION:
Remove:
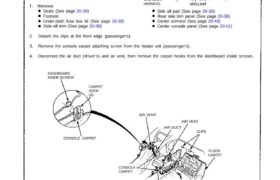
2. Detach the clips at the front edge (passenger’s).
3, Remove the console carpet attaching screw from the heater unit (passenger’s).
4. Disconnect the air duct (driver’s) and air vent, then remove the carpet hooks from the dashboard inside screws.
DASHBOARD
INSIDE SCREW
CARPET
HOOK
(3)
AIR VENT
AIR DUCT
AIR VENT
CLIPS
FLOOR
CARPET
CONSOLE
CARPET
CONSOLE CARPET
LEFT DASH
SENSOR
PASSENGER’S
AIRBAG
RIGHT DASH
SENSOR
SRS MAIN
HARNESS SRS UNIT
Side sill pad (See page 20-38)
Rear side trim panel (See page 20-38)
Center armrest (See page 20-49)
Center console panel (See page 20-52)
SRS UNIT
SCREW
(cont’d)
Seats (See page 20-39)
Footrest
Under-dash fuse box lid (See page 20-38)
Side sill trim (See page 20-38)
All SRS wiring harnesses are covered with
yellow outer insulation.
Before disconnecting any part of the SRS wire
harness, install the short connectors (see page
23-328).
Replace the entire affected SRS harness assem-
bly if it has an open circuit or damaged wiring.
Replacement
SRS wire harnesses are routed near the carpet.
CAUTION:
Remove:
2. Detach the clips at the front edge (passenger’s).
3, Remove the console carpet attaching screw from the heater unit (passenger’s).
4. Disconnect the air duct (driver’s) and air vent, then remove the carpet hooks from the dashboard inside screws.
DASHBOARD
INSIDE SCREW
CARPET
HOOK
(3)
AIR VENT
AIR DUCT
AIR VENT
CLIPS
FLOOR
CARPET
CONSOLE
CARPET
CONSOLE CARPET
LEFT DASH
SENSOR
PASSENGER’S
AIRBAG
RIGHT DASH
SENSOR
SRS MAIN
HARNESS SRS UNIT
Side sill pad (See page 20-38)
Rear side trim panel (See page 20-38)
Center armrest (See page 20-49)
Center console panel (See page 20-52)
SRS UNIT
SCREW
(cont’d)
Seats (See page 20-39)
Footrest
Under-dash fuse box lid (See page 20-38)
Side sill trim (See page 20-38)
All SRS wiring harnesses are covered with
yellow outer insulation.
Before disconnecting any part of the SRS wire
harness, install the short connectors (see page
23-328).
Replace the entire affected SRS harness assem-
bly if it has an open circuit or damaged wiring.
Carpet
Replacement (cont’d)
5. Pull up the retainers, then remove the floor carpets.
6. Remove the console carpets.
FOOTREST
CONSOLE
CARPETS
SRS UNIT
FOOTREST MOUNTING
BOLTS
RETAINERS
RETAINERS
FLOOR CARPETS
SEAT HARNESSES
7. Installation is the reverse of the removal procedure.
NOTE:
Take care not to damage, wrinkle or twist the carpets.
Make sure the air vents are connected into the heater unit and air duct.
Make sure the seat harnesses are routed correctly.