Replacement
CAUTION:
• Wear gloves to replace the molding.
• Do not damage the glass and defroster grid lines.
2. Place the rear hatch assembly on its surface as
shown.
CAUTION: Avoid setting the glass on its edges;
small chips may later develop into cracks.
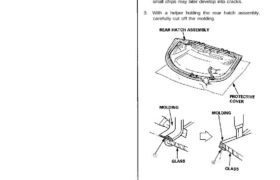
3. With a helper holding the rear hatch assembly,
carefully cut off the molding.
4. Turn the glass over, then cut the outer side rubber
portion of the molding.
1. Remove the rear hatch assembly (see page 20-64).
6. Clean the glass surface with alcohol where the new
molding is to be installed.
NOTE: Make sure the surface is kept free of water,
oil and grease.
7. With a brush, apply a light coat of glass primer
around the edge of the glass.
EXCESS PRIMER
GLASS
6 mm
(0.2 in)
SURFACE
INSIDE SURFACE
6 mm
(0.2 in)
NOTE: Scrape off excess glass primer with a putty
knife after installing the new molding.
8. Degrease the inner surfaces of the new molding
thoroughly, then apply a light coat of glass primer
to the surfaces.
NOTE:
• Apply glass primer around the entire groove of
the new molding.
• Do not apply glass primer to the outer surface.
MOLDING MOLDING
9. Run a bead of adhesive in the groove of the
molding.
ADHESIVE
MOLDING
10. Press the molding into position around the entire
edge of the glass.
NOTE: Check that the molding is not wrinkled or
lifted away at the corners.
GLASS MOLDING
PROTECTIVE
COVER
11. Scrape or wipe the excess adhesive off with a put-
ty knife or towel.
NOTE: Use a soft shop towel dampened with
alcohol to remove adhesive from a painted surface
or glass.
(Glass Surface)
MOLDING
EXCESS ADHESIVE
GLASS
Inside:
Surface to be
wiped clean.
5. Scrape all traces of the old molding from the cham-
fered edges of the glass.
NOTE: Be sure to scrape all traces of the old mold-
ing throughly.
Scrape here.
GLASS