Roof
Roof Trim/Panel Replacement
CAUTION:
• To prevent damage, place the roof on an appropriate
pad.
• When prying with a flat tip screwdriver, wrap it with
protective tape to prevent damage.
NOTE: Take care not to scratch the trim, panel and roof.
1. Remove the roof.
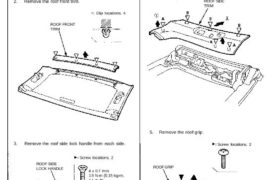
2. Remove the roof front trim.
>: Clip locations, 4
ROOF FRONT
TRIM
3. Remove the roof side lock handle from each side.
ROOF SIDE
LOCK HANDLE
Screw locations, 2
4 x 0.7 mm
1.5 N-m (0.15 kg-m,
1.1 Ib-ft)
CAP
4. Remove the roof side trim from each side.
NOTE: Do not snap the hooks.
ROOF SIDE
TRIM
5. Remove the roof grip.
Screw locations, 2
ROOF GRIP
Roof Trim/Panel Replacement
CAUTION:
• To prevent damage, place the roof on an appropriate
pad.
• When prying with a flat tip screwdriver, wrap it with
protective tape to prevent damage.
NOTE: Take care not to scratch the trim, panel and roof.
1. Remove the roof.
2. Remove the roof front trim.
>: Clip locations, 4
ROOF FRONT
TRIM
3. Remove the roof side lock handle from each side.
ROOF SIDE
LOCK HANDLE
Screw locations, 2
4 x 0.7 mm
1.5 N-m (0.15 kg-m,
1.1 Ib-ft)
CAP
4. Remove the roof side trim from each side.
NOTE: Do not snap the hooks.
ROOF SIDE
TRIM
5. Remove the roof grip.
Screw locations, 2
ROOF GRIP
6. Move the rear roof stop guide on each side as
shown.
NOTE: Do not disturb the bonded portion of the roof
side seal. SCREWS
4 x 0.7 mm
1.5 N-m (0.15 kg-m,
1.1 Ib-ft)
ROOF SIDE
SEAL
BONDED
PORTION
ROOF
TRIM
PANEL
REAR ROOF
STOP GUIDE
SCREW
4 x 0.7 mm
Remove.
7. Detach the hooks by sliding the roof trim panel
back, then remove it.
Hook locations, 3
ROOF TRIM
PANEL
8. Installation is the reverse of the removal procedure.
NOTE: If necessary, replace any damaged clips.