Doors
Moldings Removal
NOTE: Lower the glass fully.
Remove: (see pages 20-7(’93-’96),6(’91-’92),
8(’93-’96),7(’91-’92)
Trim plate Sash covers
Inside door handle Door panel
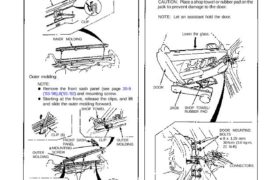
Inner molding:
NOTE: Pry the clips out using a flat tip
screwdriver, then pull up the inner molding.
INNER MOLDING
CLIP
INNER MOLDING
Outer molding:
NOTE:
Remove the front sash panel (see page 20-9
(’93-’96),8(’91-’92) and mounting screw.
Starting at the front, release the clips, and lift
and slide the outer molding forward.
SHOP TOWEL
CLIP (6)
FRONT SASH
PANEL
CLIP OUTER
MOLDING
MOUNTING
SCREWOUTER
MOLDING
REAR SASH
STABILIZERS
OUTER
MOLDING
Installation is the reverse of the removal procedure.
NOTE:
Before installing, set the clips onto the moldings.
If necessary, replace any damaged clips.
: CORROSION RESISTANT SCREW
Door Removal
1. Lower the glass fully.
2. Remove the seat (see page 20-39(’93-’96),38(’91-’92)
3. Disconnect the connectors.
4. Remove the door by removing the door mounting
bolts and detent rod pin, and by pulling out the wire
harness.
CAUTION: Place a shop towel or rubber pad on the
jack to prevent damage to the door.
NOTE: Let an assistant hold the door.
Lower the glass.
DOOR
JACK SHOP TOWEL/
RUBBER PAD
DOOR MOUNTING
BOLTS
8 x 1.25 mm
30 N·m (3.0 kg-m,
22 Ib-ft)
CONNECTORS
WIRE HARNESS
DETENT ROD
PIN
5. Installation is the reverse of the removal procedure.
NOTE: Adjust the door position (see page 20-19).
(’93-’96),18(’91-’92)
: CORROSION RESISTANT BOLT
Moldings Removal
NOTE: Lower the glass fully.
Remove: (see pages 20-7(’93-’96),6(’91-’92),
8(’93-’96),7(’91-’92)
Trim plate Sash covers
Inside door handle Door panel
Inner molding:
NOTE: Pry the clips out using a flat tip
screwdriver, then pull up the inner molding.
INNER MOLDING
CLIP
INNER MOLDING
Outer molding:
NOTE:
Remove the front sash panel (see page 20-9
(’93-’96),8(’91-’92) and mounting screw.
Starting at the front, release the clips, and lift
and slide the outer molding forward.
SHOP TOWEL
CLIP (6)
FRONT SASH
PANEL
CLIP OUTER
MOLDING
MOUNTING
SCREWOUTER
MOLDING
REAR SASH
STABILIZERS
OUTER
MOLDING
Installation is the reverse of the removal procedure.
NOTE:
Before installing, set the clips onto the moldings.
If necessary, replace any damaged clips.
: CORROSION RESISTANT SCREW
Door Removal
1. Lower the glass fully.
2. Remove the seat (see page 20-39(’93-’96),38(’91-’92)
3. Disconnect the connectors.
4. Remove the door by removing the door mounting
bolts and detent rod pin, and by pulling out the wire
harness.
CAUTION: Place a shop towel or rubber pad on the
jack to prevent damage to the door.
NOTE: Let an assistant hold the door.
Lower the glass.
DOOR
JACK SHOP TOWEL/
RUBBER PAD
DOOR MOUNTING
BOLTS
8 x 1.25 mm
30 N·m (3.0 kg-m,
22 Ib-ft)
CONNECTORS
WIRE HARNESS
DETENT ROD
PIN
5. Installation is the reverse of the removal procedure.
NOTE: Adjust the door position (see page 20-19).
(’93-’96),18(’91-’92)
: CORROSION RESISTANT BOLT