Hood
Replacement/Adjustment
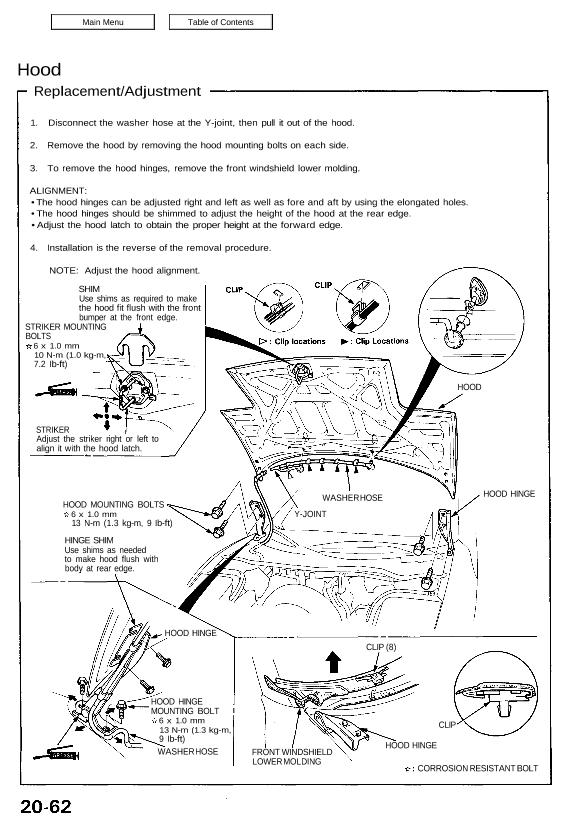
1. Disconnect the washer hose at the Y-joint, then pull it out of the hood.
2. Remove the hood by removing the hood mounting bolts on each side.
3. To remove the hood hinges, remove the front windshield lower molding.
ALIGNMENT:
• The hood hinges can be adjusted right and left as well as fore and aft by using the elongated holes.
• The hood hinges should be shimmed to adjust the height of the hood at the rear edge.
• Adjust the hood latch to obtain the proper height at the forward edge.
4. Installation is the reverse of the removal procedure.
NOTE: Adjust the hood alignment.
SHIM
Use shims as required to make
the hood fit flush with the front
bumper at the front edge.
STRIKER MOUNTING
BOLTS
6 x 1.0 mm
10 N-m (1.0 kg-m,
7.2 Ib-ft)
STRIKER
Adjust the striker right or left to
align it with the hood latch.
HOOD MOUNTING BOLTS
6 x 1.0 mm
13 N-m (1.3 kg-m, 9 Ib-ft)
HINGE SHIM
Use shims as needed
to make hood flush with
body at rear edge.
HOOD HINGE
MOUNTING BOLT
6 x 1.0 mm
13 N-m (1.3 kg-m,
9 Ib-ft)
FRONT WINDSHIELD
LOWER MOLDING
CLIP
HOOD HINGE
CORROSION RESISTANT BOLT
Y-JOINT
WASHER HOSE HOOD HINGE
HOOD
WASHER HOSE
HOOD HINGE
CLIP (8)
Replacement/Adjustment
1. Disconnect the washer hose at the Y-joint, then pull it out of the hood.
2. Remove the hood by removing the hood mounting bolts on each side.
3. To remove the hood hinges, remove the front windshield lower molding.
ALIGNMENT:
• The hood hinges can be adjusted right and left as well as fore and aft by using the elongated holes.
• The hood hinges should be shimmed to adjust the height of the hood at the rear edge.
• Adjust the hood latch to obtain the proper height at the forward edge.
4. Installation is the reverse of the removal procedure.
NOTE: Adjust the hood alignment.
SHIM
Use shims as required to make
the hood fit flush with the front
bumper at the front edge.
STRIKER MOUNTING
BOLTS
6 x 1.0 mm
10 N-m (1.0 kg-m,
7.2 Ib-ft)
STRIKER
Adjust the striker right or left to
align it with the hood latch.
HOOD MOUNTING BOLTS
6 x 1.0 mm
13 N-m (1.3 kg-m, 9 Ib-ft)
HINGE SHIM
Use shims as needed
to make hood flush with
body at rear edge.
HOOD HINGE
MOUNTING BOLT
6 x 1.0 mm
13 N-m (1.3 kg-m,
9 Ib-ft)
FRONT WINDSHIELD
LOWER MOLDING
CLIP
HOOD HINGE
CORROSION RESISTANT BOLT
Y-JOINT
WASHER HOSE HOOD HINGE
HOOD
WASHER HOSE
HOOD HINGE
CLIP (8)