Categories
Electrical

nsxe23190a.pdf

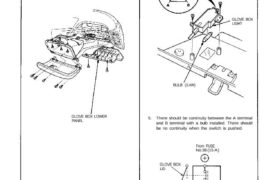
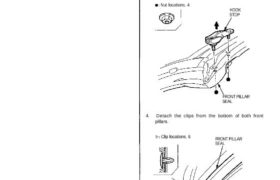
Glove Box Light Replacement/Test 1. Remove the glove box lower panel. 2. Remove the 8 screws then pull out the glove box. 3. Disconnect the 2-P connectors then remove the glove box. GLOVE BOX LOWER PANEL 4. Remove the 2 screws from the glove box light. GLOVE BOX LIGHT BULB (3.4W) 5. There should be […]

Categories
Clutch

nsxb12002a.pdf

Special Tools Ref.No. Tool Number 07LAB — PV00100 or 07924 — PD20003 07MAF—PR80100 07746 — 0010200 07749 — 0010000 07936 — 3710100 Description Ring Gear Holder Clutch Alignment Shaft Attachment, 37 x 40 mm Driver Handle Qty Page Reference 12-10, 17, 18, 19 12-18, 19 12-17 12-17 12-18, 19 1 1 1 1 1 Attachments […]

Categories
Body

nsxd20049a.pdf

Center Armrest Replacement CAUTION: When removing the center armrest inner panel, wrap the flat tip screwdriver with protective tape or a shop towel to prevent damage. NOTE: Take care not to scratch the center armrest, dashboard and rear center trim panel. Disassemble in numbered sequence. CENTER ARMREST INNER PANEL Open the Lid. CENTER ARMREST INNER […]

Categories
Electrical

nsxb23188a.pdf

Lighting System Retractor Motor Test 1. Remove the retractor motor. 2. Test the motor by connecting battery power to the A terminal and ground to the D terminal. The motor should run continuously. 3. If the motor does not run or fails to run smoothly, replace it. NOTE: The illustration shows the motor in the […]

Categories
General Info

nsxa01010a.pdf

Lift and Support Points Floor Jack CAUTION: Place a rubber pad between the lift platform and the center support point to avoid damaging the car. The lift platform must contact the support point only; it must not come in contact with any other part of the car. 1. Set the parking brake, and block the […]

Categories
Differential

nsxb15006a.pdf

Differential Disassembly 1. Hold the differential in a bench vise using a special tool, then remove the differential housing mounting bolts in a crisscross pattern in several steps. BENCH VISE DIFFERENTIAL INSPECTION TOOLS 07MAJ-PR90100 2. Remove the differential housing, stopper plate, washer, thrust needle bearing, and 65 mm shim. DIFFERENTIAL HOUSING WASHER 65 mm SHIM […]

Categories
Body

nsxb20090a.pdf

Roof Lock Guides Replacement CAUTION: To prevent damage, place the roof on an appropriate pad. 1. Remove the roof. 2. Remove: • Roof front trim (see page 20-82) • Roof side trim (see page 20-82) • Roof side lock (see page 20-83) 3. Remove the roof lock guides. NOTE: Replace the roof lock guides with […]

Categories
Engine Block

nsxb07018b.pdf

Crankshaft Installation Before installing the crankshaft, apply a coat of engine oil to the main bearings and rod bearings. 1. Insert bearing halves in the engine block and con- necting rods. 2. Lower the crankshaft into the block. 3. Install the thrust washers on the No. 3 journal. Oil thrust washer surfaces. 4. Install the […]

Categories
Body

nsxb20094a.pdf

Front Pillar Seal/Retainer Replacement NOTE: • When the front pillar seal has been removed, and or it is damaged, replace it with new one. • Have an assistant help replace the front pillar seal. 1. Remove the roof. 2. Remove the front roof rail trim (see page 20-79). 3. Remove the hook stop from each […]

Categories
Electrical

nsxb23308a.pdf

Cruise Control Brake Switch Test 1. Disconnect the 4-P connector from the switch. BRAKE SWITCH 4-P CONNECTOR BRAKE PEDAL 2. Check for continuity between the terminals accor- ding to the table. 3. If necessary, replace the switch or adjust pedal height (see section 19). Clutch Switch Test 1. Disconnect the 3-P connector from the switch. […]