Categories
Electrical

nsxb23121a.pdf

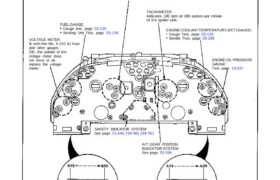
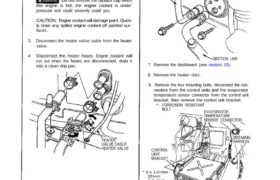
Gauge Assembly Gauge/Terminal Location Index SRS components are located in this area. Review the SRS component locations, precautions, and procedures in the SRS section (24) before performing repairs or service. SPEEDOMETER: Indicates 60 mph [60km/h] at 1.026 [637] rpm of the vehicle speed sensor (VSS). FUEL GAUGE: Gauge test, page 23-134 Sending Unit Test, page […]

Categories
Differential

nsxb15003a.pdf

Differential Illustrated Index NOTE: If the parts marked with an asterisk ( * ) are replaced, the bearing preload must be adjusted (see page 15-12). If replacement is required, always replace the limited slip differential clutch set. *75 mm THRUST SHIM Selection, Adjustment, page 15-13 Adjustment, page *TAPERED ROLLER BEARING Replacement, page 15-5 Inspect for […]

Categories
Body

nsxb20082a.pdf

Roof Roof Trim/Panel Replacement CAUTION: • To prevent damage, place the roof on an appropriate pad. • When prying with a flat tip screwdriver, wrap it with protective tape to prevent damage. NOTE: Take care not to scratch the trim, panel and roof. 1. Remove the roof. 2. Remove the roof front trim. >: Clip […]

Categories
Automatic Transmission

nsxd14009a.pdf

Power Flow MAINSHAFT REVERSE GEAR MAINSHAFT 1ST GEAR 1ST CLUTCH 1ST-HOLD CLUTCH ONE-WAY CLUTCH COUNTERSHAFT 1ST GEAR PARKING GEAR COUNTERSHAFT REVERSE GEAR COUNTERSHAFT 4TH GEAR 2ND CLUTCH SECONDARY SHAFT 2ND GEAR SECONDARY SHAFT 3RD GEAR FINAL DRIVEN GEAR (cont’d) FINAL DRIVE GEAR TORQUE CONVERTER 3RD CLUTCH COUNTERSHAFT 3RD CLUTCH COUNTERSHAFT 2ND GEAR 4TH CLUTCH MAINSHAFT […]

Categories
Heating, Ventilation and Air Conditioning

nsxb22074a.pdf

Heater-Evaporator Unit Replacement SRS components are located in this area. Review the SRS component locations, precautions, and procedures in the SRS section (24) before performing repairs or service. 1. Remove the blower unit (see page 22-67 (’93-’96), 63(’91-’92)). 2. When the engine is cool, drain the engine coolant from the radiator (see section 10). Do […]

Categories
Steering

nsxd17069a.pdf

Inspection 1. Carefully clamp the gearbox in a vise with soft jaws. 2. Remove the boot bands. BOOT BAND Replace. LOCK WASHER Replace. (cont’d) 10 cm (0.4 in) STEERING INSPECTION ARM 07974-SD90000 60 mm (2.4 in) Preload Inspection: 3. Pull the boots away from the ends of the gearbox, unbend the tie-rod lock washers. 4. […]

Categories
engind

nsxengindx.pdf

Engine Construction and Function ’91−’94 Models 5−1. . . . . . . . . . . . . . . . Engine Removal/Installation ’91−’94 Models 5−17. . . . . . . . . . . . . . . . . . . . . . . . . . . . . […]

Categories
Manual Transmission

nsxb13030a.pdf

Countershaft Assembly Clearance Inspection 1. Measure the clearance between 2nd and 3rd gear. Standard: 0.04-0.10 mm (0.002-0.004 in) 3RD GEAR 2ND GEAR 2. If the clearance exceeds the standard, select the appropriate spacer collar for the correct clearance from the chart below. SPACER COLLAR 3. Measure the clearance between 1st and reverse gear. Standard: 0.04-0.10 […]

Categories
Fuel & Emissions

nsxd11157a.pdf

Evaporative Emission (EVAP) Two Way Valve Testing 1. Remove the fuel fill cap. 2. Remove vapor line from the fuel tank and connect to T-fitting from vacuum gauge and vacuum pump as shown. PRESSURE SIDE 3. Apply vacuum slowly and continuously while wat- ching the gauge. Vacuum should stabilize momentarily at 5 to 15 mmHg […]

Categories
Electrical

nsxd23276a.pdf

Rear Window Defogger Troubleshooting NOTE: The numbers in the table show the troubleshooting sequence. Main Menu Table of Contents Rear Window Defogger Troubleshooting NOTE: The numbers in the table show the troubleshooting sequence. Item to be inspected 11 140 A) fuse disconnected terminals Rear window defogger function test Open circuit, loose or (In the under-dash […]