Categories
Fuel & Emissions

nsxd11006a.pdf

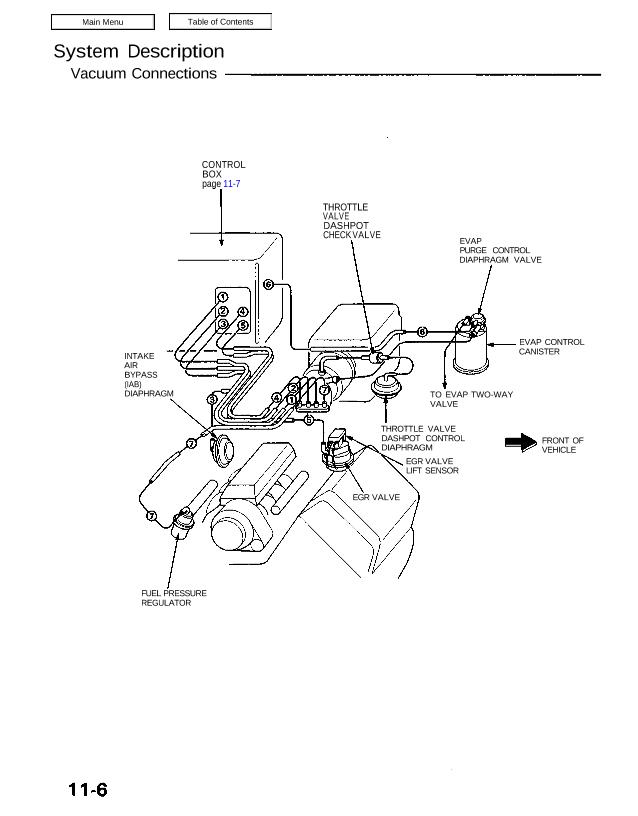
System Description Vacuum Connections CONTROL BOX page 11-7 THROTTLE VALVE DASHPOT CHECK VALVE EVAP PURGE CONTROL DIAPHRAGM VALVE EVAP CONTROL CANISTER TO EVAP TWO-WAY VALVE FRONT OF VEHICLE THROTTLE VALVE DASHPOT CONTROL DIAPHRAGM EGR VALVE LIFT SENSOR FUEL PRESSURE REGULATOR INTAKE AIR BYPASS (IAB) DIAPHRAGM EGR VALVE Control Box EVAPORATIVE EMISSION (EVAP) PURGE CONTROL SOLENOID […]

Categories
Engine Block

nsxb07008a.pdf

Main Bearings Selection CAUTION: If the codes are indecipherable because of an accumulation of dirt and dust, do not scrub them with a wire brush or scraper. Clean them only with sol- vent or detergent. Crankshaft Bore Code Locations Letters or bars have been stamped on the end of the block as a code for […]

Categories
Body

nsxb20064a.pdf

Rear Hatch/Engine Cover Replacement/Adjustment CAUTION: Use fender covers to avoid damaging painted surfaces. 1. Remove the engine cover. 2. Remove the connector cover, and disconnect the rear defogger, antenna lead and ground cable connectors. 3. Remove the rear hatch assembly by removing the support strut mounting bolts and rear hatch mounting bolts. NOTE: • Have […]

Categories
Suspension

nsxe18011a.pdf

Rear Wheel Alignment Adjusting Procedure Check the ride height. Measure camber and toe. Adjust camber. Adjust toe. Readjust camber. Readjust toe. CAMBER TOE (cont’d) Wheel Alignment Rear Wheel Alignment Adjusting Procedure (cont’d) NOTE: NSX four wheel alignment requires the use of equip- ment designed specifically for four wheel indepen- dent suspensions and capable of immediate […]

Categories
Electrical

nsxb23312a.pdf

Security Alarm System Description This system is activated automatically 15 seconds after everything has been closed and locked. The security alarm system indicator light located on the driver’s door panel will flash after the doors are properly locked. If any of the following conditions occur, the horns will sound, the headlights will pop up and […]

Categories
Suspension

nsxb18036a.pdf

Knuckle/Control Arms Removal 1. Remove, the rear wheel and bearing unit assembly (see page 18-31). 2. Remove the splash guard from the knuckle. SPLASH GUARD 3. Remove the cotter pin from the castle nut of the toe control arm. 4. Install the 10 mm hex nut on the ball joint. Be sure that the 10 […]

Categories
Heating, Ventilation and Air Conditioning

nsxb22055a.pdf

Adjustment The calibration switch can raise or lower the set temper- ature by ± 3°F (1.5°C) in relation to the digitally- displayed temperature. Attachments nsxb22055a (32 kB)

Categories
Steering

nsxd17045a.pdf

Test Harness Installation Test Harness A EPS CONTROL UNIT TEST HARNESS A 07MAZ-SL00100 Test Harness B TEST HARNESS B 07MAZ-SL00200 STEERING GEARBOX Test Harness C POWER UNIT TEST HARNESS C 07MAZ-SL00300 Power Unit Checker Connect to the cigarette lighter POWER UNIT CHECKER 07MAZ-SL00400 POWER UNIT OUTPUT (VIS) Remove the glove box and disconnect the EPS […]

Categories
Fuel & Emissions

nsxb11126a.pdf

Idle Control System Brake Switch Signal This signals the ECM when the brake pedal is depressed. Are the brake lights on without depressing the brake pedal? Inspect the brake switch (see section 19). Depress the brake pedal. Do the brake lights come on? Is the fuse OK? Check for an open in the wire: 1. […]

Categories
Fuel & Emissions

nsxd11042a.pdf

PGM-FI System Troubleshooting Flowchart Engine Will Not Start Engine will not start. Watch the Malfunction Indicator Lamp (MIL) and turn the ignition switch ON. Did the MIL come on at all? Did the MIL go off after two seconds? Turn the ignition switch OFF. Connect the test harness between the ECM and connectors (see page […]