Category: Suspension
Categories
nsxb18029a.pdf
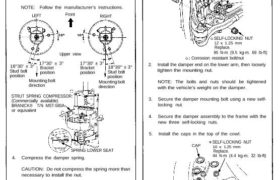
Reassembly1. Install the damper unit on a spring compressor.2. Assemble the damper in reverse order of removalexcept the damper mounting washer and self-locking nut.NOTE: Align the bottom of damper spring and spr-ing lower seat as shown.3. Position the damper mounting base on the damperunit as shown.NOTE: Follow the manufacturer’s instructions.LEFT Front RIGHTUpper view17°30′ ± 3°Bracketposition18°30′ […]
Categories
nsxe18021a.pdf
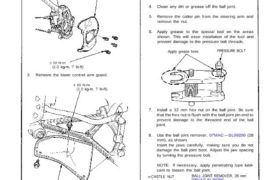
Removal 1. Remove the front wheel and bearing unit assembly (page 18-15). 2. Remove the splash guard from the knuckle. SPLASH GUARD 10 N·m (1.0 kg-m, 7 Ib-ft) 3 Remove the lower control arm guard. 10 N·m (1.0 kg-m, 7 Ib-ft) LOWER ARM GUARD (cont’d) Corrosion resistant bolt/nut COTTER PIN Replace. On reassembly, bend the […]
Categories
nsxb18007a.pdf
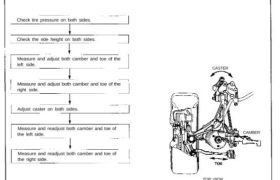
Front Wheel Alignment Adjusting Procedure Adjustment NOTE: NSX/NSX-T four wheel alignment requires the use of equipment designed specifically for four wheel independent suspensions and capable of immediate feedback. The NSX/NSX-T suspension can be adjusted for camber, caster (front only), and toe. However, because each of them relates to the other, the camber changes when the […]
Categories
nsxb18004a.pdf
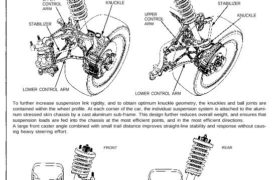
System Description Suspension Composition Outline Double wishbone independent suspension has been selected for each of the four wheels. This eliminates damper friction along the steering axis, and permits suspension geometry that takes full advantage of the performance potential of the wide, low aspect ratio tires. The double wishbone design also allows the use of aerodynamically-efficient […]
Categories
nsxe18036a.pdf
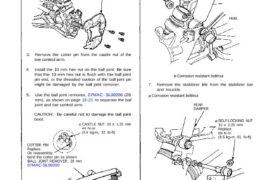
Knuckle/Control Arms Removal 1. Remove the rear wheel and bearing unit assembly (page 18-31). 2. Remove the splash guard from the knuckle. SPLASH GUARD 3. Remove the cotter pin from the castle nut of the toe control arm. 4. Install the 10 mm hex nut on the ball joint. Be sure that the 10 mm […]
Categories
nsxb18031a.pdf
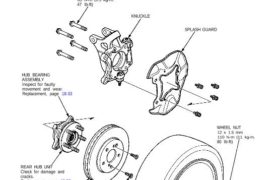
Hub Replacement NOTE: • Use only genuine Honda wheel weights for aluminum wheels. Non-genuine wheel weights may corrode and damage the aluminum wheels. • On the aluminum wheels, remove the center cap from inside of the wheel after removing the wheel. • Before installing the brake disc, clean the mating surface of the rear hub […]
Categories
nsxb18020a.pdf
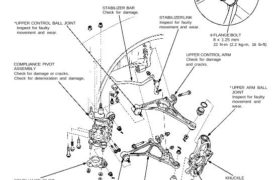
Knuckle/Control Arms/Compliance Pivot Illustrated Index Overall Suspension NOTE: Align the white line on the stabilizer bar with the bushing end, and install the stabilizer bar. NOTE: • Wipe off the grease before tightening the nut at the ball joint. • Torque specifications, see page 18-14. Corrosion resistant bolt/nut STABILIZER BAR Check for damage. *UPPER CONTROL […]
Categories
nsxb18028a.pdf
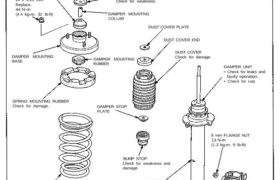
Front Damper Inspection SELF-LOCKING NUT 10 x 1.25 mm Replace. 30 N-m (3.0 kg-m. 22 Ib-ft) DAMPER MOUNTING RUBBER SELF-LOCKING NUT 10 x 1.25 mm Replace. 44 N-m (4.4 kg-m, 32 Ib-ft) DAMPER MOUNTING BASE DAMPER MOUNTING WASHER Check for weakness. DAMPER MOUNTING COLLAR DAMPER MOUNTING RUBBER DUST COVER PLATE DUST COVER END DUST COVER […]
Categories
nsxb18013a.pdf
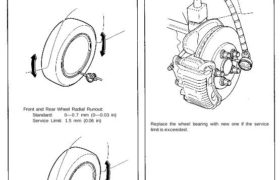
Runout 1. Raise the car off the ground, and support it with safe- ty stands in the proper locations (see section 1). 2. Place the dial gauge on each front and rear wheel rim, and turn the wheel slowly by hand. Check the axial and radial runout for front/rear wheel. Front and Rear Wheel Axial […]
Categories
nsxb18040a.pdf
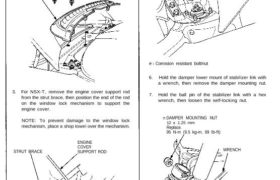
Rear Damper Removal 1. Remove the rear wheels. 2. Remove the lower rear hatch glass trim. REAR HATCH GLASS TRIM 3. For NSX-T, remove the engine cover support rod from the strut brace, then position the end of the rod on the window lock mechanism to support the engine cover. NOTE: To prevent damage to […]