Categories
Heating, Ventilation and Air Conditioning

nsxb22086a.pdf

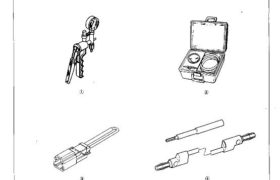
Compressor Clutch Overhaul 1. Remove the center bolt while holding the pressure plate. CENTER BOLT 12 N-m (1.2 kg-m, 9 Ib-ft) A/C CLUTCH HOLDER Commercially available Robinair: P/N 10204 Kent-Moore: P/N J37872 2. Remove the pressure plate and shim(s), taking care not to lose the shims. PRESSURE PLATE SHIM(S) 3. Use snap ring pliers to […]

Categories
Cylinder Head & Valve Train

nsxb06045b.pdf

Camshafts Installation CAUTION: Valve locknuts should be loosened and ad- justing screws backed off before installation. 1. After wiping down the camshaft and journals in the cylinder head, lubricate both surfaces and install the camshafts and rubber caps. NOTE: Apply liquid gasket around the rubber cap. 2. Turn the camshaft until its keyway is facing […]

Categories
Construction & Function

nsxb05003a.pdf

Engine Removal/Installation Removal Make sure jacks and safety stands are placed properly and hoist brackets are attached to the correct posi- tions on the engine (see section 1). • Make sure the car will not roll off stands and fall while you are working under it. CAUTION: • Use a fender cover (special tool) to […]

Categories
Cylinder Head & Valve Train

nsxd06020a.pdf

1. Disconnect the 2P connector from the VTEC solenoid valve. 2. Measure resistance between the YEL (front) or BLU/YEL (rear) terminal and body ground. Resistance: approx 14—30 ohms 4. If filters are normal, push the VTEC solenoid valve with your finger and check its movement. FILTER Replace. YEL (front) or BLU/YEL (rear) 3. If the […]

Categories
Fuel & Emissions

nsxb11002a.pdf

Special Tools 11-151,11-155, 11-163, 11-164, 11-168, 11-169, 11-170, 11-171, 11-173 11-173 11-38 11-40 11-133, 11-137 Mam Menu Table of Contents Special Tools Ref. No. 4 Tool Number Description ‘ Qty i Page Reference ‘10 A973X — 041 — XXXXX Vacuum Pump/Gauge 1 11-151,11-155,11-163, 11-164,11-168,11-169` 11-170, 11-171, 11-173 ® 07JAZ — OO‘IOOOB Vacuum/Pressure Gauge 0 v […]

Categories
Electrical

nsxb23227a.pdf

Entry Light Timer System Component Location Index SRS components are located in this area. Review the SRS component locations, precautions, and procedures in the SRS section (24) before performing repairs or service. Description: It the driver’s door has been opened by the outer handle, the foot well light and a light at the Ignition switch […]

Categories
Electrical

nsxb23298a.pdf

Cruise Control Component Location Index SRS components are located in this area. Review the SRS component locations, precautions, and procedures in the SRS section (24) before performing repairs or ser- vice. BRAKE SWITCH Test, page 23-308 (’93-’96) (’91-’92) INDICATOR LIGHT and DIMMING CIRCUIT (In tha gauge assembly) Bulb Locations, page 23-128 (’94-’96) (’91-’93) MAIN SWITCH […]

Categories
Heating, Ventilation and Air Conditioning

nsxb22013a.pdf

Function Selection and Operation Check This check will quickly and automatically select and operate all functions of the climate control system, in the combina- tions and sequence shown below. It may help clarify a problem, or identify one that didn’t show up when you perform the self-diagnosis circuit check. Turn the FAN switch to AUTO, […]

Categories
Suspension

nsxb18027a.pdf

Front Damper Removal 1. Remove the front wheel. 2. Remove the brake hose mounting bolt from the damper. 3. Separate the damper and lower arm by removing the damper mounting bolt. BRAKE HOSE MOUNTING BOLT DAMPER MOUNTING BOLT Corrosion resistant bolt/nut SELF-LOCKING NUT 12 x 1.25 mm Replace. 4. Remove the caps from the top […]

Categories
Suspension

nsxb18011a.pdf

Rear Wheel Alignment Adjusting Procedure Rear wheel alignment adjusting procedure Check tire pressure on both sides. Check the ride height on both sides. Adjust both camber and toe of the left side. Adjust both camber and toe of the right side. TOP VIEW CAMBER Wheel Alignment Rear Wheel Alignment Adjusting Procedure NOTE: • NSX/NSX-T four […]