Front Damper
Removal
1. Remove the front wheel.
2. Remove the brake hose mounting bolt from the
damper.
3. Separate the damper and lower arm by removing
the damper mounting bolt.
BRAKE HOSE MOUNTING BOLT
DAMPER MOUNTING BOLT
Corrosion resistant bolt/nut
SELF-LOCKING NUT
12 x 1.25 mm
Replace.
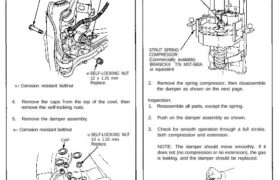
4. Remove the caps from the top of the cowl, then
remove the self-locking nuts.
5. Remove the damper assembly.
Corrosion resistant bolt/nut
CAP
SELF-LOCKING NUT
10 x 1.25 mm
Replace.
Disassembly/Inspection
Disassembly:
1. Compress the damper spring with the spring com-
pressor according to the manufacturer’s instruc-
tions, then remove the self-locking nut.
CAUTION: Do not compress the spring more than
necessary to remove the nut.
SELF-LOCKING NUT
10 x 1.25 mm
Replace.
STRUT SPRING
COMPRESSOR:
(Commercially available)
BRANICK® T/N MST-580A
or equivalent
2. Remove the spring compressor, then disassemble
the damper as shown on the next page.
Inspection:
1. Reassemble all parts, except the spring.
2. Push on the damper assembly as shown.
3. Check for smooth operation through a full stroke,
both compression and extension.
NOTE: The damper should move smoothly. If it
does not (no compression or no extension), the gas
is leaking, and the damper should be replaced.
WOODEN
BLOCK
4. Check for oil leaks, abnormal noises or binding dur-
ing these tests.
Removal
1. Remove the front wheel.
2. Remove the brake hose mounting bolt from the
damper.
3. Separate the damper and lower arm by removing
the damper mounting bolt.
BRAKE HOSE MOUNTING BOLT
DAMPER MOUNTING BOLT
Corrosion resistant bolt/nut
SELF-LOCKING NUT
12 x 1.25 mm
Replace.
4. Remove the caps from the top of the cowl, then
remove the self-locking nuts.
5. Remove the damper assembly.
Corrosion resistant bolt/nut
CAP
SELF-LOCKING NUT
10 x 1.25 mm
Replace.
Disassembly/Inspection
Disassembly:
1. Compress the damper spring with the spring com-
pressor according to the manufacturer’s instruc-
tions, then remove the self-locking nut.
CAUTION: Do not compress the spring more than
necessary to remove the nut.
SELF-LOCKING NUT
10 x 1.25 mm
Replace.
STRUT SPRING
COMPRESSOR:
(Commercially available)
BRANICK® T/N MST-580A
or equivalent
2. Remove the spring compressor, then disassemble
the damper as shown on the next page.
Inspection:
1. Reassemble all parts, except the spring.
2. Push on the damper assembly as shown.
3. Check for smooth operation through a full stroke,
both compression and extension.
NOTE: The damper should move smoothly. If it
does not (no compression or no extension), the gas
is leaking, and the damper should be replaced.
WOODEN
BLOCK
4. Check for oil leaks, abnormal noises or binding dur-
ing these tests.