Categories
Body

nsxb20083a.pdf

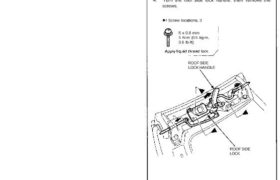
Roof Side Lock Replacement CAUTION: To prevent damage, place the roof on an appropriate pad. 1. Remove the roof. 2. Remove the roof front trim and roof side trim (see page 20-82). 3. Install the roof side lock handle. 4. Turn the roof side lock handle, then remove the screws. Screw locations, 3 5 x […]

Categories
Electrical

nsxd23274a.pdf

Rear Window Defogger Component Location Index CAUTION: All SRS wiring harnesses are covered with yellow outer insulation. Before disconnecting any part of the SRS wire harness, install the short connectors (see page 24-10). Replace the entire affected SRS harness assembly if it has an open circuit or damaged wiring. REAR WINDOW DEFOGGER TIMER CIRCUIT (In […]

Categories
Suspension

nsxb18042a.pdf

Rear Damper Disassembly/Inspection Disassembly: 1. Compress the damper spring with the spring com- pressor according to the manufacturer’s instruc- tions, then remove the self-locking nut. CAUTION: Do not compress the spring more than necessary to remove the nut. SELF-LOCKING NUT 10 x 1.25 mm Replace. STRUT SPRING COMPRESSOR: (Commercially available) BRANICK® T/N MST-580A or equivalent […]

Categories
Brakes & ABS

nsxb19008a.pdf

Front Caliper Disassembly • Never use an air hose or dry brush to clean brake assemblies. • Use an OSHA-approved vacuum cleaner to avoid breathing brake dust. CAUTION: • Do not spill brake fluid on the car; it may damage the paint; if brake fluid does contact the paint, wash it off immediately with water. […]

Categories
Heating, Ventilation and Air Conditioning

nsxb22073a.pdf

Recovery Only use service equipment that is U.L.-listed and is cer- tified to meet the requirements of SAE J2210 to remove HFC-134a (R-134a) from the air conditioning system. CAUTION: Exposure to air conditioner refrigerant and lubricant vapor or mist can irritate eyes, nose and throat. Avoid breathing the air conditioner refrigerant and lubricant vapor or […]

Categories
Uncategorized

nsx05indxb.pdf

Construction and Function (’91−’94 Models) Outline 5−2. . . . . . . . . . . . . . . . . . . . . . . . . . . . . . . . . . . . . . . . . . . . . . . . . […]

Categories
Engine Lubrication

nsxe08004a.pdf

Oil Level Engine Oil Inspection Replacement 1. Check engine oil with the engine off and the car parked on level ground. 2. Make certain that the oil level indicated on the dipstick is between the upper and lower marks. 3. If the level has dropped close to the lower mark, add oil until it reaches […]

Categories
Electrical

nsxb23080a.pdf

Starting System Starter Cut Relay Test 1. Remove the glove box (see section 20). 2. Disconnect the 4-P connector from the starter cut relay. (Wire colors of 4-P connector: BLK/GRN, BLK/ WHT, BLK/BLU and BLK/WHT) 3. Check continuity at the relay terminals. • There should be continuity between the C and D terminals. • There […]

Categories
Steering

nsxd17063a.pdf

Component Location Index NOTE: EPS CONTROL UNIT Replacement, page 17-74 POWER UNIT Replacement, page 17-73 STEERING WHEEL/ AIRBAG ASSEMBLY Removal, page 17-8 Disassembly, page 17-9 Installation, page 17-10 STEERING COLUMN Removal, page 17-12 Inspection, page 17-14 Installation, page 17-15 STEERING GEARBOX Removal/Installation, page 17-64 Illustrated Index, page 17-68 Pinion Preload Inspection, page 17-69 Rack Guide […]

Categories
Heating, Ventilation and Air Conditioning

nsxb22087a.pdf

Relief Valve Replacement 1. Remove the relief valve and O-ring. Don’t let any refrigerant oil run out. NOTE: Be sure to use the right O-rings for R-134a. 2. Clean off the mating surface. 3. Replace O-ring with new one at the relief valve, and apply refrigerant oil (ND-OIL 8) to it. NOTE: • Do not […]