Categories
Maintenance

nsxc04004a.pdf

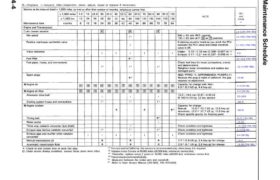
R—Replace I—Inspect After inspection, clean, adjust, repair or replace if necessary. NOTE SEC and PAGE *6 11-129 (’94-’96) 11-102 (’94-’96) 11-151 (’94-’96) 6-9 11-114 (’94-’96) 11-4 (’94-’96) 23-96 8-4 (’94-’96) 8-5 (’94-’96) 23-109 10-2 10-5 6-21 (’94-’96) 10-10 11-144 (’94-’96) 9-4 (’94-’96) 9-4 (’94-’96) 13-3 14-90 (’94-’96) Main Menu Table of Contents R—Replace I—Inspect After […]

Categories
Uncategorized

nsx05indxa.pdf

Engine Removal/Installation (’91−’94 Models) Special Tools 5−18. . . . . . . . . . . . . . . . . . . . . . . . . . . . . . . . . . . . . . . . . . . Engine Removal 5−19. . . . […]

Categories
Electrical

nsxd23279a.pdf

Switch Test 1. Remove the dashboard lower cover. 2. If necessary, remove the knee bolster. 3. Disconnect the 18-P connector from the floor wire harness. 4. Check for continuity between the terminals in each switch position according to the table. 18-P CONNECTOR View from wire side Attachments nsxd23279a (142 kB)

Categories
Driveshafts

nsxb16002a.pdf

Special Tools 16-13, 16-14, 16-16, 16-17 16-16 16-16 16-16 16-17 16-14 16-14, 16-16, 16-17 Main Menu Table of Contents Special Tools Number Tool Number Description Qty Page Reference CD O7GAF—SD407OO Hub Dis/Assembly Base 2 16-13, 16-14, 16-16, 16-17 ® 07GAF-SE00200 Hub Assembly Guide Attachment 1 16-16 © O7GAD—PG40100 Oil Seal Driver 1 16-16 @ 07JAD—SH301OA […]

Categories
Body

nsxb20038a.pdf

Headliner/lnterior Trim Replacement To remove the headliner, first remove the: Sunvisors Center pillar trim panels Front pillar trim panels Seats (see page 20-39(’93-’96) Ceiling light (see section 23) NOTE: When installing the headliner, be careful not to fold or bend it. Also, be careful not to scratch the body. Check that both sides of the […]

Categories
Suspension

nsxb18026a.pdf

Knuckle/Control Arms/Compliance Pivot Ball Joint Boot Replacement NOTE: Do not damage the tapered section of the ball pin with the bear- ing puller. 3. Pack the interior of the boot and lip with grease. BOOT INSTALLATION SECTION CAUTION: Do not contaminate the boot installa- tion section with grease. 4. Wipe the grease off the sliding […]

Categories
Body

nsxb20084a.pdf

Roof Side Seal/Retainer Replacement CAUTION: To prevent damage, place the roof on an appropriate pad. 1. Remove the roof. 2. Remove the roof front trim and roof side trim (see page 20-82). 3. Remove the screws from each end of the roof side seal. Front: ROOF SIDE SEAL Rear: ROOF SIDE SEAL Roof 4. Remove […]

Categories
Cylinder Head & Valve Train

nsxb06024a.pdf

Cylinder Heads Removal Engine removal is not required for this procedure. Make sure jacks and safety stands are placed properly and hoist brackets ere attached to cor- rect positions on the engine. CAUTION: Use a fender cover (special tool) to avoid damaging painted surfaces. Unplug the wiring connectors carefully while holding the connector portion to […]

Categories
Body

nsxb20061a.pdf

Disassembly UPPER FRAME BUMPER BRACKET SIDE FRAME BUMPER SKIRT LICENSE PLATE SUPPORT BUMPER BEAM LEFT ABSORBER UPPER PLATE BUMPER RIGHT ABSORBER CENTER LOWER STAY Rear Bumper Attachments nsxb20061a (57 kB)

Categories
Electrical

nsxb23133a.pdf

Vehicle Speed Sensor (VSS) Replacement 1. Disconnect the 3-P connector from the vehicle speed sensor (VSS). 3-P CONNECTOR MOUNTING BOLTS 2. Remove the mounting bolts and the VSS, then take out the VSS assembly. NOTE: The VSS drive link is a very small part, be careful not to lose it. 3. Install in the reverse […]