Replacement
CAUTION: To prevent damage, place the roof on an
appropriate pad.
1. Remove the roof.
2. Remove the roof front trim and roof side trim (see
page 20-82).
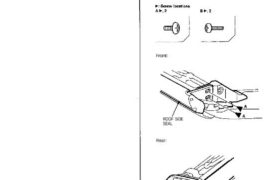
3. Remove the screws from each end of the roof side
seal.
Front:
ROOF SIDE
SEAL
Rear:
ROOF SIDE
SEAL
Roof
4. Remove the bonded portion of the roof side seal
from one end, then pull the seal away from the roof
side retainer, and remove the bonded portion from
the other end.
NOTE:
• If the old roof side seal is to be reinstalled, take
care not to damage it.
• If the roof side seal is damaged, replace it with
new one.
• When removing the bonded portions of each
roof side seal, remove them gradually.
Rear:
ROOF SIDE
RETAINER
ROOF SIDE
SEAL
BONDED
PORTION
Front:
ROOF SIDE
SEAL BONDED
PORTION
5. Remove the screws, then remove the roof side
retainer.
Screw locations, 3
ROOF SIDE
RETAINER
6. Scrape the old sealant and EPT sealer from the roof
bonding surfaces with a putty knife.
NOTE: Do not scrape down to the painted surfaces
of the roof.
7. Clean the roof bonding surfaces with a sponge
dampened in alcohol.
NOTE: After cleaning, keep oil, grease and water
from getting on the surface.
8. If the old roof side retainer is to be reinstalled, use a
putty knife to scrape off all traces of old sealant and
the EPT sealer, then clean the roof side retainer sur-
face with alcohol where new sealant and EPT sealer
are to be applied.
ROOF SIDE
RETAINER
Roof
Roof Side Seal/Retainer Replacement
9. If the old roof side retainer is to be reinstalled, glue
the new EPT sealer to it as shown.
NOTE: Be careful not to touch the roof side retainer
where the EPT sealer will be applied.
EPT SEALER
Length: 445 mm (17.5 in)
Width: 10 mm (0.39 in)
Thickness: 10 mm (0.39 in)
EPT SEALER
Length: 15 mm (0.59 in)
Width: 25 mm (0.98 in)
Thickness: 5 mm (0.2 in)
EPT SEALER
Length: 75 mm (3.0 in)
Width: 10 mm (0.39 in)
Thickness: 3 mm (0.1 in)
10. If the old roof side seal is to be reinstalled, scrape
the old butyl tape from each end of it, then clean
each end with alcohol. Glue the new butyl tape on
each end as shown.
Butyl tape thickness: 0.5 mm (0.02 in)
BUTYL
TAPE
ROOF SIDE
SEAL
(Front portion)
15 mm
(0.59 in)
BUTYL
TAPE
ROOF SIDE
> SEAL
(Rear portion)
3 mm
(0.1 in)
20 mm
(0.79 in)
11. Install the roof side retainer.
NOTE:
• Be careful not to touch the roof side retainer
where sealant will be applied.
• Align each end of the roof side retainer with the
roof corner edges.
Screw locations, 3
Align.
Align. ROOF SIDE
RETAINER
12. Glue the new EPT sealer on the roof as shown.
EPT sealer thickness: 3.0 mm (0.12 in)
Front: EPT
SEALER
ROOF
20 mm
(0.79 in)
30 mm
(1.2 in)
10 mm
(0.39 in)
Rear:
ROOF SIDE
HOOK
EPT
SEALER
5 mm (0.2 in)
ROOF
20 mm
(0.79 in)
30 mm
(1.2 in)
3 mm
(0.1 in)
20 mm (0.79 in)
15 mm
(0.59 in)
ROOF SIDE
RETAINER
13. Apply new sealant to the roof and roof side retainer
as shown.
: Sealant locations
(Cemedine P/N 08712 – 0004, or equivalent)
4 – 6 mm
(0.16 – 0.25 in)
Front: SEALANT
ROOF SIDE
RETAINER
EPT
SEALER
5 mm (0.2 in)
min.
10 mm
(0.39 in)
min.
ROOF
20 – 30 mm
(0.79 – 1.2 in)
ROOF SIDE
HOOK
Rear:
5 mm (0.2 in)
min.
5 – 10 mm
(0.2 – 0.39 in)
20 – 30 mm
(0.79 – 1.2 in)
ROOF
EPT
SEALER
ROOF SIDE
RETAINER
14. Engage the lip of the roof side seal with the groove
of the roof side retainer as shown, then gently set
each end of the roof side seal down on the sealant.
NOTE:
• Do not press on the seal yet to make the adhe-
sive stick.
• Remove the separator from the butyl tape on
each end of the roof side seal.
Front:
ROOF SIDE
SEAL
BUTYL
TAPE
GROOVE
Rear:
ROOF SIDE
RETAINER SEALANT
BUTYL
TAPE
ROOF SIDE
SEAL
SEALANT ROOF SIDE
RETAINER
GROOVE LIP
Roof
Roof Side Seal/Retainer Replacement
15. Install the screws on each end of the roof side seal.
NOTE: Do not press on the seal yet to make the
adhesive stick.
4 x 0.7 mm
1.5 N-m (0.15 kg-m,
1.1 Ib-ft)
Front:
4 x 0.7 mm
1.5 N-m (0.15 kg-m,
1.1 Ib-ft)
ROOF SIDE
SEAL
Rear:
ROOF SIDE
SEAL
16. Install the side portion of the roof side seal into the
roof side retainer as shown.
NOTE:
• Do not press on the seal yet to make the adhe-
sive stick.
• After setting the lip at location install the roof
side seal while pushing the lip in the roof side
retainer with a rounded plastic spatula at loca-
tion
ROOF SIDE
SEAL
PLASTIC
SPATULA
ROOF SIDE
RETAINER
ROOF SIDE
SEAL
LIP
ROOF SIDE
RETAINER
17. Scrape or wipe the excess sealant off with a putty
knife or towel.
NOTE: To remove sealant from a painted surface or
the roof side seal, wipe with a soft shop towel
dampened with alcohol.
18. Let the roof stand for at least three hours after
installing the roof side seal.
19. Before installing the roof trim, install the roof on the
body, then check that the seal fits flush (see page
20-107).
If necessary, align the roof side seal by adjusting
the roof side lock unit (see page 20-106).
When you are satisfied that the seal fits properly,
press on the seal to make the adhesive stick.
20. Check that the door glass contacts the seal evenly
(see page 20-109).
21. Check for water leaks (see page 20-110).
22. Remove the roof, then install the roof trim (see
page 20-82).