Categories
Construction & Function

nsxb05011a.pdf

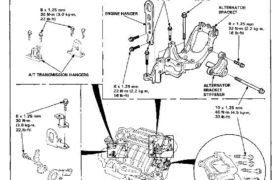
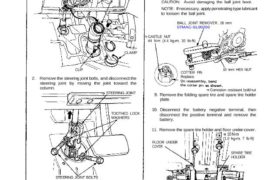
Installation Additional Torque Value Specifications: NOTE: For manifold replacement, refer to section 9. Engine Removal/Installation Engine Removal/Installation Installation Engine Installation: Install the engine in the reverse order of removal. Reinstall the mount bolts/nuts in the following sequence, failure to follow these procedures may cause excessive noise and vibration, and reduce bushing life. 1. Install the […]

Categories
Steering

nsxd17064a.pdf

Power Steering Gearbox Removal/Installation NOTE: Before removing the steering gearbox, make sure the front wheels are straight ahead. 1. Remove the steering joint cover. STEERING JOINT COVER CLAMP CLIP 2. Remove the steering joint bolts, and disconnect the steering joint by moving the joint toward the STEERING JOINT column. STEERING JOINT BOLTS 22 N.m (2.2 […]

Categories
Specifications

nsxb03004a.pdf

Engine Lubrication — Section 8 Standards and Service Limits Cooling — Section 10 M/T: Manual Transmission A/T: Automatic Transmission Attachments nsxb03004a (50 kB)

Categories
Electrical

nsxb23189a.pdf

Headlight Relay Test 1. Remove the headlight relay from the under-hood fuse/relay box. 2. Check continuity at the relay terminals. • There should be continuity between the C and D terminals. • There should be continuity between the A and B terminals when power and ground are connect- ed to the C and D terminals. […]

Categories
Uncategorized

nsx01index.pdf

General Information Chassis and Paint Codes ’91 Model U.S. Model 1−2. . . . . . . . . . . . . . . . . . . . . . . . . . . . . . . . . . . . Canada Model 1−3. . . . . . . […]

Categories
Electrical

nsxb23282a.pdf

Rear Window Defogger Component Location Index SRS components are located in this area. Review the SRS component locations, precautions, and procedures in the SRS section 24 before performing repairs or ser- vice. REAR WINDOW DEFOGGER TIMER CIRCUIT (In the integrated control unit) REAR WINDOW DEFOGGER Function Test, page 23-288 UNDER-DASH FUSE BOX REAR WINDOW DEFOGGER […]

Categories
Cooling

nsxb10011a.pdf

Inspection Replacement 1. Remove the timing belt (see page 6-15) (’91-’93) or (’94-’96). 2. Check that the water pump pulley turns counterclock- wise. 3. Check for signs of seal leakage. NOTE: A small amount of “weeping” from the bleed hole is normal. Turns counterclockwise BLEED HOLEBLEED HOLE 1. Remove the timing belt (see page 6-15 […]

Categories
Fuel & Emissions

nsxb11058a.pdf

Troubleshooting How to Read Flowcharts A flowchart is designed to be used from start to final repair. It’s like a map showing you the shortest distance. But beware: if you go off the “map” anywhere but a “stop” symbol, you can easily get lost. Describes the conditions or situation to start a troubleshooting flowchart. Asks […]

Categories
Cylinder Head & Valve Train

nsxd06042a.pdf

SEAT WIDTH 2. Carefully grind a 45° seat, removing only enough material to ensure a smooth and concentric seat. 3. Bevel the upper edge of the seat with the 30° stone and the lower edge of the seat with the 60° stone. Check width of seat and adjust accordingly. 4. Make one more very light […]

Categories
Driveshafts

nsxb16008a.pdf

Driveshafts Reassembly Outboard joint side NOTE: Wrap the splines with vinyl tape to prevent damage to the boot. 1. Install the outboard boot to the driveshaft, then remove the vinyl tape. OUTBOARD BOOT VINYL TAPE 2. Install the set ring into the driveshaft groove. 3. Install the spider on the driveshaft by aligning the marks […]