Additional Torque Value Specifications:
NOTE: For manifold replacement, refer to section 9.
Engine Removal/Installation
Engine Removal/Installation
Installation
Engine Installation:
Install the engine in the reverse order of removal. Reinstall
the mount bolts/nuts in the following sequence, failure to
follow these procedures may cause excessive noise and
vibration, and reduce bushing life.
1. Install the rear mount, then tighten the bolts on the
transmission side.
NOTE: Do not tighten the mounting bolt.
MOUNTING BOLT
Replace.
REAR MOUNT
M/T: 12 x 1.25 mm
105 N-m (10.5 kg-m, 76 Ib-ft)
A/T: 10 x 1.25 mm
60 N-m (6.0 kg-m, 43 Ib-ft)
2. Install the front mount, then tighten the bolts in the
numbered sequence as shown
FRONT MOUNT
12 x 1.25 mm
77 N-m (7.7 kg-m,
56 Ib-ft)
Replace.
10 x 1.25 mm
60 N-m (6.0 kg-m, 43 Ib-ft)
CORROSION RESISTANT BOLT/NUT
3. Install the subframe, then tighten the subframe-to-
body mounting bolts (see section 20).
NOTE: Align the bolt holes of the beam brackets
and body with a tapered punch.
GUIDE HOLE
(BODY)
GUIDE HOLE
(SIDE BEAM)
TAPERED PUNCH
4. Install the transmission mount, then tighten the bolts
on the transmission side.
NOTE: Do not tighten the mounting bolt.
10 x 1.25 mm
60 N-m (6.0 kg-m,
43 Ib-ft)
MOUNTING
BOLT
TRANSMISSION
MOUNT
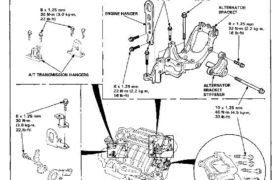
5. Install the side engine mount, then tighten the bolts
in the numbered sequence as shown ( – ),
12 x 1.26 mm
73 N·m (7.3 kg-m,
53 Ib-ft)
Replace.
12 x 1.25 mm
95 N·m (9.5 kg-m,
69 Ib-ft)
SIDE ENGINE
MOUNT
6. Tighten the transmission mount mounting bolt.
MOUNTING BOLT
12 x 1.25 mm
95 N·m (9.5 kg-m, 69 Ib-ft)
7. Tighten the rear mount mounting bolt.
MOUNTING BOLT
12 x 1.25 mm
77 N·m (7.7 kg-m, 56 Ib-ft)
Replace.
Check that the spring clip on the end of each
driveshaft clicks into place.
CAUTION: Use new spring clips.
Bleed air from the cooling system (see page 10-5).
Bleed air from the brake lines {see section 19).
Check the clutch pedal free play (see section 12).
Adjust the clutch guide assemblies when disas-
sembling clutch (see section 12).
Check that the transmission shifts into gear
smoothly.
Adjust the alternator belt (see section 23).
Adjust the A/C compressor belt (see section 22).
Clean battery posts and cable terminals with
sandpaper, assemble, then apply grease to pre-
vent corrosion.
Inspect for fuel leakage (see section 11).
After assembling the fuel line parts, turn on
the ignition switch (do not operate the starter)
so that the fuel pump operates for approxi-
mately two seconds and the fuel line pressu-
rizes. Repeat this operation two or three times
and check for fuel leakage at any point in the
fuel line.
Check and adjust wheel alignment (see section 18).
Refill the engine with engine oil (see page 8-4 (’91-’92
Models), (’93-Model),or (’94-’96 Models).
Refill the transmission with oil/fluid (see section
13 or 14).