Categories
Brakes & ABS

nsxb19013a.pdf

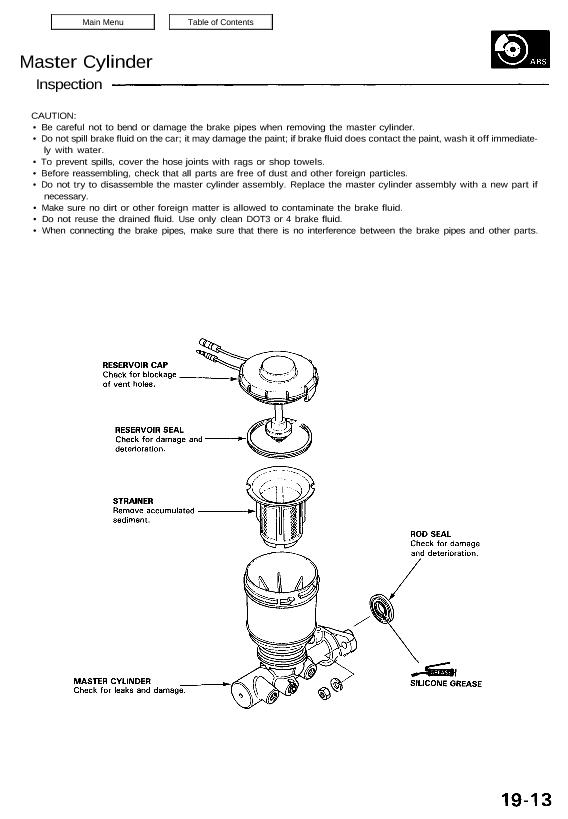
Master Cylinder Inspection CAUTION: • Be careful not to bend or damage the brake pipes when removing the master cylinder. • Do not spill brake fluid on the car; it may damage the paint; if brake fluid does contact the paint, wash it off immediate- ly with water. • To prevent spills, cover the hose […]

Categories
Steering

nsxb17006a.pdf

System Description Energy-absorbing Steering Column/Wheel Both the steering column and steering wheel are designed to absorb impact energy during a collision. Steering Wheel The steering wheel absorbs the energy of a collision through the deformation of the spoke portion. Should the impact absorbing capacity of the column side decrease due to the deformation of the […]

Categories
Suspension

nsxe18007a.pdf

Front Wheel Alignment Adjusting Procedure Adjustment NOTE: NSX four wheel alignment requires the use of equipment designed specifically for four wheel independent suspensions and capable of immediate feedback. The NSX suspension can be adjusted for camber, caster (front only), and toe. However, because each of them relates to the other, the camber changes when the […]

Categories
Suspension

nsxd18015a.pdf

Hub Replacement NOTE: Use only genuine Honda wheel weights for aluminum wheels. Non-genuine wheel weights may corrode and damage the aluminum wheels. Remove the center cap by prying it out with a flat screwdriver. Use a rag at the point you are going to pry, because aluminum alloy wheels can be easily damaged. Avoid damage […]

Categories
Specifications

nsxb03008a.pdf

Standards and Service Limits Automatic Transmission — Section 14 * Clutch end plate diameter: 1st: 116 mm (4.57 in) 1st-hold, 2nd, 3rd and 4th: 120 mm (4.72 in) Automatic Transmission (cont’d) — Section 14 Main Menu Table of Contents — Automatic Transmission (cont’d) — Section 14 Unit of length: mm (in) Shift fork shaft valve […]

Categories
Electrical

nsxb23306a.pdf

Cruise Control Main Switch Test 1. Remove the dashboard lower cover (see page 23-305). 2. If necessary, remove the dashboard lower pad. 3. Disconnect the 20-P connector, and check for conti- nuity between the terminals, in each switch posi- tion, according to the table. CRUISE CONTROL SWITCH 20-P CONNECTOR View from wire side Attachments nsxb23306a […]

Categories
Electrical

nsxf23088a.pdf

Ignition system Component Location Index IGNITION TIMING CONTROL SYSTEM Troubleshooting, section 11 Inspection and setting, page 23-91 Description, page 23-89 RADIO NOISE CONDENSER Test, page 23-97 SPARK PLUGS (6) Inspection, page 23-96 TACHOMETER CONNECTOR (Engine revolution detected) CYL/CRANK SENSOR Troubleshooting, section 11 Replacement, section 5 IGNITION COILS (6) Removal, page 23-94 Test, page 23-95 IGNITER […]

Categories
Electrical

nsxe23234a.pdf

Stereo Sound System Rear Speaker Replacement 1. Remove the center armrest and upper bulkhead panel (see section 20). 2. Remove the bulkhead panels. 3. Remove the 5 screws, then disconnect the 2-P con- nector from the floor wire harness. CENTER BULKHEAD PANEL R. BULKHEAD PANEL 2-P CONNECTOR L. BULKHEAD PANEL 4. Remove the 4 screws, […]

Categories
Electrical

nsxb23326a.pdf

Security Alarm System Ignition Key Switch Test SRS components are located in this area. Review the SRS component locations, precautions, and procedures in the SRS section 24 before performing repairs or ser- vice. 1. Remove the dashboard lower cover, and disconnect the connectors. DASHBOARD LOWER COVER 2. Disconnect the 8-P connector from the floor wire […]

Categories
Heating, Ventilation and Air Conditioning

nsxb22054a.pdf

Climate Control Unit Replacement SRS components are located in this area. Review the SRS component locations, precautions, and procedures in the SRS section 24 before performing repairs or service. 1. Remove the clock (see section 23). 2. Remove the two screws behind the clock, then remove the center air vent (see section 20). 3. Take […]