Categories
Fuel & Emissions

nsxd11092a.pdf

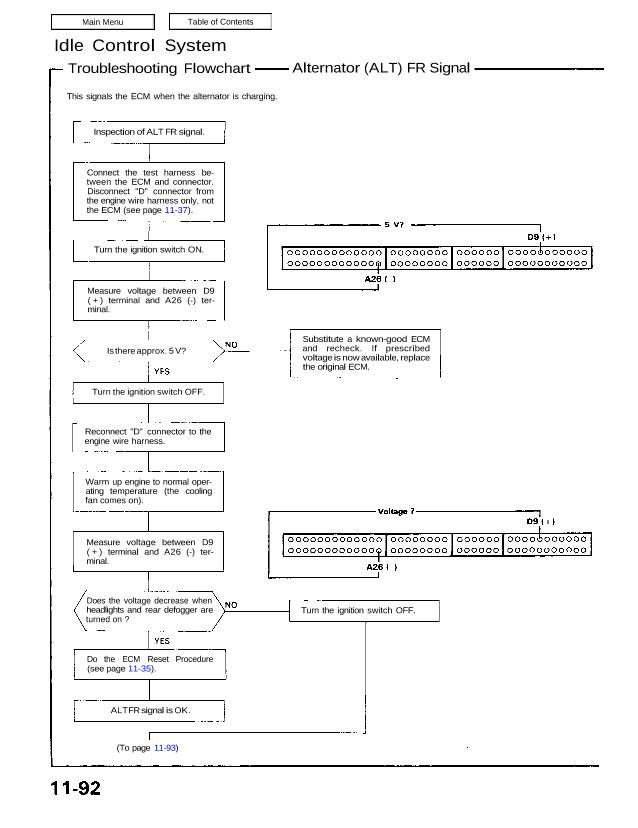
Idle Control System Troubleshooting Flowchart Alternator (ALT) FR Signal This signals the ECM when the alternator is charging. Inspection of ALT FR signal. Connect the test harness be- tween the ECM and connector. Disconnect “D” connector from the engine wire harness only, not the ECM (see page 11-37). Turn the ignition switch ON. Measure voltage […]

Categories
Electrical

nsxb23263a.pdf

Troubleshooting NOTE: The numbers in the table show the troubleshooting sequence. Main Menu Table of Contents ¡- Troubleshooting NOTE: The numbers in the table show the troubleshooting sequence Item to be inspected x U O ‘i` Í .g g J: ↼ î O gg Ë и г ∙⊏ 2 ö .I: г æ ⋮ д […]

Categories
Body

nsxb20050a.pdf

Dashboard Component Removal/Installation Clock and center air vent removal: NOTE: Take care not to scratch the dashboard and related parts. 1. Remove the clock by pulling it backward from the center air vent, then disconnect the connector. 2. Remove the center air vent mounting screws. 4. To make a gap between the center air vent […]

Categories
Manual Transmission

nsxe13006a.pdf

Transmission Assembly Removal Make sure lifts are placed properly, and hoist brackets are attached to correct position, (see page 1-6). CAUTION: Use fender covers to avoid damaging painted surfaces. 1. Check and record the rear camber. (see section 18). 2. Disconnect the battery negative (-), and positive (+) cables from the battery. 3. Drain transmission […]

Categories
Automatic Transmission

nsxd14110a.pdf

CAP SPRING VALVE VALVE BODY ROLLER CAP VALVE BODY SPRING SEAT ROLLER SPRING VALVE VALVE BODY Valve Assembly NOTE: Coat all parts with ATF before assembly. Set the spring in the valve and install it in the valve body. Push the spring in with a screwdriver then in- stall the spring seat. SPRING Install the […]

Categories
Body

nsxb20059a.pdf

Disassembly BUMPER BRACKET WASHER TANK ABSORBER GUARD BUMPER FRONT SPOILER MOUNTING BOLT (13) BUMPER BEAM UPPER SEAL FOG LAMP BRACKET TOWING HOOK COVER BUMPER LOWER EXTENSION SIDE FRAME SIDE PLATE UPPER PLATE HEADLIGHT LID UPPER PLATE UPPER FRAME BUMPER SKIRT Front spoiler installation: SKIRT FRONT SPOILER PLATE NUT LICENSE PLATE TRIM FRONT SPOILER SKIRT COVER […]

Categories
Electrical

nsxd23278a.pdf

Rear Window Defogger Switch Light Bulb Replacement 1. Remove the steering column lower and upper covers. 2. Remove the four screws from the combination switch. 3. Remove the rear window defogger switch (see previous page). 4. Remove the rear window defogger switch bulbs. BULBS (0.91 W) REAR WINDOW DEFOGGER SWITCH Relay Test 1. Remove the […]

Categories
Electrical

nsxb23095a.pdf

Ignition Coil Test 1. With the ignition switch OFF, remove the ignition coil. 2. Using an ohmmeter, measure resistance between the terminals. Replace the coil if the resistance is not within specifications. NOTE: Resistance will vary with the coil temperature; specification is at 77°F (25°C). Primary Winding Resistance (Between the A and B terminals): 0.9—1.1 […]

Categories
Electrical

nsxb23259a.pdf

Door Mirror Test 1. Remove the door panel, and carefully remove the plastic cover (see section 20). 2. Disconnect the power mirror 3-P connector. 3. Test actuator operation: TILT UP: Connect battery power to the No. 3 terminal and ground to the No. 2 terminal. TILT DOWN: Connect battery power to the No. 2 terminal […]

Categories
Electrical

nsxe23272a.pdf

Rear Window Defogger Troubleshooting NOTE: The numbers in the table show the troubleshooting sequence. Main Menu Table of Contents Rear Window Defogger Troubleshooting NOTE: The numbers in the table show the troubleshooting sequence. Item to be inspected (in the engine compartment fuse/relay box] Blown No. 11 (40A) fuse (in the integrated control unit) (in the […]