Categories
Clutch

nsxb12012a.pdf

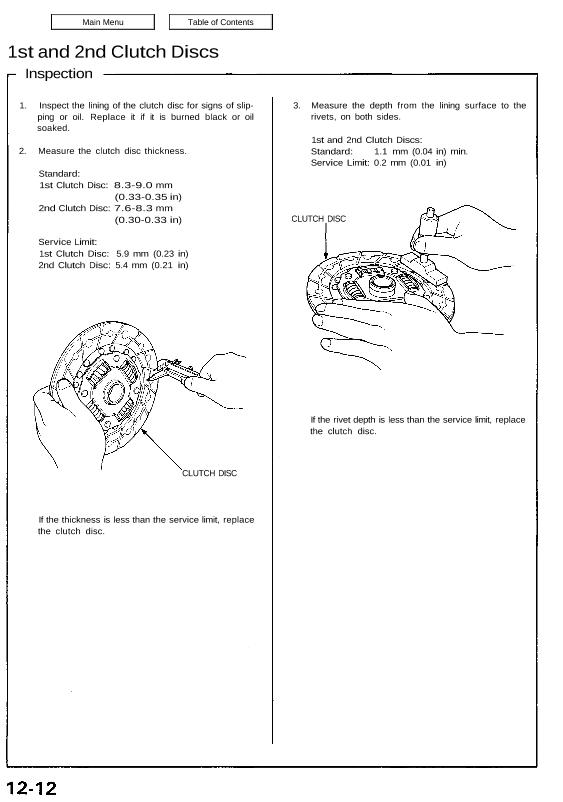
1st and 2nd Clutch Discs Inspection 1. Inspect the lining of the clutch disc for signs of slip- ping or oil. Replace it if it is burned black or oil soaked. 2. Measure the clutch disc thickness. Standard: 1st Clutch Disc: 8.3-9.0 mm (0.33-0.35 in) 2nd Clutch Disc: 7.6-8.3 mm (0.30-0.33 in) Service Limit: 1st […]

Categories
Fuel & Emissions

nsxd11151a.pdf

Positive Crankcase Ventilation (PCV) System Description The Positive Crankcase Ventilation (PCV) system is designed to prevent blow-by gas from escaping to the atmosphere. The PCV valve contains a spring-loaded plunger. When the engine starts, the plunger in the PCV valve is lifted in proportion to intake manifold vacuum and the blow-by gas is drawn directly […]

Categories
Steering

nsxd17005a.pdf

Energy-absorbing Steering Column/Wheel Both the steering column and steering wheel are designed to absorb impact energy during a collision. Steering Wheel The steering wheel absorbs the energy of a collision through the deformation of the spoke portion. Should the impact absorbing capacity of the column side decrease due to the deformation of the vehicle body […]

Categories
Body

nsxb20067a.pdf

Opener Cables Replacement 1. Remove the openers and latches, then disconnect the opener cables. 2. Remove the fuel lid latch. 3. Remove the opener cables by removing the clips as shown, NOTE: Before pulling out the opener cables, tie a string to the opener cable so you can pull it back in later. Take care […]

Categories
Body

nsxb20060a.pdf

Rear Bumper Replacement 1. Fold the trunk floor trim panel forward, and remove the bumper mounting nuts. 2. Remove the bumper mounting nuts on each side from under the trunk floor. 3. Lower the inner fender. 4. Remove the skirt mounting bolts and under covers from inside the rear fender on each side. 5. Remove […]

Categories
Body

nsxb20047a.pdf

Carpet Replacement SRS components are located in this area. Review the SRS component locations, precautions, and procedures in the SRS section (24) before performing repairs or service. DASHBOARD INSIDE SCREW CARPET HOOK (3) AIR VENT AM VENT AIR DUCT CUPS FLOOR CARPET CONSOLE CARPET CONSOLE CARPET SRS UNIT SCREW (cont’d) 1. Remove: Seats (see page […]

Categories
Maintenance

nsxb04004a.pdf

Follow the Normal Conditions Maintenance Schedule if the severe driving conditions specified in the Severe Conditions Maintenance Schedule on pages 4-6 and 4-7 do not apply. SECTION and PAGE 8-4. 8-5 (’91-92), (’92), or (’94-’96) 8-4, 10-5 (’91-92), (’92), or (’94-’96) 11-149 6-9 (’91-’93), or (’94-’96) 23-96 (’91) or (’92-’96) 6-15, 10-11 23-109 11-138(’91-’92), (’93),or […]

Categories
Fuel & Emissions

nsxb11148a.pdf

Intake Air System System Description The system supplies air for all engine needs. It consists of the intake air pipe, Air Cleaner (ACL), intake air duct, throttle body, and intake manifold. A resonator in the intake air duct provides additional silencing as air is drawn into the system. IAB CONTROL SOLENOID VALVE To No. 5 […]

Categories
Electrical

nsxb23281a.pdf

Motor Test CAUTION: Be careful not to damage the seats, the interior trim or the body. 1. Remove the power seat, then disconnect the 2-P connector from the slide motor. 2. Remove the two screws, then remove the power seat switch from the power seat. 3. Disconnect the 5-P connector from the power seat switch […]

Categories
Fuel & Emissions

nsxd11043a.pdf

Troubleshooting Flowchart Engine Control Module (ECM) Malfunction Indicator Lamp (MIL) never comes on (even for two se- conds) after ignition is turned on. Is the low oil pressure light on? Turn the ignition switch OFF. Connect the test harness between the ECM and connectors (see page 11-37). Connect A13 terminal to body ground. Turn the […]