Carpet
Replacement
SRS components are located in this area. Review the SRS component locations, precautions, and procedures in the SRS
section (24) before performing repairs or service.
DASHBOARD
INSIDE SCREW
CARPET
HOOK
(3)
AIR VENT
AM VENT
AIR DUCT
CUPS
FLOOR
CARPET
CONSOLE
CARPET
CONSOLE CARPET
SRS UNIT
SCREW
(cont’d)
1. Remove:
Seats (see page 20-39(’93-’96), 38(’91-’92)
Footrest
Under-dash fuse box lid (see page 20-38(’93-’96),37(’91-’92)
Side sill trim (see page 20-38 (’93-’96), 37(’91-’92)
Side sill pad (see page 20-38(’93-’96), 37(’91-’92)
Rear side trim panel (see page 20-38(’93-’96), 37(’91-’92)
Center armrest (see page 20-49(’94-’96)(’91-’93)
Center console panel (see page 20-52(’94-’96)(’91-’93)
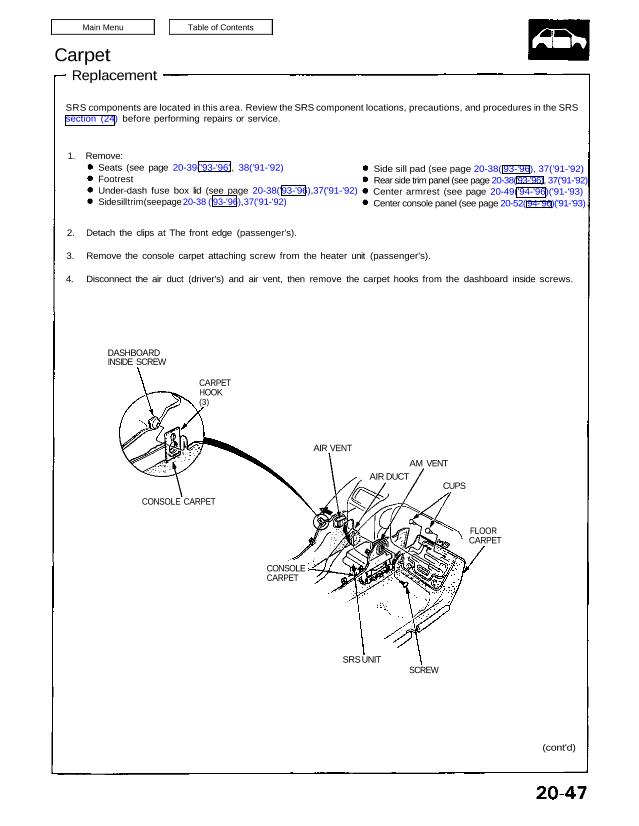
2. Detach the clips at The front edge (passenger’s).
3. Remove the console carpet attaching screw from the heater unit (passenger’s).
4. Disconnect the air duct (driver’s) and air vent, then remove the carpet hooks from the dashboard inside screws.
Replacement
SRS components are located in this area. Review the SRS component locations, precautions, and procedures in the SRS
section (24) before performing repairs or service.
DASHBOARD
INSIDE SCREW
CARPET
HOOK
(3)
AIR VENT
AM VENT
AIR DUCT
CUPS
FLOOR
CARPET
CONSOLE
CARPET
CONSOLE CARPET
SRS UNIT
SCREW
(cont’d)
1. Remove:
Seats (see page 20-39(’93-’96), 38(’91-’92)
Footrest
Under-dash fuse box lid (see page 20-38(’93-’96),37(’91-’92)
Side sill trim (see page 20-38 (’93-’96), 37(’91-’92)
Side sill pad (see page 20-38(’93-’96), 37(’91-’92)
Rear side trim panel (see page 20-38(’93-’96), 37(’91-’92)
Center armrest (see page 20-49(’94-’96)(’91-’93)
Center console panel (see page 20-52(’94-’96)(’91-’93)
2. Detach the clips at The front edge (passenger’s).
3. Remove the console carpet attaching screw from the heater unit (passenger’s).
4. Disconnect the air duct (driver’s) and air vent, then remove the carpet hooks from the dashboard inside screws.
Carpet
Replacement (cont’d)
5. Pull up the retainers, then remove the floor carpets.
6. Remove the console carpets.
FOOTREST RETAINERS
FOOTREST MOUNTING
BOLTS FLOOR CARPETS
SEAT HARNESSES
7. Installation is the reverse of the removal procedure.
NOTE:
• Take care not to damage, wrinkle or twist the carpets.
• Make sure the air vents are connected, into the heater unit and air duct.
• Make sure the seat harnesses are routed correctly.
CONSOLE
CARPETS
SRS UNIT
RETAINERS