Categories
Fuel & Emissions

nsxd11102a.pdf

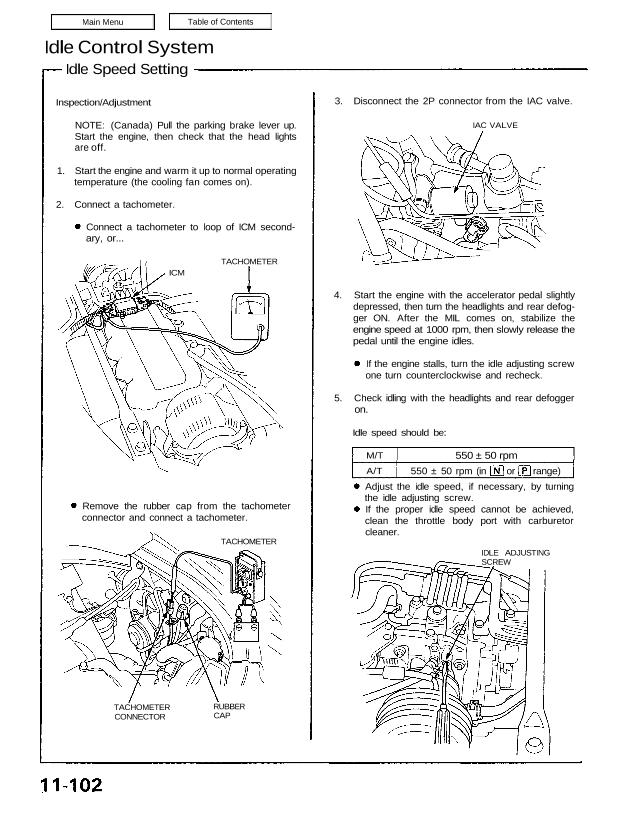
Idle Control System Idle Speed Setting Inspection/Adjustment NOTE: (Canada) Pull the parking brake lever up. Start the engine, then check that the head lights are off. 1. Start the engine and warm it up to normal operating temperature (the cooling fan comes on). 2. Connect a tachometer. Connect a tachometer to loop of ICM second- […]

Categories
Heating, Ventilation and Air Conditioning

nsxb22012a.pdf

Troubleshooting Self-diagnosis Circuit Check The Automatic Climate Control System has a built-in self diagnosis feature. To run it, turn the ignition switch ON (II), then turn the fan speed dial to the AUTO position. Set the temperature control dial to 60° F(18°C), then gradually move0 the dial up the temperature range to 90°F (32°C). At […]

Categories
Electrical

nsxb23201a.pdf

Ceiling Light Test Coupe: Check for continuity between the terminals in each switch position according to the table. View from terminal side Ceiling/Courtesy/Trunk Lights Ceiling Light Test NSX-T (open top): Check for continuity between the terminals in each switch position according to the table. Attachments nsxb23201a (60 kB)

Categories
Electrical

nsxe23173a.pdf

Lighting/Turn Signal Switch Test 1. Remove the dashboard lower cover and dashboard center panel. 2. If necessary, remove the knee bolster. 3. Disconnect the 16-P connector from the floor wire harness. 4. Check for continuity between the terminals in each switch position according to the table. KNEE BOLSTER DASHBOARD CENTER PANEL Lighting/Dimmer/Passing Switch Turn Signal […]

Categories
Body

nsxb20013a.pdf

Assembly 2. Roll the glass up and down to see if it moves freely without binding. Also make sure that there is no clearance between the glass and upper weather- strip when the glass is closed. Adjust the position of the glass as necessary (see pages 20-14 to 18(’93-’96) 20-13 to 17(’91-’92) 3. Attach the […]

Categories
Suspension

nsxd18044a.pdf

Rear Damper Installation (cont’d) 6. Install the rear damper bar on the stud bolts of damper as shown. 7. Loosely tighten the new self-locking nuts. REAR DAMPER BAR SELF-LOCKING NUT 10 x 1.25 mm 54 N.m (5.4 kg-m. 39 Ib-ft) Corrosion resistant bolt/nut 8. Secure the damper mounting nut. 9. Secure the damper assembly to […]

Categories
Clutch

nsxb12016a.pdf

Mid Plate Guide Replacement (cont’d) 5. Install the new mid plate guide with the screw installed. MII D PLATE GUIDE SCREW MI D PLATE 6. Install the washer, spring and guide collar, then remove the screw. GUIDE COLLAR SCREW SPRI NG WASHER MID PLATE GUIDE Install as shown. 7. Initialize the mid plate guides after […]

Categories
Body

nsxb20023a.pdf

Windshield Removal CAUTION: Wear gloves to remove and install the windshield. Use covers to avoid damaging any surfaces. 1. To remove the windshield, first remove the: Seats (see page 20-39(’93-’96)(’91-’92) Rearview mirror (see page 20-46(’93-’96)(’91-’92) Sunvisors (see page 20-38(’93-’96),37(’91-’92) Front pillar retainer (see page 20-21(’93-’96),20(’91-’92) Front wiper and air scoop (see section 23) Front pillar […]

Categories
Body

nsxe20043a.pdf

Dashboard/Center Armrest Component Removal/Installation SRS wire harnesses are routed near the dashboard. CAUTION: All SRS electrical wiring harnesses are covered with yellow outer insulation. Before disconnecting the SRS wire harness, install the short connector on the airbag (see page 23-323). Replace the entire effected SRS harness assembly if it has an open circuit or damaged […]

Categories
Fuel & Emissions

nsxb11132b.pdf

Fuel Supply System Fuel Pressure Relieving Before disconnecting fuel pipes or hoses, release pres- sure from the system by loosening the 6 mm service bolt on top of the fuel filter. • Do not smoke while working on the fuel system. Keep open flames or sparks away from your work area. • Be sure to […]