Windshield
Removal
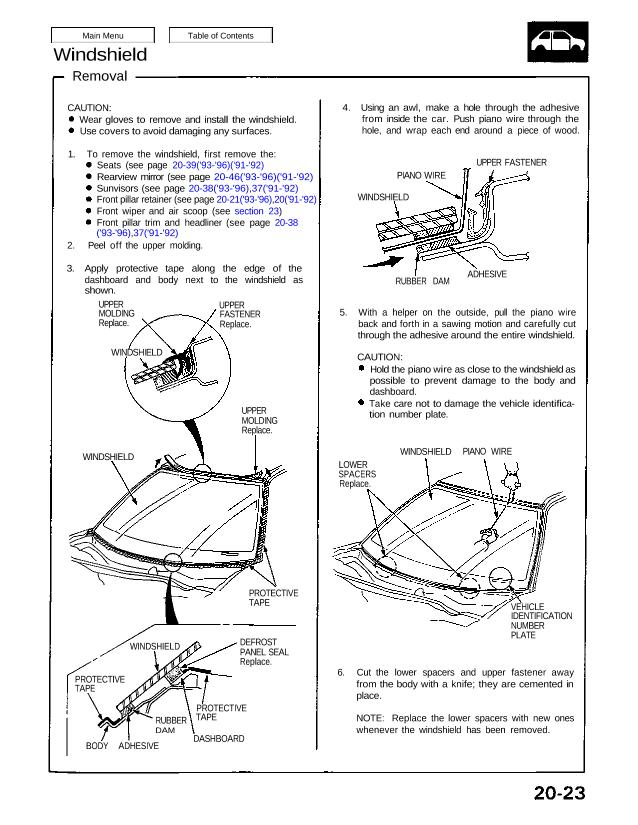
CAUTION:
Wear gloves to remove and install the windshield.
Use covers to avoid damaging any surfaces.
1. To remove the windshield, first remove the:
Seats (see page 20-39(’93-’96)(’91-’92)
Rearview mirror (see page 20-46(’93-’96)(’91-’92)
Sunvisors (see page 20-38(’93-’96),37(’91-’92)
Front pillar retainer (see page 20-21(’93-’96),20(’91-’92)
Front wiper and air scoop (see section 23)
Front pillar trim and headliner (see page 20-38
(’93-’96),37(’91-’92)
2. Peel off the upper molding.
3. Apply protective tape along the edge of the
dashboard and body next to the windshield as
shown.
UPPER
MOLDING
Replace.
UPPER
FASTENER
Replace.
WINDSHIELD
UPPER
MOLDING
Replace.
WINDSHIELD
PROTECTIVE
TAPE
WINDSHIELD DEFROSTPANEL SEAL
Replace.
PROTECTIVE
TAPE
BODY ADHESIVE
RUBBER
DAM
DASHBOARD
PROTECTIVE
TAPE
4. Using an awl, make a hole through the adhesive
from inside the car. Push piano wire through the
hole, and wrap each end around a piece of wood.
UPPER FASTENER
PIANO WIRE
WINDSHIELD
ADHESIVE
RUBBER DAM
5. With a helper on the outside, pull the piano wire
back and forth in a sawing motion and carefully cut
through the adhesive around the entire windshield.
CAUTION:
Hold the piano wire as close to the windshield as
possible to prevent damage to the body and
dashboard.
Take care not to damage the vehicle identifica-
tion number plate.
WINDSHIELD PIANO WIRE
LOWER
SPACERS
Replace.
VEHICLE
IDENTIFICATION
NUMBER
PLATE
6. Cut the lower spacers and upper fastener away
from the body with a knife; they are cemented in
place.
NOTE: Replace the lower spacers with new ones
whenever the windshield has been removed.
Removal
CAUTION:
Wear gloves to remove and install the windshield.
Use covers to avoid damaging any surfaces.
1. To remove the windshield, first remove the:
Seats (see page 20-39(’93-’96)(’91-’92)
Rearview mirror (see page 20-46(’93-’96)(’91-’92)
Sunvisors (see page 20-38(’93-’96),37(’91-’92)
Front pillar retainer (see page 20-21(’93-’96),20(’91-’92)
Front wiper and air scoop (see section 23)
Front pillar trim and headliner (see page 20-38
(’93-’96),37(’91-’92)
2. Peel off the upper molding.
3. Apply protective tape along the edge of the
dashboard and body next to the windshield as
shown.
UPPER
MOLDING
Replace.
UPPER
FASTENER
Replace.
WINDSHIELD
UPPER
MOLDING
Replace.
WINDSHIELD
PROTECTIVE
TAPE
WINDSHIELD DEFROSTPANEL SEAL
Replace.
PROTECTIVE
TAPE
BODY ADHESIVE
RUBBER
DAM
DASHBOARD
PROTECTIVE
TAPE
4. Using an awl, make a hole through the adhesive
from inside the car. Push piano wire through the
hole, and wrap each end around a piece of wood.
UPPER FASTENER
PIANO WIRE
WINDSHIELD
ADHESIVE
RUBBER DAM
5. With a helper on the outside, pull the piano wire
back and forth in a sawing motion and carefully cut
through the adhesive around the entire windshield.
CAUTION:
Hold the piano wire as close to the windshield as
possible to prevent damage to the body and
dashboard.
Take care not to damage the vehicle identifica-
tion number plate.
WINDSHIELD PIANO WIRE
LOWER
SPACERS
Replace.
VEHICLE
IDENTIFICATION
NUMBER
PLATE
6. Cut the lower spacers and upper fastener away
from the body with a knife; they are cemented in
place.
NOTE: Replace the lower spacers with new ones
whenever the windshield has been removed.