Categories
Body

nsxb20022a.pdf

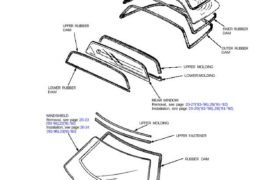
Windshield, Rear Window, Rear Hatch Glass Index ( ): Quantity of parts used. REAR HATCH GLASS Removal. see page 20-33 (’93-’96),32(’91-’92) Installation, see page 20-33 (’93-’96),32(’91-’92) UPPER RUBBER DAM MOLDING Replacement, see page 20-36(’93-’96), 35(’91-’92) INNER RUBBER DAM OUTER RUBBER DAM UPPER MOLDING LOWER MOLDING LOWER RUBBER DAM WINDSHIELD Removal, see page 20-23 (’93-’96),22(’91-’92) Installation, […]

Categories
Heating, Ventilation and Air Conditioning

nsxb22062a.pdf

Outside Air Temperature Sensor Removal Remove the screw, disconnect the connector, and remove the outside air temperature sensor. Be careful not to damage the front grille and front bumper. OUTSIDE AIR TEMPERATURE SENSOR Test Compare the resistance reading between the terminals of the outside air temperature sensor with specifica- tions shown in the following graph: […]

Categories
Electrical

nsxd23303a.pdf

Actuator Cable Adjustment 1. Check that the actuator cable moves smoothly with no binding or sticking. 2. Start the engine and warm it up to normal operating temperature (radiator fan comes on). 3. Measure how far the output linkage moves before the engine speed starts to increase. Make sure you begin with the linkage at […]

Categories
Cooling

nsxb10010a.pdf

Water Pump Illustrated Index NOTE: Use new O-rings and new special bolts when reassembling. 8 x 1.25 mm 22 N-m (2.2 kg-m 16 Ib-ft) ECT SWITCH 18 N-m (1.8 kg-m, 13 Ib-ft) ENGINE COOLANT TEMPERATURE (ECT) GAUGE SENDING UNIT 9 N-m (0.9 kg-m, 7 Ib-ft) Apply liquid gasket to the threads. BLEED BOLT 10 N-m […]

Categories
Electrical

nsxb23285a.pdf

Switch Replacement SRS components are located in this area. Review the SRS component locations, precautions, and procedures in the SRS section 24 before performing repairs or ser- vice. 1. Remove the dashboard lower cover, and disconnect the connectors. 2. Remove the dashboard lower pad. DASHBOARD LOWER COVER DASHBOARD LOWER PAD 3. Remove the tilt cover. […]

Categories
Fuel & Emissions

nsxe11016a.pdf

Troubleshooting Troubleshooting Guide NOTE: Across each row in the chart, the systems that could be sources of a symptom are ranked in the order they should be inspected starting with . Find the symptom in the left column, read across to the most likely source, then refer to the page listed at the top of […]

Categories
Heating, Ventilation and Air Conditioning

nsxb22077a.pdf

“DEF” Door Adjustment Connect the control rod to the clip. Turn this lever all the way clockwise and hold it there. Turn this lever clockwise and hold it against its stop. “HEAT” Door Adjustment Reposition gear 2 so this mark lines up with the mark . on gear 1 Loosen this screw in gear 2. […]

Categories
Electrical

nsxb23234a.pdf

Cigarette Lighter Relay Test 1. Remove the glove box (see section 20). 2. Disconnect the 4-P connector from the cigarette lighter relay (wire colors of 4-P connector: BLU/ GRN, YEL/RED, BRN/YEL, BLK). 3. Check continuity at the relay terminals. • There should be continuity between the C and D terminals. • There should be continuity […]

Categories
Brakes & ABS

nsxb19071a.pdf

Fail-Safe Relays/Motor Relay Inspection 1. Check for continuity between terminals and There should be no continuity. 2. Connect a 12 V battery across terminals and There should be continuity between terminals and Pulsers/Sensors Inspection 1. Check the pulser for chipped or damaged teeth. 2. Measure air gap between the sensor and pulser all the way […]

Categories
Body

nsxb20005a.pdf

Types and Materials of Exterior Resin Parts NOTE: A standard symbol is stamped on the underside of each resin part to show the type of material used. Example: HONDA >PP< NO. Part Name Headlight lid Front bumper Front and rear skirts Mirror Side sill panel Trunk ltd spoiler Rear bumper Fuel filler lid Washer Tank […]