Categories
Electrical

nsxb23091a.pdf

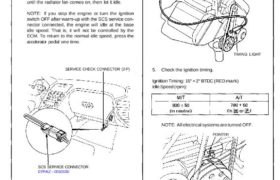
Ignition Timing Inspection SRS components are located in this area. Review the SRS component locations, precautions, and procedures in the SRS section 24 before performing repairs or service. 1. Pull out the service check connector located under the middle of the dash. Connect the BLU and BRN/ BLK terminals with the SCS service connector. 2. […]

Categories
Brakes & ABS

nsxb19043a.pdf

Wheel Sensor Signal Confirmation NOTE: Use the ALB checker (mode 0) to confirm pro- per wheel sensor operation. 1. Disconnect the 6-P inspection connector from the connector cover located under the glove box, and connect the 6-P inspection connector to the ALB checker. 07HAJ-SG0010B see page 19-2 for other applicable checkers. 2. Raise the car […]

Categories
Engine Block

nsxb07012a.pdf

Cylinder Block Inspection 1. Measure wear and taper in directions X and Y at three levels in each cylinder as shown. CYLINDER BORE SIZES (A or B) NOTE: To maintain proper piston clearance, match these letters with the letters on the pistons. The let- ters on the block read from left to right, No. 1 […]

Categories
Fuel & Emissions

nsxd11032a.pdf

Troubleshooting Troubleshooting Guide NOTE: Across each row in the chart, the systems that could be sources of a symptom are ranked in the order they should be inspected starting with . Find the symptom in the left column, read across to the most likely source, then refer to the page listed at the top of […]

Categories
General Info

nsxf01002a.pdf

Chassis and Paint Codes U.S. Model Vehicle Identification Number Transmission Number Paint Code Paint Code Color Engine Number Paint Code R-77 NH-547 NH-545M Formula Red Berlina Black Sebring Silver Metallic Vehicle Identification Number and Federal Motor Vehicle Safety Standard Certification Attachments nsxf01002a (93 kB)

Categories
Electrical

nsxb23245a.pdf

Front/Rear Speaker Replacement Front speaker: 1. Remove the door panel (see section 20). 2. Remove the door speaker assembly from the door panel by removing the five screws. DOOR SPEAKER ASSEMBLY Rear speaker: 1. Remove the speaker grille. 2. Remove the four screws, then disconnect the 2-P connector from the speaker. SPEAKER GRILLE 2-P CONNECTOR […]

Categories
Brakes & ABS

nsxe19062a.pdf

Hydraulic System Relieving Accumulator/Line Pressure Use the Bleeder T-Wrench before disassembling the parts shaded in the illustration. 1. Drain the brake fluid from the master cylinder and modulator reservoir thoroughly. 2. Remove the red cap from the bleeder on the top of the power unit. 3. Install the special tool on the bleeder screw and […]

Categories
Fuel & Emissions

nsxb11157a.pdf

Intake Air Bypass (IAB) Control Valve Testing CAUTION: Do not adjust the IAB control valve full-close screw. It was preset at the factory. 1. Check the IAB control valve shaft for binding or sticking. 2. Check the IAB control valve for smooth movement. 3. Check that of the IAB control valve is in close contact […]

Categories
Electrical

nsxd23106a.pdf

Charging System Alternator Overhaul NOTE: It is only necessary to separate the pulley, drive end housing and rotor when the front bearing needs replacement. Loosen the locknut with 10 mm and 22 mm wrenches to remove the pulley from the rotor. If necessary, use an impact wrench. TERMINAL INSULATOR END COVER BRUSH HOLDER 22 mm […]

Categories
General Info

nsxa01009a.pdf

Lift and Support Points Lift and Safety Stands CAUTION: • If ground clearance is inadequate to clear the shop lift, either: — Install rubber spacers on the coil springs to raise the car. Use the floor jack procedures to raise the car (page 1-10). or — Remove the chin spoiler. or — If you need […]