Category: Body
Categories
nsxb20038a.pdf
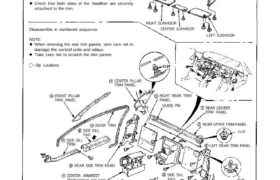
Headliner/lnterior Trim Replacement To remove the headliner, first remove the: Sunvisors Center pillar trim panels Front pillar trim panels Seats (see page 20-39(’93-’96) Ceiling light (see section 23) NOTE: When installing the headliner, be careful not to fold or bend it. Also, be careful not to scratch the body. Check that both sides of the […]
Categories
nsxb20084a.pdf
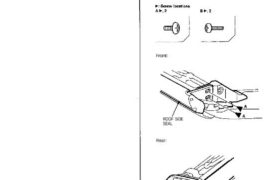
Roof Side Seal/Retainer Replacement CAUTION: To prevent damage, place the roof on an appropriate pad. 1. Remove the roof. 2. Remove the roof front trim and roof side trim (see page 20-82). 3. Remove the screws from each end of the roof side seal. Front: ROOF SIDE SEAL Rear: ROOF SIDE SEAL Roof 4. Remove […]
Categories
nsxb20061a.pdf
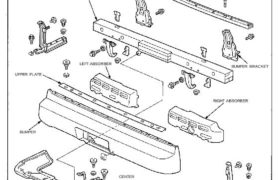
Disassembly UPPER FRAME BUMPER BRACKET SIDE FRAME BUMPER SKIRT LICENSE PLATE SUPPORT BUMPER BEAM LEFT ABSORBER UPPER PLATE BUMPER RIGHT ABSORBER CENTER LOWER STAY Rear Bumper Attachments nsxb20061a (57 kB)
Categories
nsxb20091a.pdf
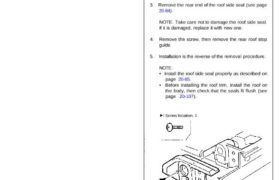
Rear Roof Stop Guide Replacement CAUTION: To prevent damage, place the roof on an appropriate pad. 1. Remove the roof. 2. Remove: • Roof front trim (see page 20-82) • Roof side trim (see page 20-82) • Roof side lock (see page 20-83) • Rear roof lock guide (see page 20-90) 3. Remove the rear […]
Categories
nsxb20045a.pdf
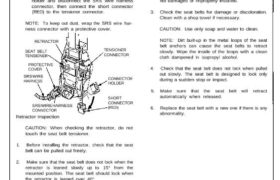
Inspection SRS wire harnesses are routed near the retractor. All SRS wire harnesses and connec- tors are colored yellow. Do not use electrical test equipment on these circuits. CAUTION: • Be careful not to damage the SRS wire har- nesses when servicing the retractor. • Remove the short connector (RED) from the its holder and […]
Categories
nsxb20055a.pdf
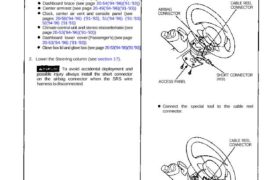
Replacement NOTE: Remove the access panel, then remove the short connector (RED). Disconnect the connec- tor between the airbag and cable reel, then con- nect the short connector (RED) to the airbag connector. AIRBAG CONNECTOR CABLE REEL CONNECTOR ACCESS PANEL SHORT CONNECTOR (RED) Connect the special tool to the cable reel connector. CABLE REEL CONNECTOR […]
Categories
nsxb20078a.pdf
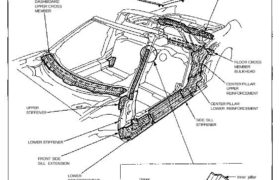
Construction Features The reinforced parts are located as shown. : Reinforced parts. DASHBOARD UPPER CROSS MEMBER UPPER STIFFENER ROOF PANEL TRUNK FRONT CROSS MEMBER FLOOR CROSS MEMBER BULKHEAD CENTER PILLAR UPPER REINFORCEMENT CENTER PILLAR LOWER REINFORCEMENT LOWER STIFFENER FRONT SIDE SILL EXTENSION LOWER REINFORCEMENT Upper Reinforcement Upper stiffener Upper patch Outer panel Inner pillar Front […]
Categories
nsxb20063a.pdf
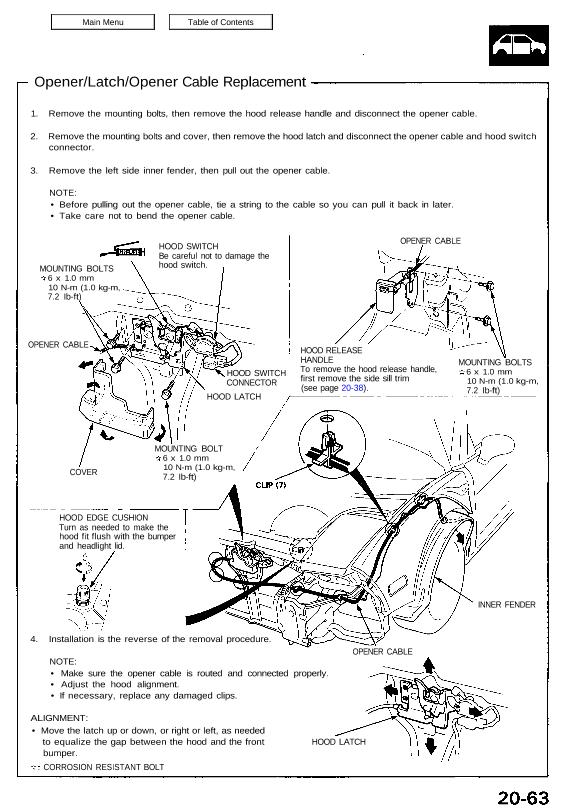
Opener/Latch/Opener Cable Replacement 1. Remove the mounting bolts, then remove the hood release handle and disconnect the opener cable. 2. Remove the mounting bolts and cover, then remove the hood latch and disconnect the opener cable and hood switch connector. 3. Remove the left side inner fender, then pull out the opener cable. NOTE: • […]
Categories
nsxb20050a.pdf
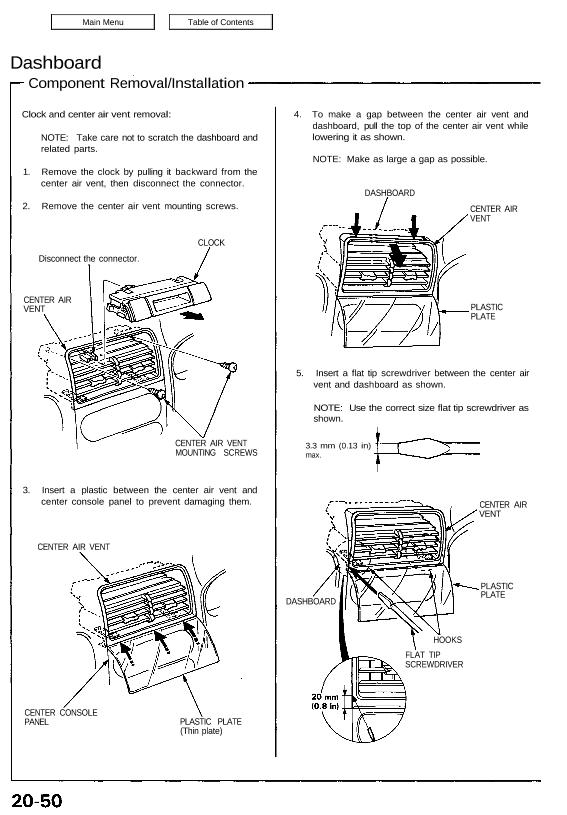
Dashboard Component Removal/Installation Clock and center air vent removal: NOTE: Take care not to scratch the dashboard and related parts. 1. Remove the clock by pulling it backward from the center air vent, then disconnect the connector. 2. Remove the center air vent mounting screws. 4. To make a gap between the center air vent […]
Categories
nsxb20059a.pdf

Disassembly BUMPER BRACKET WASHER TANK ABSORBER GUARD BUMPER FRONT SPOILER MOUNTING BOLT (13) BUMPER BEAM UPPER SEAL FOG LAMP BRACKET TOWING HOOK COVER BUMPER LOWER EXTENSION SIDE FRAME SIDE PLATE UPPER PLATE HEADLIGHT LID UPPER PLATE UPPER FRAME BUMPER SKIRT Front spoiler installation: SKIRT FRONT SPOILER PLATE NUT LICENSE PLATE TRIM FRONT SPOILER SKIRT COVER […]