Opener/Latch/Opener Cable Replacement
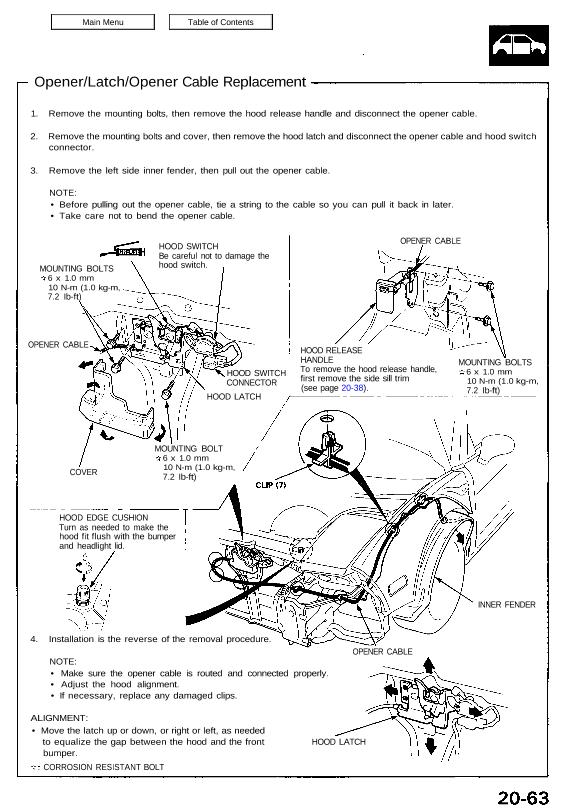
1. Remove the mounting bolts, then remove the hood release handle and disconnect the opener cable.
2. Remove the mounting bolts and cover, then remove the hood latch and disconnect the opener cable and hood switch
connector.
3. Remove the left side inner fender, then pull out the opener cable.
NOTE:
• Before pulling out the opener cable, tie a string to the cable so you can pull it back in later.
• Take care not to bend the opener cable.
MOUNTING BOLTS
6 x 1.0 mm
10 N-m (1.0 kg-m,
7.2 Ib-ft)
OPENER CABLE
HOOD SWITCH
Be careful not to damage the
hood switch.
OPENER CABLE
HOOD SWITCH
CONNECTOR
HOOD LATCH
HOOD RELEASE
HANDLE
To remove the hood release handle,
first remove the side sill trim
(see page 20-38).
MOUNTING BOLTS
6 x 1.0 mm
10 N-m (1.0 kg-m,
7.2 Ib-ft)
COVER
MOUNTING BOLT
6 x 1.0 mm
10 N-m (1.0 kg-m,
7.2 Ib-ft)
HOOD EDGE CUSHION
Turn as needed to make the
hood fit flush with the bumper
and headlight lid.
4. Installation is the reverse of the removal procedure.
NOTE:
• Make sure the opener cable is routed and connected properly.
• Adjust the hood alignment.
• If necessary, replace any damaged clips.
INNER FENDER
OPENER CABLE
ALIGNMENT:
• Move the latch up or down, or right or left, as needed
to equalize the gap between the hood and the front
bumper.
CORROSION RESISTANT BOLT
HOOD LATCH