Categories
Construction & Function

nsxd05009a.pdf

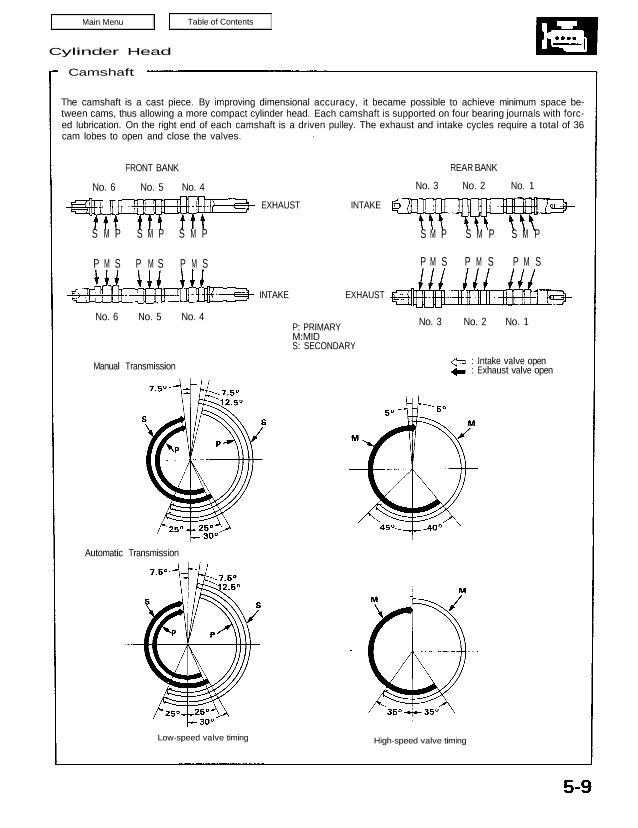
Cylinder Head Camshaft The camshaft is a cast piece. By improving dimensional accuracy, it became possible to achieve minimum space be- tween cams, thus allowing a more compact cylinder head. Each camshaft is supported on four bearing journals with forc- ed lubrication. On the right end of each camshaft is a driven pulley. The exhaust […]

Categories
Electrical

nsxd23290a.pdf

Cruise Control Component Location Index CAUTION: All SRS wiring harnesses are covered with yellow outer Insulation. Before disconnecting any part of the SRS wire hamess Install the short connectors (see page 24-10). Replace the entire affected SRS harness assembly if it has an open circuit or damaged wiring. BRAKE SWITCH Test, page 23-308 MAIN SWITCH […]

Categories
Electrical

nsxb23193a.pdf

Headlight Replacement CAUTION: • Halogen headlights can become very hot in use; do not touch them or the attaching hardware immediately after they have been turned off. • Do not try to replace or clean the headlights with the lights on. 1. Remove the No. 42 (15 A) and No. 43 (15 A) fuses from […]

Categories
Electrical

nsxd23302a.pdf

Cruise Control A/T Gear Position Switch Test 1. Remove the front console, then disconnect the 12-P connector from the A/T gear position switch. 2. Check for continuity between the terminals in each switch position according to the table. Move the lever back and forth at each position without touching the push button and check for […]

Categories
Engine Block

nsxb07017a.pdf

Piston/Connecting Rod Assemblies Installation Before installing the piston, apply a coat of engine oil to the ring grooves and cylinder bores. 1. If the crankshaft is already installed: • Guide the piston carefully to prevent damage. • Fit long rubber hoses (about 30 cm (12 in) long) to the connecting rod bolts to protect the […]

Categories
Electrical

nsxb23258a.pdf

Power Mirrors Switch Removal 1. Remove the left door panel, then disconnect all connectors from the door panel (see section 20). 2. Remove the three screws, then remove the mirror switch from the armrest. DOOR PANEL SCREWS MIRROR SWITCH Switch Test 1. Remove the power mirror switch from the armrest. 2. Check for continuity between […]

Categories
Automatic Transmission

nsxd14112a.pdf

Toward spring. Toward outside of valve body. Toward spring. Toward outside of valve body. Toward spring. Caps with flat ends and a groove around the cap are installed with the groove side opposite the spring. Toward spring. Caps with one projected tip and hollow end are in- stalled with the tip toward the spring. The […]

Categories
Electrical

nsxb23105a.pdf

Alternator Replacement 1. Disconnect the negative cable from the battery. 2. Disconnect the 4-P connector from the alternator. 3. Remove the nut and the BLK wire from the B terminal. BLK WIRE NUT 12 N-m (1.2 kg-m, 8.7 Ib-ft) 4-P CONNECTOR 4. Remove the pulley cover from the alternator. PULLEY COVER 5. Remove the nut […]

Categories
Automatic Transmission

nsxd14116a.pdf

3RD ORIFICE CONTROL VALVE VALVE CAP ROLLER VALVE SEAT 2ND EXHAUST VALVE CPC VALVE SECONDARY VALVE BODY 4-3 KICK-DOWN VALVE CHECK BALLS (7/32) 7 3-2 KICK-DOWN VALVE FILTER Replace. Install in this direction. 4TH EXHAUST VALVE SERVO CONTROL VALVE MODULATOR VALVE 2ND ORIFICE CONTROL VALVE Secondary Valve Body Disassembly/lnspection/Reassembly Clean all parts thoroughly in solvent […]

Categories
Brakes & ABS

nsxb19005a.pdf

Front Brakes Index/Inspection • Never use an air hose or dry brush to clean brake assemblies. • Use an OSHA-approved vacuum cleaner to avoid breathing brake dust. • Contaminated brake discs or pads reduce stopping ability. NOTE: • Coat piston, piston seal, and caliper bore with clean brake fluid. • Replace all rubber parts with […]