Category: Electrical
Categories
nsxb23012a.pdf
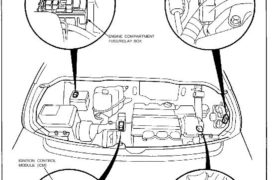
Relay and Control Unit Locations Engine Compartment REAR WINDOW DEFOGGER RELAY ENGINE COMPARTMENTFAN RELAY (A/T) Wire colors: YEL/BLK, BLU/RED, WHT/GRN, and WHT/BLU SPARK PLUG VOLTAGE DETECTION MODULE ENGINE COMPARTMENT FUSE/RELAY BOX IGNITION CONTROL MODULE (ICM) Attachments nsxb23012a (62 kB)
Categories
nsxb23240a.pdf
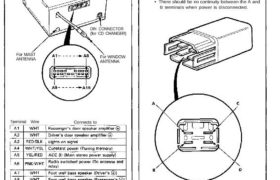
Stereo Sound System Unit Terminals For MAST ANTENNA DIN CONNECTOR (for CD CHANGER) For WINDOW ANTENNA Terminal Wire Connects to Power Amplifier Relay Test 1. Remove the power amplifier relay from under-hood relay box 8. 2. Check continuity at the relay terminals. • There should be continuity between the C and D terminals. • There […]
Categories
nsxd23212a.pdf
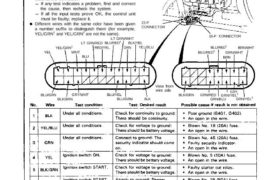
Side Marker/Turn Signal/Hazard Flash System Turn Signal/Hazard Relay Input Test 1. Remove the dashboard lower cover. Remove the turn signal/hazard relay from the left kick panel, then dis- connect the 6-P connector. 2. Inspect the connector terminals to be sure they are all making good contact. If the terminals are bent, loose or corroded, repair […]
Categories
nsxd23312a.pdf
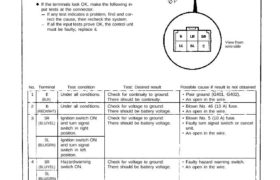
Security Alarm System Control Unit Input Test Remove the glove box and disconnect the 22-P connec- tor and 16-P connector from the control unit. Inspect the connector terminals to be sure they are all making good contact. If the terminals are bent, loose, or corroded, repair them as necessary, and recheck the system. If the […]
Categories
nsxb23307a.pdf
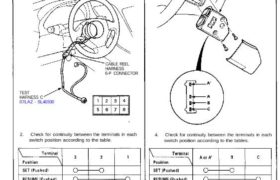
SET/RESUME Switch Test CAUTION: Before disconnecting any part of an SRS wire harness, connect the short connectors (see section 24). 1. Disconnect the cable reel harness and main harness 6-P connector. Connect test harness C only to the cable reel harness side of the 6-P connector. CABLE REEL HARNESS 6-P CONNECTOR TEST HARNESS C 07LAZ […]
Categories
nsxb23264a.pdf
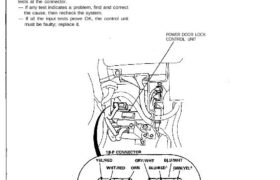
Power Door Locks Control Unit Input Test Remove the glove box, then disconnect the 18-P con- nector from the control unit. Inspect the connector terminals to be sure they are all making good contact. • If the terminals are bent, loose, or corroded, repair them as necessary, and recheck the system. • If the terminals […]
Categories
nsxb23204a.pdf
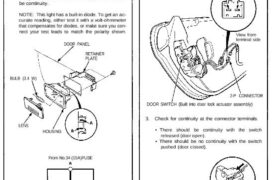
Ceiling/Courtesy/Trunk Lights Courtesy Light Test/Replacement NOTE: The bulb or lens alone can be replaced without having to remove the door panel. 1. Remove the door panel (see section 20). 2. Remove the two screws and the retainer plate, then remove the light from behind the door panel. 3. Make sure that the bulb is OK, […]
Categories
nsxb23178a.pdf
Lighting System Retractable Headlight Control Unit Input Test Remove the rear bulkhead panels, and disconnect the 18-P connector from the control unit. Inspect the connector and socket terminals to be sure they are all making good contact. • If the terminals are bent, loose, or corroded, repair them as necessary, and recheck the system. • […]
Categories
nsxb23302a.pdf
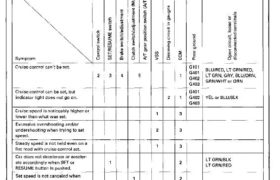
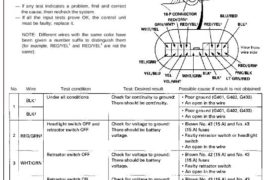
Troubleshooting Cruise Control NOTE: • The numbers in the table show the troubleshooting sequence. • Before troubleshooting: — Check the No. 5 (15 A) fuse in the under-dash fuse box, and the No. 29 (50 A) and No. 45 (20 A) fuses in the under- hood fuse/relay box. — Check that the horns sound. — […]
Categories
nsxb23190a.pdf
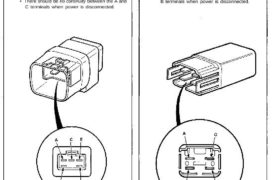
Lighting System Retractor Relay Test 1. Remove the retractor relay (located at the right side of the front compartment area). 2. Check continuity at the relay terminals. • There should be continuity between the E and F terminals and between the B and C terminals. • There should be continuity between the A and C […]