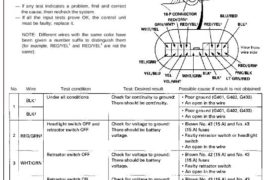
Retractable Headlight Control Unit Input Test
Remove the rear bulkhead panels, and disconnect the
18-P connector from the control unit.
Inspect the connector and socket terminals to be sure
they are all making good contact.
• If the terminals are bent, loose, or corroded, repair
them as necessary, and recheck the system.
• If the terminals look OK, make the following input
tests at the connector.
— If any test indicates a problem, find and correct
the cause, then recheck the system.
— If all the input tests prove OK, the control unit
must be faulty; replace it.
NOTE: Different wires with the same color have
been given a number suffix to distinguish them
(for example, RED/YEL1 and RED/YEL4 are not the
same).
REAR BULKHEAD
RETRACTABLE HEADLIGHT
CONTROL UNIT
No. Wire Test condition Test: Desired result Possible cause if result is not obtained
No. Wire Test condition Test: Desired result Possible cause if result is not obtained
Main Menu Table of Contents
No. Wire Test condition Test: Desired result Possible cause if result is not obtained
∣∙⊤ GRN, l Passing switch ON Check for voltage to ground: – Faulty headlight relay or passing
7 RED There should be battery voltage. switch
– An open in the wire
⋅ Check for voltage to ground: ∙ Blown No. 42 (15 A) fuse
BLU/RED Retracmr motor Statlonaw There should be battery volt- – Faulty right retractor relay
В age. ∙ An open in the wire
– Blown No. 43 (15 Al fuse
⊟∣−∪↿ ∙ Faulty left retractor relay
∙ ⋀⋂ open in the wire
Under all conditions Check for continuity to ground: ∙ Faulty right retractor cut relay
YEL There should be continuity. ‘ РООГ ground (G202)
9 – An open in the wire
– Faulty left retractor cut relay
YEL/GRN – Poor ground (G202)
– An open in the wire
Ignition switch ON (ll) Connect battery power: – Faulty safety indicator circuit
10 RED/YE“ The retractable headlight mal- – An open in the wire
function indicator should come
on.
Headlight retractor switch Check that there is no continu- ⋅ Faulty headlight retractor motor
OFF (retractable headlight ity between the WHT/YEL and
closed) the GRNNVHT’ (or YEL/BLU)
Connect an ohmmeter with terminals.
the negative lead to the
WHT/YEL terminal, and the
positive lead to the
WHT/YEL GRNNVHT‘ (or YEL/BLU)
⋅∣↿ ∙ I terminal.
GRNNVHT’ . . . . .
„EL/BLU) Raise the headlights Check for contrnutty between – Faulty headlight retractor motor
halfway by turning the the WHT/YEL and the GRN/ – An open in the Wire
retractor knob clockwise. WHT1 (or YEL/BLU) terminals:
There should be continuity.
Turn the retractor knob Check for continuity between ‘ Faultv headlÍQhï ГЭТГЭС’ЮГ mOIOF
clockwise until the head- the WHT/YEL and the GRN/ ∙ An open in the Wire
⊳↴ lights are fully raised. WHT‘ (or YEL/BLU) terminals:
` There should be continuity.
Headlight retractor switch Check for continuity between – Faulty headlight retractor motor
OFF (retractable headlight the YELNVHT and the GRN/ – An open in the wire
closed) WHT1 (or YEL/BLU) terminals:
Connect an ohmmeter neg- There should be continuity.
ative lead to the YEL/WHT
terminal, and the positive
YELNVHT lead to the GRN/WHT‘ (or
∙ YEL/BLU) terminal.
12 GRN/WHT1 Raise the headlights Check for continuity between ∙ Faulty headlight retractor motor
(YEL/BLU) halfway by turning the the YEL/WHT and the GRN/ – An open in the wire
retractor knob clockwise. WHT‘ (or YEL/BLU) terminals:
There should be continuity.
Turn the retractor knob Check that there is no continu- – Faulty headlight retractor motor
clockwise until the head- ity between the YEL/WHT and
lights are fully raised. the GRNNVHT’ (or YEL/BLU)
terminals.
23-179
