Categories
Heating, Ventilation and Air Conditioning

nsxb22060a.pdf

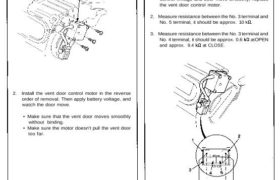
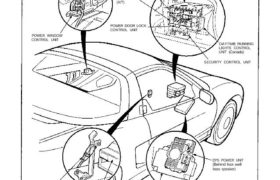
Vent Door Control Motor Replacement 1. Remove the three screws and vent door control motor. VENT DOOR CONTROL MOTOR 2. Install the vent door control motor in the reverse order of removal. Then apply battery voltage, and watch the door move. • Make sure that the vent door moves smoothly without binding. • Make sure […]

Categories
Manual Transmission

nsxb13005a.pdf

Cable Adjustment 1. Remove the center console panel (see section 20). 2. Move the shift lever into 1st gear. 3. Install the 6 mm bolt to the shift lever. NOTE: While moving the shift lever back and forth, and right and left, tighten the bolt until the range of free play of the shift lever […]

Categories
Differential

nsxb15020a.pdf

Differential Disassembly 1. Hold the differential in a bench vise using a special tool, then remove the differential housing mounting bolts in a crisscross pattern in several steps. BENCH VISE DIFFERENTIAL INSPECTION TOOLS 07MAJ-PR90100 2. Remove the differential housing, then install the special tools on the stopper plate as shown. CLUTCH SPRING COMPRESSOR ATTACHMENT 07LAE-PX40100 […]

Categories
Engine Lubrication

nsxb08003a.pdf

Engine Lubrication Illustrated Index FRONT CYLINDER HEAD ENGINE OIL PRESSURE GAUGE SENDING UNIT 22 N-m (2.2 kg-m. 16 Ib-ft) NOTE: • Use new O-rings when reassembling. • Apply oil to O-rings before installation. • Use liquid gasket, Part No. 08718-0001. • If the bottom of the oil pan is deformed, it should be repaired or […]

Categories
Specifications

nsxb03006a.pdf

Standards and Service Limits Manual Transmission — Section 13 Main Menu Table of Contents Standards and Service Limits — Manual Transmission — Section 13 gear MEASUREMENT STANDARD (NEW) SERVICE LIMIT Transmission oil Capacity! (US qt. Imp qt) 2.8 (3.0, 2.5) for overhaul 2.7 (2.9, 2.4) for oil change Mainshaft Diameter of hall hearing contact area […]

Categories
Electrical

nsxd23009a.pdf

Dashboard, Door and Floor DRIVER’S DOOR PANEL POWER WINDOW CONTROL UNIT CIGARETTE LIGHTER RELAY SRS UNIT FOOT WELL BASS SPEAKER RIGHT FRONT FLOOR PANEL EPS POWER UNIT (Behind foot well bass speaker) SECURITY CONTROL UNIT DAYTIME RUNNING LIGHTS CONTROL UNIT (Canada) ABS CONTROL UNIT CRUISE CONTROL UNIT EPS CONTROL UNIT (A/T) POWER DOOR LOCK CONTROL […]

Categories
Electrical

nsxd23299a.pdf

5. Remove the four screws and remove the combina- tion light switch (main switch). COMBINATION LIGHT SWITCH 10-P CONNECTOR 16-P CONNECTOR Main Switch Test 1. Remove the dashboard lower panel and knee bolster pad. 2. If necessary, remove the knee bolster. 3. Disconnect the 16-P connector and check for con- tinuity between the terminals in […]

Categories
Cooling

nsxb10004a.pdf

Radiator Replacement 1. Remove the spare tire. 2. Drain the radiator (see page 10-5 thru 10-7). 3. Disconnect the fan motor connector and the resistor connector. 4. Remove the upper and lower hoses from the radiator. 5. Remove the bracket and the radiator. Install the radiator in the reverse order of removal: NOTE: • Set […]

Categories
Differential

nsxb15002a.pdf

Special Tools Ref. No Tool Number Description Qty Page Reference 07GAD—SD40101 07MAD—PR90100 07MAD—PR90200 07MAJ—PR90100 07746—0010500 07746—0010600 07749—0010000 07947—S090100 or 07947—SD90101 07965—SA00600 Bearing Driver Attachment Attachment, 45 x 55 mm I.D. Pilot, 32 x 50 mm Differential Inspection Tools Attachment, 62 x 68 mm Attachment, 72 x 75 mm Driver Seal Driver Attachment Bearing Driver Attachment […]

Categories
Electrical

nsxb23260a.pdf

Power Mirrors Door Mirror Actuator Replacement 1. Remove the mirror and actuator assembly from the housing (see section 20). 2. Place the mirror on a flat, padded surface. Pull up on the spring-loaded lug, and remove the roll pin. LUG ROLL PIN 3. Pull the actuator away from the mirror. If the actua- tor shafts […]