Category: Manual Transmission
nsxb13040a.pdf
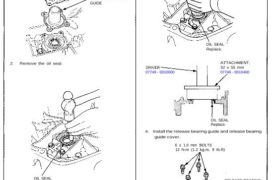
Mainshaft Oil Seal (Clutch Housing) Replacement 1. Remove the release bearing guide cover and release bearing guide. RELEASE BEARING GUIDE COVER RELEASE BEARING GUIDE 2. Remove the oil seal. OIL SEAL Replace. 3. Drive a new oil seal from the clutch side using the special tools as shown. OIL SEAL Replace. DRIVER 07749 – 0010000 […]
nsxb13013a.pdf
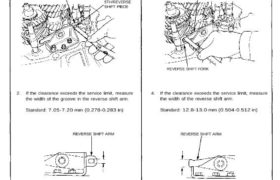
Reverse Shift Arm, Reverse Shift Fork Clearance Inspection 1. Measure the clearance between the reverse shift arm and the 5th/reverse shift piece. Standard: 0.05-0.30 mm (0.002-0.012 in) Service Limit: 0.5 mm (0.020 in) REVERSE SHIFT ARM 5TH/REVERSE SHIFT PIECE 2. If the clearance exceeds the service limit, measure the width of the groove in the […]
nsxb13037a.pdf
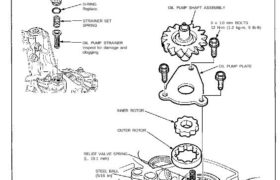
Oil Pump Disassembly/Reassembly Prior to reassembling, clean all the parts in solvent, dry them, and apply lubricant to any contact surfaces. 6 x 1.0 mm BOLT 12 N-m (1.2 kg-m, 9 Ib-ft) STRAINER COVER O-RING Replace. STRAINER SET SPRING OIL PUMP STRAINER Inspect for damage and clogging. OIL PUMP SHAFT ASSEMBLY 6 x 1.0 mm […]
nsxb13017a.pdf
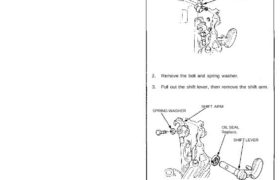
Shift Lever, Select Lever Removal 1. Remove the shift spring set plate and shift detent spring from the transmission housing. TRANSMISSION HOUSING SHIFT SPRING SET PLATE SHIFT DETENT SPRING 2. Remove the bolt and spring washer. 3. Pull out the shift lever, then remove the shift arm. SPRING WASHER SHIFT ARM SHIFT LEVER OIL SEAL […]
nsxb13031a.pdf
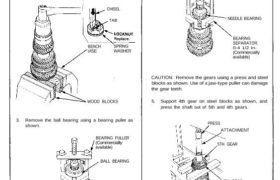
Disassembly 1. Securely clamp the countershaft assembly in a bench vise with wood blocks. 2. Raise the locknut tab from the groove of the countershaft, and remove the locknut and the spring washer. NOTE: The locknut has left-hand threads. WOOD BLOCKS 3. Remove the ball bearing using a bearing puller as shown. BEARING PULLER (Commercially […]
nsxb13006a.pdf
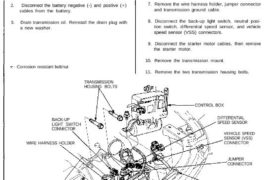
Transmission Assembly Removal Make sure lifts are placed properly, and hoist brackets are attached to correct positions (see section 1). CAUTION: Use fender covers to avoid damaging painted surfaces. 1. Check and record the rear wheel alignment (see section 18). 2. Disconnect the battery negative (-) and positive (+) cables from the battery. 3. Drain […]
nsxb13016b.pdf
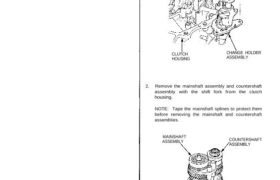
Mainshaft, Countershaft, Differential Assemblies Removal 1. Remove the change holder assembly from the clutch housing. CLUTCH HOUSING CHANGE HOLDER ASSEMBLY 2. Remove the mainshaft assembly and countershaft assembly with the shift fork from the clutch housing. NOTE: Tape the mainshaft splines to protect them before removing the mainshaft and countershaft assemblies. MAINSHAFT ASSEMBLY COUNTERSHAFTASSEMBLY SHIFT […]
nsxb13033a.pdf
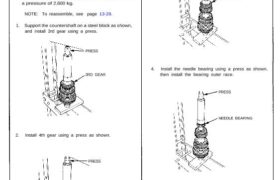
Reassembly CAUTION: • Prior to reassembling, clean all the parts in solvent, dry them, and apply lubricant to any contact parts. • Press the 3rd, 4th and 5th gears on the countershaft without lubrication. • When installing the 3rd, 4th and 5th gears, support the shaft on steel blocks, and install the gears using a […]
nsxb13012a.pdf
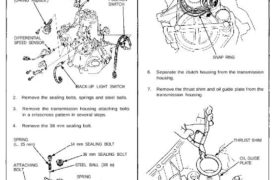
Transmission Housing Removal NOTE: Place the clutch housing on two pieces of wood thick enough to keep the mainshaft from hitting the workbench. 1. Remove the back-up light switch, neutral position switch, differential speed sensor and vehicle speed sensor (VSS). VSS (O-RING Replace.) NEUTRAL POSITION SWITCH DIFFERENTIAL SPEED SENSOR BACK-UP LIGHT SWITCH 2. Remove the […]
nsxd13048a.pdf
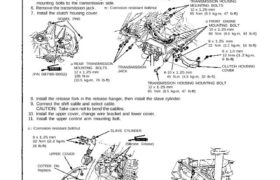
Transmission Assembly Installation NOTE: Check that the two dowel pins are installed in the clutch housing. Use only Super High Temp Urea Grease (P/N 08798-9002). 1. Place the transmission on the transmission jack, and raise it to the engine level. 2. Set the release fork to the clutch housing. 3. Install the two transmission housing […]