Category: Manual Transmission
Categories
nsxe13010a.pdf
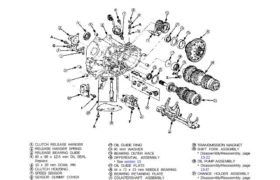
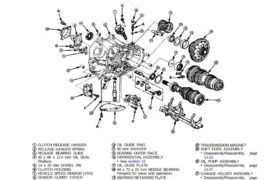
CLUTCH RELEASE HANGER RELEASE HANGER SPRING RELEASE BEARING GUIDE 40 x 68 x 12.5 mm OIL SEAL Replace. 10 x 20 mm DOWL PIN CLUTCH HOUSING SPEED SENSOR SENSOR DUMMY COVER O-RING Replace. HOLDER PLATE REVERSE SHIFT FORK ASSEMBLY Disassembly/Reassembly, page 13-16 REVERSE IDLE GEAR SHAFT ASSEMBLY Disassembly/Reassembly, page 13-15 OIL GUIDE RING 90 mm […]
Categories
nsxe13012a.pdf
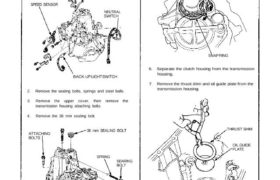
Transmission Housing Removal NOTE: Place the clutch housing on two pieces of wood thick enough to keep the mainshaft from hitting the workbench. 1. Remove the back-up light switch, neutral switch and speed sensor. SPEED SENSOR NEUTRAL SWITCH BACK-UP LIGHT SWITCH 2. Remove the sealing bolts, springs and steel balls. 3. Remove the upper cover, […]
Categories
nsxb13041a.pdf
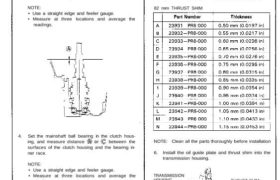
Mainshaft Thrust Shim Adjustment 1. Remove the thrust shim and oil guide plate from the transmission housing. 2. Install the mainshaft in the transmission housing. NOTE: Do not install the clutch housing side ball bearing. 3. Measure distance between the end of the transmission housing and mainshaft. NOTE: • Use a straight edge and feeler […]
Categories
nsxb13043a.pdf
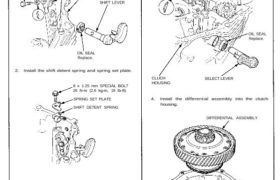
Transmission Reassembly 1. Install the oil seal, shift arm, and shift lever in the transmission housing. 8 x 1.0 mm SPECIAL BOLT 32 N-m (3.2 kg-m, 23 Ib-ft) SPRING WASHER SHIFT ARM TRANSMISSION HOUSING SHIFT LEVER OIL SEAL Replace. 2. Install the shift detent spring and spring set plate. 8 x 1.25 mm SPECIAL BOLT […]
Categories
nsxb13005a.pdf

Cable Adjustment 1. Remove the center console panel (see section 20). 2. Move the shift lever into 1st gear. 3. Install the 6 mm bolt to the shift lever. NOTE: While moving the shift lever back and forth, and right and left, tighten the bolt until the range of free play of the shift lever […]
Categories
nsxd13010a.pdf
Illustrated Index Clean all parts thoroughly in solvent and dry with compressed air. Lubricate all parts with oil before reassembly. NOTE: This transmission uses no gaskets between the major housings; use liquid gasket (P/N 08718—0001). If 20 minutes have passed after applying liquid gasket, reapply it and assemble the housings and allow it to cure […]
Categories
nsxe13005a.pdf
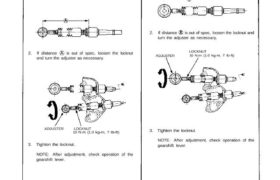
Cable Adjustment NOTE: See page 13-6, 13-47 for removal and installation. Select Cable 1. With the transmission in neutral, measure the distance : 140.5-141.5 mm (5.53-5.57 in) 2. If distance is out of spec, loosen the locknut and turn the adjuster as necessary. ADJUSTER LOCKNUT 10 N.m (1.0 kg-m, 7 Ib-ft) 3. Tighten the locknut. […]
Categories
nsxb13010a.pdf
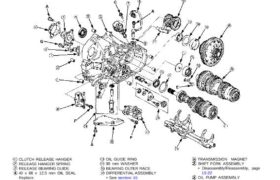
Illustrated Index Clean all parts thoroughly in solvent and dry with compressed air. Lubricate all parts with oil before reassembly. NOTE: • This transmission uses no gaskets between the major housings; use liquid gasket (P/N 08718—0001). If 20 minutes have passed after applying liquid gasket, reapply it and assemble the housings and allow it to […]
Categories
nsxb13015a.pdf

Disassembly/Reassembly NOTE: • The thrust needle bearing are the same size. • The needle bearing are the same size. Prior to reassembling, clean all the parts in solvent, dry them, and apply lubricant to any contact surface. 22 x 38 x 3 mm THRUST WASHER THRUST NEEDLE BEARING Inspect for wear and operation. REVERSE DRIVEN […]
Categories
nsxe13006a.pdf
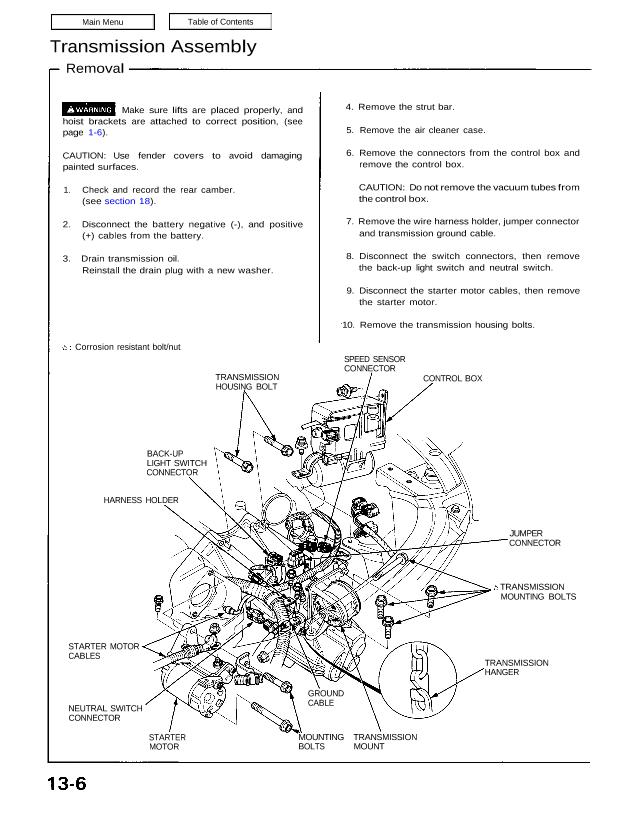
Transmission Assembly Removal Make sure lifts are placed properly, and hoist brackets are attached to correct position, (see page 1-6). CAUTION: Use fender covers to avoid damaging painted surfaces. 1. Check and record the rear camber. (see section 18). 2. Disconnect the battery negative (-), and positive (+) cables from the battery. 3. Drain transmission […]