Disassembly
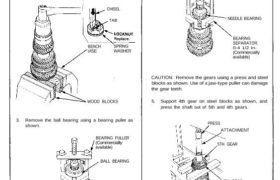
1. Securely clamp the countershaft assembly in a
bench vise with wood blocks.
2. Raise the locknut tab from the groove of the
countershaft, and remove the locknut and the spring
washer.
NOTE: The locknut has left-hand threads.
WOOD BLOCKS
3. Remove the ball bearing using a bearing puller as
shown.
BEARING PULLER
(Commercially
available)
BALL BEARING
BEARING
SEPARATOR,
0-4 1/2 in.
(Commercially
available)
4. Remove the bearing outer race from the needle
bearing, then remove the needle bearing using a
bearing puller as shown.
BEARING PULLER
(Commercially
available)
NEEDLE BEARING
BEARING
SEPARATOR,
0-4 1/2 in.
(Commercially
available)
CAUTION: Remove the gears using a press and steel
blocks as shown. Use of a jaw-type puller can damage
the gear teeth.
5. Support 4th gear on steel blocks as shown, and
press the shaft out of 5th and 4th gears.
5TH GEAR
4TH GEAR
PRESS
ATTACHMENT
BENCH
VISE
SPRING
WASHER
TAB
CHISEL
Countershaft Assembly
Disassembly
6. Support 2nd gear on steel blocks as shown, and
press the shaft out of 3rd and 2nd gears.
PRESS
ATTACHMENT
3RD GEAR
2ND GEAR
