Trunk Light Test/Replacement
NOTE: The bulb or lens alone can be replaced without
having to remove the trunk side panel.
1. Remove the trunk side panel.
2. Disconnect the 3-P connector from the light housing.
3. Remove the two screws and the retainer plate, then
remove the light from the trunk side panel.
TRUNK SIDE
PANEL
RETAINER
PLATE
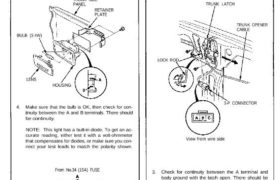
BULB (3.4W)
LENS
4. Make sure that the bulb is OK, then check for con-
tinuity between the A and B terminals. There should
be continuity.
NOTE: This light has a built-in diode. To get an ac-
curate reading, either test it with a volt-ohmmeter
that compensates for diodes, or make sure you con-
nect your test leads to match the polarity shown.
From No.34 (15A) FUSE
To LATCH SWITCH
Latch Switch Test/Replacement
1. Open the trunk lid, and remove the trunk rear panel.
2. Disconnect the trunk latch 3-P connector.
TRUNK LATCH
LOCK ROD
TRUNK OPENER
CABLE
3-P CONNECTOR
View from wire side
3. Check for continuity between the A terminal and
body ground with the latch open. There should be
continuity.
4. If you need to remove the latch, disconnect the lock
rod from the latch, then remove the two bolts, and
pull the latch toward the left side.
5. Disconnect the trunk opener cable from the latch.
HOUSING
NOTE: The bulb or lens alone can be replaced without
having to remove the trunk side panel.
1. Remove the trunk side panel.
2. Disconnect the 3-P connector from the light housing.
3. Remove the two screws and the retainer plate, then
remove the light from the trunk side panel.
TRUNK SIDE
PANEL
RETAINER
PLATE
BULB (3.4W)
LENS
4. Make sure that the bulb is OK, then check for con-
tinuity between the A and B terminals. There should
be continuity.
NOTE: This light has a built-in diode. To get an ac-
curate reading, either test it with a volt-ohmmeter
that compensates for diodes, or make sure you con-
nect your test leads to match the polarity shown.
From No.34 (15A) FUSE
To LATCH SWITCH
Latch Switch Test/Replacement
1. Open the trunk lid, and remove the trunk rear panel.
2. Disconnect the trunk latch 3-P connector.
TRUNK LATCH
LOCK ROD
TRUNK OPENER
CABLE
3-P CONNECTOR
View from wire side
3. Check for continuity between the A terminal and
body ground with the latch open. There should be
continuity.
4. If you need to remove the latch, disconnect the lock
rod from the latch, then remove the two bolts, and
pull the latch toward the left side.
5. Disconnect the trunk opener cable from the latch.
HOUSING