Clutch Master Cylinder (Canada)
Disassembly
CAUTION: Avoid spilling brake fluid on paint as it may
damage the finish.
1. Remove the dust seal from the clutch master
cylinder.
DUST SEAL
CIRCLIP
2. Pry the circlip off the clutch master cylinder.
3. Carefully remove the piston by applying air
pressure through the clutch line hole.
CAUTION:
• Hold a shop towel over the master cylinder to stop
the piston in case it comes out suddenly.
• Plug the end of the clutch hose port with a shop
towel to prevent fluid from coming out.
• Clean all disassembled parts in solvent, and blow
through all ports and passages with compressed
air.
PISTON
ASSEMBLY
SHOP TOWEL
MASTER
CYLINDER
BODY
Plug port.
Reassembly
CAUTION:
• Before assembling, make sure all parts are complete-
ly clean.
• Replace parts with new ones whenever specified to
do so.
• Do not allow dust or water to enter the system.
• Do not mix different brands of brake fluid as they
may not be compatible.
• Do not reuse the brake fluid which was drained out.
• Avoid spilling the brake fluid on painted surfaces as
it may damage the finish.
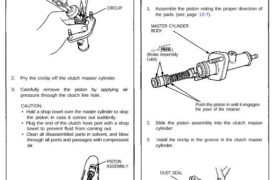
1. Assemble the piston noting the proper direction of
the parts (see page 12-7).
MASTER CYLINDER
BODY
(Brake Assembly
Lube)
Push the piston in until it engages
the pawl of the retainer.
2. Slide the piston assembly into the clutch master
cylinder.
3. Install the circlip in the groove in the clutch master
cylinder.
DUST SEAL
CIRCLIP
4. Install the dust seal.
Disassembly
CAUTION: Avoid spilling brake fluid on paint as it may
damage the finish.
1. Remove the dust seal from the clutch master
cylinder.
DUST SEAL
CIRCLIP
2. Pry the circlip off the clutch master cylinder.
3. Carefully remove the piston by applying air
pressure through the clutch line hole.
CAUTION:
• Hold a shop towel over the master cylinder to stop
the piston in case it comes out suddenly.
• Plug the end of the clutch hose port with a shop
towel to prevent fluid from coming out.
• Clean all disassembled parts in solvent, and blow
through all ports and passages with compressed
air.
PISTON
ASSEMBLY
SHOP TOWEL
MASTER
CYLINDER
BODY
Plug port.
Reassembly
CAUTION:
• Before assembling, make sure all parts are complete-
ly clean.
• Replace parts with new ones whenever specified to
do so.
• Do not allow dust or water to enter the system.
• Do not mix different brands of brake fluid as they
may not be compatible.
• Do not reuse the brake fluid which was drained out.
• Avoid spilling the brake fluid on painted surfaces as
it may damage the finish.
1. Assemble the piston noting the proper direction of
the parts (see page 12-7).
MASTER CYLINDER
BODY
(Brake Assembly
Lube)
Push the piston in until it engages
the pawl of the retainer.
2. Slide the piston assembly into the clutch master
cylinder.
3. Install the circlip in the groove in the clutch master
cylinder.
DUST SEAL
CIRCLIP
4. Install the dust seal.