Category: Electrical
Categories
nsxb23189a.pdf
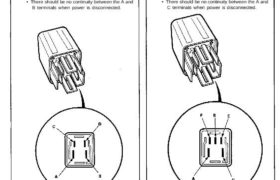
Headlight Relay Test 1. Remove the headlight relay from the under-hood fuse/relay box. 2. Check continuity at the relay terminals. • There should be continuity between the C and D terminals. • There should be continuity between the A and B terminals when power and ground are connect- ed to the C and D terminals. […]
Categories
nsxb23282a.pdf

Rear Window Defogger Component Location Index SRS components are located in this area. Review the SRS component locations, precautions, and procedures in the SRS section 24 before performing repairs or ser- vice. REAR WINDOW DEFOGGER TIMER CIRCUIT (In the integrated control unit) REAR WINDOW DEFOGGER Function Test, page 23-288 UNDER-DASH FUSE BOX REAR WINDOW DEFOGGER […]
Categories
nsxb23198a.pdf
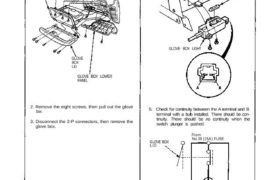
(95-96 Models) Glove Box Light 1. Remove the glove box lower panel. GLOVE BOX GLOVE BOX LOWER PANEL 2. Remove the eight screws, then pull out the glove box. 3. Disconnect the 2-P connectors, then remove the glove box. 4. Remove the two screws from the glove box light. BULB (3.4 W) 5. Check for […]
Categories
nsxb23205a.pdf
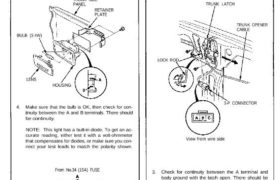
Trunk Light Test/Replacement NOTE: The bulb or lens alone can be replaced without having to remove the trunk side panel. 1. Remove the trunk side panel. 2. Disconnect the 3-P connector from the light housing. 3. Remove the two screws and the retainer plate, then remove the light from the trunk side panel. TRUNK SIDE […]
Categories
nsxb23268a.pdf
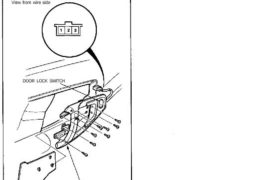
Power Door Locks Door Lock Switch Test 1. Remove the door grip assembly. 2. Disconnect the 3-P connector from the switch. 3. Check for continuity between the terminals, in each switch position, according to the table. View from wire side DOOR GRIP ASSEMBLY DOOR LOCK SWITCH Attachments nsxb23268a (36 kB)
Categories
nsxb23203a.pdf
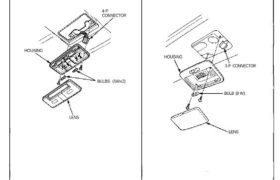
Ceiling Light Replacement Coupe: 1. Turn the light switch OFF. 2. Pry off the lens. 3. Remove the two bolts and the housing. 4. Disconnect the 4-P connector from the housing. 4-P CONNECTOR HOUSING BULBS (5Wx2) LENS NSX-T (open top): 1. Turn the light switch OFF. 2. Pry off the lens. 3. Remove the two […]
Categories
nsxd23012a.pdf
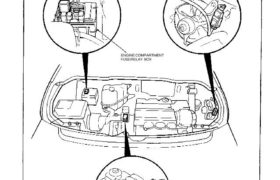
Relay and Control Unit Locations Engine Compartment REAR WINDOW DEFOGGER RELAY ENGINE COMPARTMENT FUSE/RELAY BOX ENGINE COMPARTMENT FAN RELAY Wire colors: YEL/BLU, BLK/YEL, WHT/RED, and WHT/BLU IGNITION CONTROL MODULE (ICM) Attachments nsxd23012a (160 kB)
Categories
nsxb23196a.pdf

Taillights Replacement 1. Open the trunk lid, and remove the rear trim panel. 2. Disconnect the 8-P connector and 2-P connector from the taillight assembly. 3. Disconnect the 2-P connector from the trunk key cylinder switch. 8-P CONNECTOR 2-P CONNECTOR TRUNK KEY CYLINDER CONNECTOR REAR TRIM PANEL 4. Remove the four mounting nuts and rear […]
Categories
nsxb23083a.pdf
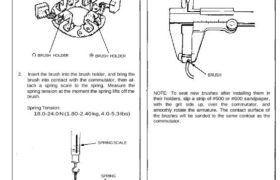
Starter Brush Holder Test 1. Check that there is no continuity between the and brush holders. If continuity exists, replace the brush holder assembly. BRUSH HOLDER BRUSH HOLDER BRUSH HOLDER 2. Insert the brush into the brush holder, and bring the brush into contact with the commutator, then at- tach a spring scale to the […]
Categories
nsxb23220a.pdf
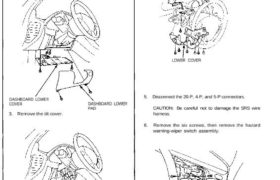
Side Marker/Turn Signal/Hazard Flasher System Hazard Warning Switch Replacement SRS components are located in this area. Review the SRS component locations, precautions, and procedures in the SRS section 24 before performing repairs or ser- vice. 1. Remove the dashboard lower cover, and disconnect the connectors. 2. Remove the dashboard lower pad. DASHBOARD LOWER COVER 3. […]