2. Disconnect the 5-P connector from the steering an-
gle sensor.
3. Remove the steering angle sensor mounting bolts,
then remove the steering angle sensor.
NOTE: Take care not to drop the adjusting shim
used between the steering angle sensor and sensor
mounting bracket.
CAUTION: Take care not to damage or drop the
steering angle sensor as it is sensitive.
2. Connect the 5-P connector to the steering angle
sensor.
3. Install the steering column covers.
4. Perform the steering angle sensor system check (See
page 19-96).
If there is an abnormalty, check the troubleshoot-
ing flowchart (see page 19-96).
NOTE:
Installation:
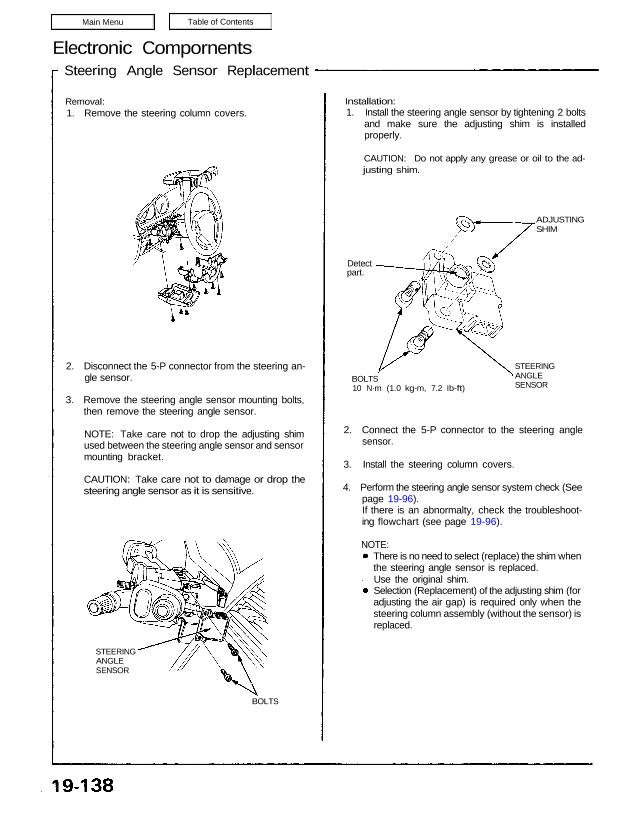
1. Install the steering angle sensor by tightening 2 bolts
and make sure the adjusting shim is installed
properly.
CAUTION: Do not apply any grease or oil to the ad-
justing shim.
Removal:
1. Remove the steering column covers.
Electronic Compornents
Steering Angle Sensor Replacement
STEERING
ANGLE
SENSOR
BOLTS
There is no need to select (replace) the shim when
the steering angle sensor is replaced.
Use the original shim.
Selection (Replacement) of the adjusting shim (for
adjusting the air gap) is required only when the
steering column assembly (without the sensor) is
replaced.
STEERING
ANGLE
SENSOR
BOLTS
10 N·m (1.0 kg-m, 7.2 Ib-ft)
ADJUSTING
SHIM
Detect
part.
gle sensor.
3. Remove the steering angle sensor mounting bolts,
then remove the steering angle sensor.
NOTE: Take care not to drop the adjusting shim
used between the steering angle sensor and sensor
mounting bracket.
CAUTION: Take care not to damage or drop the
steering angle sensor as it is sensitive.
2. Connect the 5-P connector to the steering angle
sensor.
3. Install the steering column covers.
4. Perform the steering angle sensor system check (See
page 19-96).
If there is an abnormalty, check the troubleshoot-
ing flowchart (see page 19-96).
NOTE:
Installation:
1. Install the steering angle sensor by tightening 2 bolts
and make sure the adjusting shim is installed
properly.
CAUTION: Do not apply any grease or oil to the ad-
justing shim.
Removal:
1. Remove the steering column covers.
Electronic Compornents
Steering Angle Sensor Replacement
STEERING
ANGLE
SENSOR
BOLTS
There is no need to select (replace) the shim when
the steering angle sensor is replaced.
Use the original shim.
Selection (Replacement) of the adjusting shim (for
adjusting the air gap) is required only when the
steering column assembly (without the sensor) is
replaced.
STEERING
ANGLE
SENSOR
BOLTS
10 N·m (1.0 kg-m, 7.2 Ib-ft)
ADJUSTING
SHIM
Detect
part.
Selection of the adjusting shim for the steering angle sensor air gap adjustment.
NOTE:
The adjustment of the air gap between the steering shaft and the steering angle sensor should be carried out
in order to obtain adequate sensor output.
The adjusting shim reference number is stamped on the steering column. Adequate air gap can be kept by select-
ing the adjusting shim with the reference number.
Selection of The Adjusting Shim
Reference Number Locations
REFERENCE
NUMBER
STEERING
COLUMN
Adjusting Shim