Replacement
1. Disconnect the negative cable from the battery.
2. Remove the from bumper (see section 20).
3. Recover the refrigerant using a R-134a refrigerant
Recover/Recycling/Charging System (see page
22-73).
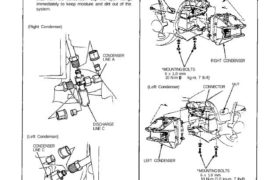
4. Disconnect the discharge line C and the condenser
lines from the condenser. Cap the open fittings
immediately to keep moisture and dirt out of the
system.
(Right Condenser)
CONDENSER
LINE A
DISCHARGE
LINE C
(Left Condenser)
CONDENSER
LINE C
CONDENSER
LINE A
5. Disconnect the connector from the condenser fan,
remove the two mounting bolts and nut, then
remove the condenser.
*: CORROSION RESISTANT BOLT
(Right Condenser)
NUT CONNECTOR
RIGHT CONDENSER
* MOUNTING BOLTS
6 x 1,0 mm
10 N·m (1.0 kg-m, 7 Ib-ft)
(Left Condenser) CONNECTOR NUT
LEFT CONDENSER
* MOUNTING BOLTS
6 x 1.0 mm
10 N·m (1.0 kg-m. 7 Ib-ft)
6. Install the condenser in the reverse order of
removal; and:
If you’re installing a new condenser, add
refrigerant oil (ND-OIL 8) (see page 22-69 ).
Replace 0-rings with new ones at each fitting,
and apply refrigerant oil to them.
NOTE: Be sure to use the right O-rings for
R-134a to avoid leakage.
Charge the system (see page 22-91) and test its
performance (see page 22-70).
1. Disconnect the negative cable from the battery.
2. Remove the from bumper (see section 20).
3. Recover the refrigerant using a R-134a refrigerant
Recover/Recycling/Charging System (see page
22-73).
4. Disconnect the discharge line C and the condenser
lines from the condenser. Cap the open fittings
immediately to keep moisture and dirt out of the
system.
(Right Condenser)
CONDENSER
LINE A
DISCHARGE
LINE C
(Left Condenser)
CONDENSER
LINE C
CONDENSER
LINE A
5. Disconnect the connector from the condenser fan,
remove the two mounting bolts and nut, then
remove the condenser.
*: CORROSION RESISTANT BOLT
(Right Condenser)
NUT CONNECTOR
RIGHT CONDENSER
* MOUNTING BOLTS
6 x 1,0 mm
10 N·m (1.0 kg-m, 7 Ib-ft)
(Left Condenser) CONNECTOR NUT
LEFT CONDENSER
* MOUNTING BOLTS
6 x 1.0 mm
10 N·m (1.0 kg-m. 7 Ib-ft)
6. Install the condenser in the reverse order of
removal; and:
If you’re installing a new condenser, add
refrigerant oil (ND-OIL 8) (see page 22-69 ).
Replace 0-rings with new ones at each fitting,
and apply refrigerant oil to them.
NOTE: Be sure to use the right O-rings for
R-134a to avoid leakage.
Charge the system (see page 22-91) and test its
performance (see page 22-70).