Front and Center Pillar Retainer/Upper Weatherstrip/
Center Pillar Panel
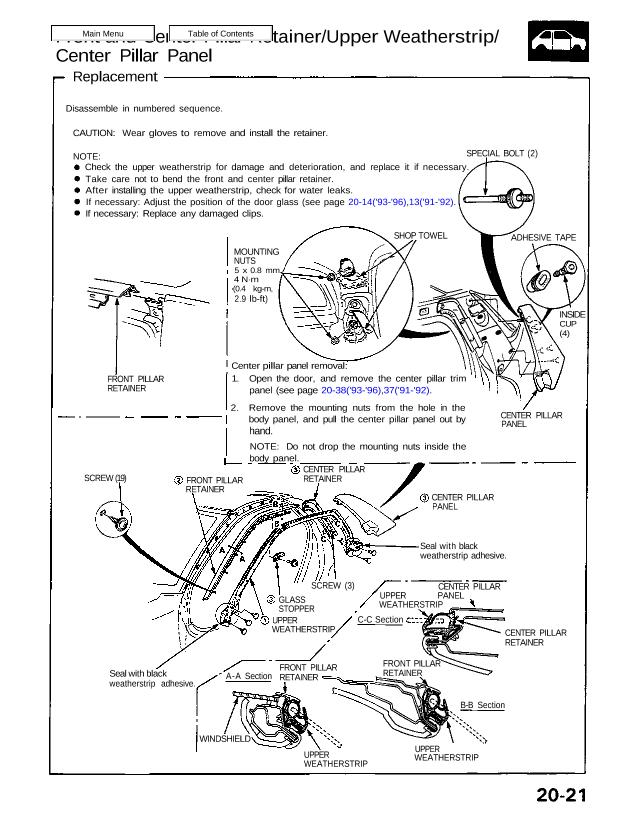
Replacement
Disassemble in numbered sequence.
CAUTION: Wear gloves to remove and install the retainer.
NOTE:
Check the upper weatherstrip for damage and deterioration, and replace it if necessary.
Take care not to bend the front and center pillar retainer.
After installing the upper weatherstrip, check for water leaks.
If necessary: Adjust the position of the door glass (see page 20-14(’93-’96),13(’91-’92).
If necessary: Replace any damaged clips.
SHOP TOWEL ADHESIVE TAPE
SPECIAL BOLT (2)
INSIDE
CUP
(4)
CENTER PILLAR
PANEL
MOUNTING
NUTS
5 x 0.8 mm
4 N·m
(0.4 kg-m,
2.9 lb-ft)
Center pillar panel removal:
1. Open the door, and remove the center pillar trim
panel (see page 20-38(’93-’96),37(’91-’92).
2. Remove the mounting nuts from the hole in the
body panel, and pull the center pillar panel out by
hand.
NOTE: Do not drop the mounting nuts inside the
body panel.
CENTER PILLAR
RETAINER
CENTER PILLAR
PANEL
FRONT PILLAR
RETAINER
SCREW (19)
FRONT PILLAR
RETAINER
Seal with black
weatherstrip adhesive.
SCREW (3)
GLASS
STOPPER
UPPER PANEL
WEATHERSTRIP
CENTER PILLAR
CENTER PILLAR
RETAINER
B-B Section
FRONT PILLAR
RETAINER
UPPER
WEATHERSTRIP
C-C SectionUPPER
WEATHERSTRIP
FRONT PILLAR
RETAINERA-A SectionSeal with black
weatherstrip adhesive.
WINDSHIELD
UPPER
WEATHERSTRIP
Center Pillar Panel
Replacement
Disassemble in numbered sequence.
CAUTION: Wear gloves to remove and install the retainer.
NOTE:
Check the upper weatherstrip for damage and deterioration, and replace it if necessary.
Take care not to bend the front and center pillar retainer.
After installing the upper weatherstrip, check for water leaks.
If necessary: Adjust the position of the door glass (see page 20-14(’93-’96),13(’91-’92).
If necessary: Replace any damaged clips.
SHOP TOWEL ADHESIVE TAPE
SPECIAL BOLT (2)
INSIDE
CUP
(4)
CENTER PILLAR
PANEL
MOUNTING
NUTS
5 x 0.8 mm
4 N·m
(0.4 kg-m,
2.9 lb-ft)
Center pillar panel removal:
1. Open the door, and remove the center pillar trim
panel (see page 20-38(’93-’96),37(’91-’92).
2. Remove the mounting nuts from the hole in the
body panel, and pull the center pillar panel out by
hand.
NOTE: Do not drop the mounting nuts inside the
body panel.
CENTER PILLAR
RETAINER
CENTER PILLAR
PANEL
FRONT PILLAR
RETAINER
SCREW (19)
FRONT PILLAR
RETAINER
Seal with black
weatherstrip adhesive.
SCREW (3)
GLASS
STOPPER
UPPER PANEL
WEATHERSTRIP
CENTER PILLAR
CENTER PILLAR
RETAINER
B-B Section
FRONT PILLAR
RETAINER
UPPER
WEATHERSTRIP
C-C SectionUPPER
WEATHERSTRIP
FRONT PILLAR
RETAINERA-A SectionSeal with black
weatherstrip adhesive.
WINDSHIELD
UPPER
WEATHERSTRIP