CAUTION:
• Make sure all parts are clean before reassembly.
• Use only new replacement parts.
• Use only clean DOT3 or 4 brake fluid.
• Do not allow dirt or other foreign matter to con-
taminate the brake fluid.
• Avoid spilling brake fluid on painted, plastic or rubber
surfaces as it can damage the finish. Wash spilled
brake fluid off immediately with clean water.
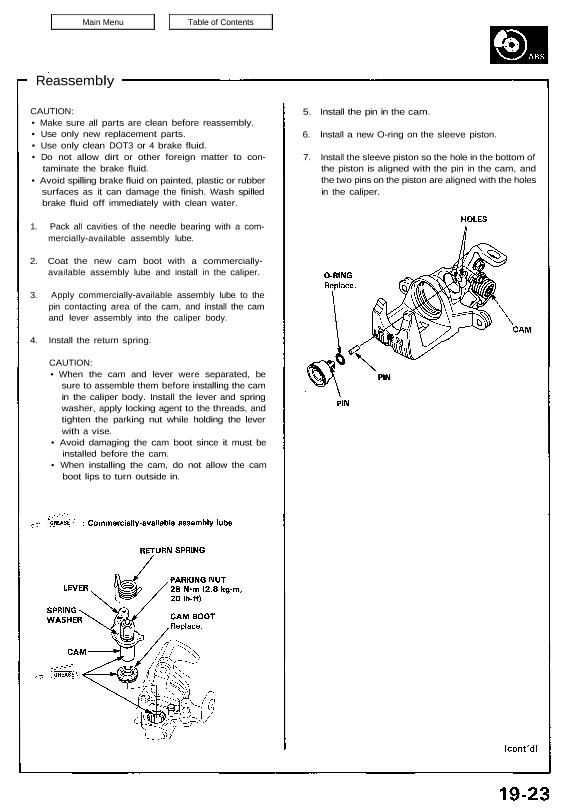
1. Pack all cavities of the needle bearing with a com-
mercially-available assembly lube.
2. Coat the new cam boot with a commercially-
available assembly lube and install in the caliper.
3. Apply commercially-available assembly lube to the
pin contacting area of the cam, and install the cam
and lever assembly into the caliper body.
4. Install the return spring.
CAUTION:
• When the cam and lever were separated, be
sure to assemble them before installing the cam
in the caliper body. Install the lever and spring
washer, apply locking agent to the threads, and
tighten the parking nut while holding the lever
with a vise.
• Avoid damaging the cam boot since it must be
installed before the cam.
• When installing the cam, do not allow the cam
boot lips to turn outside in.
5. Install the pin in the cam.
6. Install a new O-ring on the sleeve piston.
7. Install the sleeve piston so the hole in the bottom of
the piston is aligned with the pin in the cam, and
the two pins on the piston are aligned with the holes
in the caliper.
15. Install the adjusting nut, adjusting spring A, and
washer, then secure with the circlip.
07HAE-SG00100
07HEA-SG00100
Rear Caliper
Reassembly (cont’d)
8. Install a new cup with its groove facing the bearing
A side on the adjusting bolt.
9. Fit the bearing A, spacer, adjusting spring B and
spring cover on the adjusting bolt, and install in the
caliper cylinder.
NOTE: Install the bearing A with its open end fac-
ing the spacer.
10. Adjust the special tool as shown.
11. Install the special tool as shown.
12. Compress the spring until it bottoms out.
13. Check that the flared end of the spring cover is
below the circlip groove.
14. Install the circlip, then remove the brake spring
compressor.
NOTE: Check that the circlip is seated in the
groove properly.
SNAP RING PLIERS
07914-SA50000
16. Coat the new piston seal and piston boot with
silicone grease, and install them in the caliper.
17. Coat the outside of the piston with silicone grease,
and install it on the adjusting bolt while rotating it
clockwise.
CAUTION: Avoid damaging the piston and piston
boot.
18. Install the brake pad retainers and brake pads.
19. Install the pad spring on the caliper.
20. Install the caliper on the caliper bracket, and tighten
the caliper mounting bolts.
21. Connect the brake hose to the caliper with new
sealing washers, and tighten the banjo bolt.
22. Connect the parking brake cable to the arm on the
caliper.
23. Fill the brake reservoir up, and bleed the brake
system (see page 19-10).
24. Operate the brake pedal several times, then adjust
the parking brake lever.
NOTE: Before adjustments, make sure the parking
brake arm on the caliper touches the pin.
25. Install the caliper shield and tighten the bolts.