Inspection/Replacement
• Never use an air hose or dry brush to clean brake
assemblies,
Use an OSHA-approved vacuum cleaner to avoid
breathing brake dust.
1. Loosen the rear wheel nuts slightly, then raise each
side of the car and support it on safety stands (see
page 1-9 through 1-11).
Remove the rear wheels.
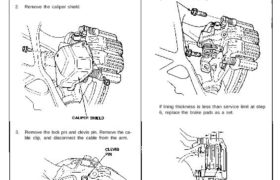
2. Remove the caliper shield.
3. Remove the lock pin and clevis pin. Remove the ca-
ble clip, and disconnect the cable from the arm.
4. Remove the two caliper mounting bolts and the
caliper from the bracket.
CAUTION:
• Thoroughly clean the outside of the caliper to
prevent dust and dirt from entering inside.
• Support the caliper with a piece of wire so that it
does not hang from the brake hose.
If lining thickness is less than service limit at step
6, replace the brake pads as a set.
Rear Brake Pads
Inspection/Replacement (cont’d)
5. Remove the pad shims, pads and pad retainers.
6. Using vernier calipers, measure the thickness of each
brake pad lining.
NOTE: Measurement does not include pad backing
thickness.
7. Clean the caliper thoroughly; remove any rust, and
check for grooves and cracks.
8. Make sure that the pad retainers are installed in the
correct positions.
9. Install the new brake pads and pad shims on caliper
bracket.
• When reusing the pads, always reinstall the
brake pads in their original positions to prevent
loss of braking efficiency.
• Contaminated brake discs or pads reduce stop-
ping ability. Keep grease off the discs and pads.
NOTE:
• Apply Molykote® M77 to the shims (see page
19-16). Wipe excess grease off the shims.
• Install the inner pad with its wear indicator fac-
ing upward.
• Make sure that the pad spring is installed onto
the caliper body.
10. Rotate the piston clockwise into place in the
cylinder, then align the cutout in the piston with the
tab on the inner pad by turning back the piston
back.
CAUTION: Lubricate the boot with silicone grease
to avoid twisting the piston boot. If the piston boot
is twisted, back it out so it sits properly.
11. Install and tighten the two caliper mounting bolts.
12. Insert the cable through the arm, and connect the
cable to the lever with the clevis pin and new lock
pin.
Install the new cable clip securely.
13. Install the caliper shield.
14. Depress the brake pedal several times to make sure
the brakes work, then test-drive the car.
NOTE: Engagement of the brake may require a
greater pedal stroke immediately after the brake
pads have been replaced as a set. Several applica-
tions of the brake pedal will restore the normal
pedal stroke.
1 5. Install the rear wheels and torque the wheel nuts.
NOTE: Clean the mating surfaces of the wheel and
hub before installing the wheel.